
Learning how to make Mini Halloween witch hats handmade with colorful crochet yarn – Step by Step Tutorial is a fun and creative project that blends the festive spirit of Halloween with the cozy charm of crochet. These tiny witch hats make perfect decorations, party favors, or even wearable accessories for dolls or costumes. With just some colorful yarn, a crochet hook, and a bit of time, you can create these adorable hats to bring a touch of magic to your Halloween season.
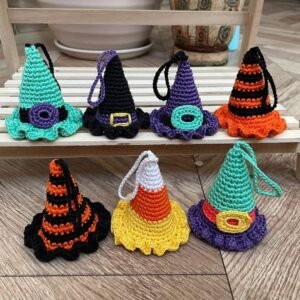
One of the best things about making Mini Halloween witch hats handmade with colorful crochet yarn is how customizable they are. You can use traditional black yarn for a classic spooky look or experiment with bright colors like purple, green, and orange to give your hats a playful twist. Adding embellishments such as little bows, glittery yarn, or tiny stars can make each hat unique and full of character.
In this Step by Step Tutorial, we will guide you through the entire process: from gathering your materials and learning the basic stitches to crocheting the hat’s crown, brim, and finishing touches. Even if you are new to crochet, this project is simple enough to follow, and by the end, you will have mastered a few useful crochet techniques while creating something delightful for Halloween.
Materials and Tools for Mini Halloween Witch Hats
To begin making Mini Halloween witch hats handmade with colorful crochet yarn – Step by Step Tutorial, you need just a few basic materials and tools. Having everything ready before you start will make the process smoother and help you stay organized throughout the project.
First, you will need colorful crochet yarn. Cotton yarn works well for a sturdy finish, while acrylic yarn offers a lightweight and vibrant option. You can mix and match colors to create fun combinations or stick to the classic black-and-orange Halloween theme.
Next, choose the right crochet hook for your yarn weight. Most yarn labels indicate the recommended hook size, but for small projects like these hats, a slightly smaller hook can help keep the stitches tight and the hat nicely shaped.
You will also need a pair of scissors for cutting yarn, a yarn needle for weaving in ends, and stitch markers if you want to keep track of your rounds easily. These simple tools make the process more efficient and help you maintain a neat, professional look.
Optional decorations like tiny ribbons, beads, or fabric glue can be added after the hat is complete. These details transform a simple hat into a magical Halloween accessory.
Finally, keep a measuring tape handy if you want all your hats to be the same size. Consistency is important, especially if you are making several hats for a party or as gifts.
With all materials prepared, you are ready to move on to the fun part—crocheting your mini witch hats.
Crocheting the Hat’s Crown Step by Step
The crown is the tall, pointed part of Mini Halloween witch hats handmade with colorful crochet yarn, and it is the first section you will crochet in this Step by Step Tutorial. Starting with the crown allows you to shape the hat gradually and make adjustments if needed.
Begin with a magic ring, which creates a tight, closed center for the top of the hat. If you are unfamiliar with the magic ring technique, it involves looping the yarn to form an adjustable circle where you work the first round of stitches. This method prevents any hole from appearing at the tip of the hat.
In the first round, crochet six single crochets into the ring and pull it tight. This forms the very top point of your witch hat. From here, each new round will gradually increase the number of stitches, widening the hat as it grows downward.
For example, in round two, you might place two single crochets in each stitch from the previous round, doubling the stitch count. As you progress through the rounds, alternate between single crochets and increases to keep the cone shape smooth and even.
The key to shaping the crown is to increase slowly. Too many increases at once will make the hat flare out instead of forming a neat point. By spacing out your increases every few rounds, you keep the triangular shape that gives witch hats their iconic look.
Continue working in rounds until the crown reaches the desired height. For mini hats, about 10–12 rounds are usually enough, but you can adjust the size depending on your project.
Adding the Brim and Decorative Details
After finishing the crown of your Mini Halloween witch hats handmade with colorful crochet yarn, it is time to add the brim—the flat, circular part that completes the witch hat shape. This section adds stability and gives the hat its final Halloween-ready appearance.
To start the brim, crochet one full round without any increases to create a smooth transition from the crown. In the next round, begin increasing stitches evenly all the way around to make the brim expand outward. The more increases you add, the wider and floppier the brim will become.
For a sturdy brim that holds its shape, keep the increases moderate. A total of two or three increase rounds is usually enough for a small, neat brim. If you prefer a dramatic, wavy brim, continue increasing for additional rounds.
Once the brim reaches your preferred size, finish the edge with a slip stitch all the way around. This creates a clean, polished border that prevents the edge from curling or stretching over time.
Now comes the fun part—decorating your hat! Using contrasting yarn, you can crochet a small band around the base of the crown to mimic a witch hat buckle. Alternatively, sew on tiny beads or glue a glittery ribbon for extra sparkle.
Personalizing each hat with unique decorations makes them special, whether you plan to use them as party favors, ornaments, or gifts. These small details truly bring the Halloween theme to life.
Using and Displaying Your Mini Halloween Witch Hats
With your Mini Halloween witch hats handmade with colorful crochet yarn – Step by Step Tutorial complete, it is time to think about creative ways to use and display them. Their small size makes them perfect for many Halloween-themed projects.
One popular idea is to use them as table decorations for Halloween parties. Placed on top of small pumpkins or candy jars, they add a festive and charming touch to any setup.
You can also turn them into wearable accessories. Attach hair clips or headbands to the hats for a cute costume piece, especially for children or dolls. They are lightweight and comfortable to wear.
Another fun option is to string several hats together to create a garland. Hanging across a doorway or window, a garland of mini witch hats instantly transforms a room into a Halloween wonderland.
Gift-giving is another great use for these hats. Placed on small treat bags or as part of a handmade Halloween gift, they show thoughtfulness and creativity that store-bought decorations simply cannot match.
Finally, keep a few for yourself as reusable Halloween decorations. Unlike paper or plastic items, crochet decorations last for years when stored properly, making them an eco-friendly choice.
FAQ About Mini Halloween Witch Hats Handmade with Colorful Crochet Yarn
1. Do I need advanced crochet skills for this project?
No, basic skills like single crochet, increases, and slip stitches are enough for beginners to complete this tutorial.
2. How long does it take to make one mini witch hat?
On average, each hat takes about 30–45 minutes, depending on your crochet speed and chosen decorations.
3. Can I use leftover yarn for this project?
Yes, this is a perfect project for using up small amounts of leftover yarn from other crochet projects.
4. How do I keep the hat’s brim from curling?
Finishing the edge with a slip stitch and blocking the hat gently helps maintain the brim’s shape.
5. Are these hats washable?
Yes, if made with washable yarn, but always follow the yarn’s care instructions to prevent shrinking or damage.
Conclusion
In this article, you learned how to make Mini Halloween witch hats handmade with colorful crochet yarn – Step by Step Tutorial from start to finish.
We covered materials, crocheting the crown, adding the brim, and decorating your hats with creative details. These mini witch hats are perfect for Halloween parties, costumes, gifts, or home décor.
We hope this tutorial inspires you to grab your crochet hook and start creating your own magical Halloween decorations. Share your honest opinions and suggestions in the comments—we would love to hear about your experiences and ideas for future crochet projects!