
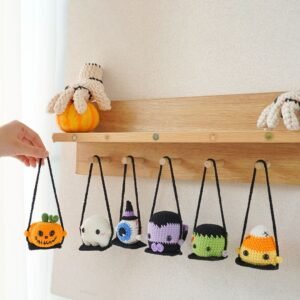
If you are looking for a fun and creative way to decorate your home this spooky season, crochet monster patterns for Halloween hanging- Step by Step Tutorial is the perfect project for you. Crocheting adorable little monsters that can be hung around the house brings charm and a touch of handmade magic to your Halloween celebrations. Using yarn, a crochet hook, and a bit of imagination, you can create spooky but cute decorations that will impress family and friends.
The best part about crochet monster patterns for Halloween hanging- Step by Step Tutorial is that it is beginner-friendly and eco-friendly at the same time. With just a few simple stitches and easy techniques, anyone can bring these little monsters to life. Whether you are a crochet pro or just getting started, this project will help you improve your skills while giving you creative freedom to experiment with colors, sizes, and facial expressions.
Throughout this article, we will break down every step clearly so you can follow along at your own pace. We will explore materials, patterns, and techniques, along with helpful tips to make sure your crochet monster patterns for Halloween hanging- Step by Step Tutorial experience is fun, rewarding, and stress-free. By the end, you will have plenty of unique monsters ready to hang on doors, walls, or even gift to friends as charming seasonal decorations.
Materials and Preparation for Crochet Monster Patterns
Before diving into the crochet monster patterns for Halloween hanging- Step by Step Tutorial, it is essential to gather all the materials you will need. Proper preparation makes the entire crafting process smoother and more enjoyable. For this project, the basic supplies include yarn in multiple colors, a suitable crochet hook, scissors, a tapestry needle for weaving in ends, and stuffing if you want to give your monsters a 3D look.
The beauty of crochet monster patterns for Halloween hanging- Step by Step Tutorial is that you can use leftover yarn scraps from previous projects. Halloween is all about creativity, so bright oranges, spooky purples, greens, and classic black work perfectly for these hanging decorations. Cotton yarn is ideal because it holds its shape well and comes in a wide range of colors.
Another tip for beginners is to choose a comfortable hook size that matches your yarn thickness. Most yarn labels recommend hook sizes, so check before starting. A hook that is too small will make the work tight and difficult, while a large one might make the stitches loose and floppy. Balance is key for neat and professional-looking results.
When working on crochet monster patterns for Halloween hanging- Step by Step Tutorial, it helps to set up a dedicated workspace with good lighting. Having everything organized prevents interruptions while crocheting and allows you to enjoy the creative process fully. A small basket for holding yarn and tools keeps things tidy and prevents tangles.
If you plan to add eyes or decorative buttons to your monsters, make sure they are safe and secure, especially if children will be handling the decorations. Alternatively, you can crochet small circles for eyes instead of using plastic parts. This keeps the project safe and eco-friendly.
Finally, prepare yourself mentally to enjoy the process rather than rush it. Crocheting is as much about relaxation as it is about crafting. Take breaks, stretch your hands, and celebrate each completed step in your crochet monster patterns for Halloween hanging- Step by Step Tutorial journey.
Step by Step Instructions for Crochet Monster Patterns
Now that you have your materials ready, let’s begin the crochet monster patterns for Halloween hanging- Step by Step Tutorial step by step. We will start with the basic monster body, then move on to adding details like eyes, mouths, and hanging loops.
First, create a magic ring or chain two stitches and work single crochets into the second chain from the hook. This forms the base circle for the monster’s body. Continue increasing stitches evenly around to make the circle larger. The size of this circle will determine how big your monster will be. Small monsters are great for garlands, while larger ones make fun wall hangings.
Once the base circle is complete, stop increasing and continue crocheting in the round to build up the body’s height. This will give your monster a slightly 3D shape. You can make them flat too by stopping after the base circle if you prefer a simple hanging decoration.
Now comes the fun part: adding personality! Use different yarn colors to create stripes, spots, or even tiny horns. You can crochet small triangles or circles separately and sew them onto the main body. These extra details make each monster unique and playful.
For the eyes, crochet small white circles and add smaller black circles for pupils. Sew them securely onto the monster’s face. If you want a spooky look, make one eye bigger than the other or position them unevenly for a silly monster expression.
Finally, crochet a small chain at the top of the monster to form a loop. This makes it easy to hang your creations anywhere you like. Your first crochet monster patterns for Halloween hanging- Step by Step Tutorial piece is complete, and you can now make as many as you want in different colors and sizes.
Creative Variations for Halloween Monsters
One of the best things about crochet monster patterns for Halloween hanging- Step by Step Tutorial is the endless room for creativity. Once you master the basic shape, you can experiment with different designs, colors, and accessories to make each monster unique.
For example, try making a one-eyed monster by placing a single large crocheted eye in the center. This gives a fun and cartoonish vibe to your decoration. You can even make tiny arms or legs from chains and attach them to the sides for a more detailed look.
Another creative idea is to use glow-in-the-dark yarn for certain parts of the monster, like the eyes or the mouth. When the lights go out, your monsters will glow softly, adding a spooky but playful touch to your Halloween decorations.
If you want to keep the project eco-friendly, consider using recycled yarn or unravel old projects you no longer need. This way, your crochet monster patterns for Halloween hanging- Step by Step Tutorial not only look good but also help reduce waste.
You can also turn these crochet monsters into garlands by making several and attaching them to a long chain. Hang the garland across your porch, fireplace, or windows for an impressive handmade Halloween display.
Lastly, involve kids in the decorating process by letting them choose the colors and facial expressions for the monsters. It becomes a fun family project, making Halloween even more memorable with everyone contributing to the decorations.
Tips for Perfect Crochet Monster Patterns
While working on crochet monster patterns for Halloween hanging- Step by Step Tutorial, following some helpful tips can make your final creations look neat and professional. First, maintain consistent tension while crocheting. Uneven tension can make the stitches look messy, so practice until you find a comfortable rhythm.
Second, always weave in yarn ends securely at the back of your work. Loose ends can unravel over time, especially if the decorations are handled frequently. A tapestry needle works best for hiding these ends neatly.
Third, block your crochet monsters if needed. Lightly steaming or shaping them after finishing helps them lie flat and look more polished. Just be careful with acrylic yarn, as too much heat can damage the fibers.
Another tip is to use stitch markers when working in the round. This prevents losing track of the beginning of each round, especially if you are making larger monsters with multiple color changes.
Experiment with different yarn textures for added variety. Fuzzy yarn can give your monsters a fun, hairy appearance, while metallic threads add a magical Halloween sparkle.
Finally, don’t be afraid to improvise. The charm of crochet monster patterns for Halloween hanging- Step by Step Tutorial lies in their uniqueness. No two monsters need to look the same, so embrace imperfections and enjoy the creative journey.
FAQ About Crochet Monster Patterns for Halloween Hanging
Q1: Do I need advanced crochet skills to make Halloween monsters?
No, this project is beginner-friendly. Basic stitches like single crochet, increase, and decrease are all you need to know for most monster patterns.
Q2: What type of yarn works best for crochet monsters?
Cotton yarn works well because it holds its shape, but acrylic yarn is also a great affordable option with many color choices.
Q3: Can I make these crochet monsters without stuffing them?
Yes, you can leave them flat if you prefer. Stuffing just gives them a more 3D look, but it is optional.
Q4: How long does it take to make one crochet monster?
Depending on size and details, a small monster can take under an hour, while larger or more detailed ones may take two to three hours.
Q5: Are these decorations safe for kids?
If you avoid small plastic parts and use securely attached crocheted eyes, they are safe for children to handle as decorations.
Conclusion
In this article, we explored crochet monster patterns for Halloween hanging- Step by Step Tutorial in detail, from materials and preparation to creative variations and helpful tips.
By following the step-by-step guide, you can create charming and eco-friendly Halloween decorations that bring warmth and creativity to your home.
Now it’s your turn to try these patterns, have fun experimenting with colors and designs, and create a set of unique monsters for your Halloween celebrations. Share your honest opinions and suggestions in the comments so we can keep improving and bringing more exciting crochet tutorials for everyone to enjoy.