
Learning how to make a full opening cube toiletry bag- Step by Step Tutorial is a fantastic way to create a personalized and functional accessory for your everyday life. A toiletry bag is not just a travel necessity but also a stylish way to keep your cosmetics, hygiene products, and small personal items neatly organized. By creating your own, you have full control over the size, colors, fabrics, and features, making it unique and tailored to your needs.
In this tutorial, we will guide you through the entire process in detail, ensuring that even beginners can follow along easily. Whether you want to make one for yourself or as a thoughtful handmade gift, this full opening cube toiletry bag tutorial will provide everything you need. We will cover essential materials, preparation steps, sewing techniques, and helpful tips to achieve professional results.
Another benefit of making your own toiletry bag is cost-effectiveness. Store-bought versions can be expensive, especially those with full opening zippers and quality linings. However, by following this Step by Step Tutorial, you can craft a beautiful, durable, and fully functional bag at a fraction of the price. Let’s dive into the process and start learning how to make a full opening cube toiletry bag that you will be proud to use or gift to someone special.
Materials and Tools Needed for the Full Opening Cube Toiletry Bag
Before you begin learning how to make a full opening cube toiletry bag- Step by Step Tutorial, you need to gather all the necessary materials and tools. Having everything ready will make the process smooth and enjoyable from start to finish.
First, you will need fabric for both the outer layer and the lining. Cotton, canvas, or waterproof fabrics work well for this project because they are durable and easy to sew. For the lining, you might want to choose a wipe-clean material like laminated cotton or nylon for practicality.
Next, you will need a zipper that is long enough to create the full opening feature of the bag. A double-pull zipper can add extra convenience. Interfacing or stabilizer is also essential to give the bag structure so it can stand upright when opened.
Other items include basic sewing tools such as scissors, pins, measuring tape, thread, and a sewing machine. If you want to add extra compartments inside the bag, you might also need elastic bands or mesh fabric.
Make sure to pre-wash your fabrics before cutting to avoid shrinkage later. Iron them thoroughly to make cutting and sewing easier and more precise. With all materials ready, you are set to begin the fun part of making your full opening cube toiletry bag.
Finally, keeping your workspace organized is key. Having everything within reach will save time and make the sewing process smoother, especially if this is your first time creating a cube-shaped bag.
Cutting and Preparing the Fabric Pieces
Now that you have all your materials, the next step in how to make a full opening cube toiletry bag- Step by Step Tutorial is cutting and preparing your fabric pieces accurately. Precision in this step ensures the final product looks neat and professional.
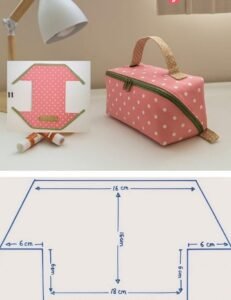
Start by deciding on the dimensions of your toiletry bag. A common size is around 9 inches long, 5 inches wide, and 5 inches tall, but you can adjust these measurements according to your needs. Remember to add seam allowances, usually about ½ inch, to each side.
Cut out your main fabric pieces for the outer layer as well as the lining. You will need two main panels for the front and back, two side panels, a bottom piece, and a top piece where the zipper will be inserted. For the lining, cut identical pieces.
If you are using interfacing, cut pieces the same size as your outer fabric panels and fuse them according to the manufacturer’s instructions. This step adds body and strength to the bag, making it more durable and stylish.
Mark the placement of the zipper on the top panel clearly. Using fabric chalk or a disappearing marker can help you avoid mistakes. Also, prepare any interior pockets or elastic holders now so they can be attached before final assembly.
Once all pieces are cut and marked, stack them neatly in the order you will use them. This preparation will help you follow the Step by Step Tutorial more efficiently as you begin assembling the toiletry bag.
Lastly, double-check all measurements before moving to the sewing stage. Correcting mistakes now is much easier than after the bag has been sewn together.
Sewing the Full Opening Cube Toiletry Bag
With your pieces ready, we now move to the most exciting part of how to make a full opening cube toiletry bag- Step by Step Tutorial: sewing the bag together. This stage brings your project to life as flat fabric pieces transform into a functional three-dimensional item.
Begin by attaching the zipper to the top panel. Place the zipper face down on the right side of the fabric and sew along the edge. Then attach the lining to the opposite side of the zipper, creating a sandwich with the zipper in the middle. Topstitch near the edge for a neat finish.
Next, sew any interior pockets or compartments onto the lining panels before assembling the full bag. This is easier to do while the pieces are still flat. You can add mesh pockets, elastic loops, or small zippered compartments for better organization.
Join the side panels to the bottom panel, forming a long strip. Then attach the front and back panels, creating a cube-like structure. Make sure all seams align properly for a clean look.
Insert the lining by repeating the same steps and then sewing it to the zipper edges. Leave a small opening in the lining so you can turn the bag right side out at the end.
After turning the bag right side out, sew the opening in the lining closed, and press all seams carefully. The cube shape should now be fully visible, and the zipper should allow the bag to open completely flat.
Finally, check all seams for strength and neatness. Your full opening cube toiletry bag is now ready to use or gift, looking both professional and handmade with love.
Tips for Customizing and Enhancing Your Toiletry Bag
Learning how to make a full opening cube toiletry bag- Step by Step Tutorial also gives you the chance to customize it to your personal style and needs. Adding unique touches will make your bag stand out and be more functional.
One simple way to customize is by choosing fabrics in your favorite colors or patterns. You can mix and match prints for a fun, creative look or choose solid colors for a classic style.
Adding decorative stitching or embroidery is another way to enhance the design. Personalizing with initials or small motifs makes the toiletry bag a wonderful gift idea for friends and family.
You can also play with the interior organization. Adding extra pockets, elastic straps, or even small detachable pouches can make the bag even more practical for travel or daily use.
Consider using waterproof fabrics or adding a water-resistant lining to protect against spills. This is especially helpful if you plan to carry liquids like shampoo or lotions in your bag.
Another option is to include a handle or a detachable strap. This makes the toiletry bag easier to carry and more versatile for different uses.
Finally, experiment with different zipper styles or metal hardware to give your bag a polished, store-bought appearance while keeping it fully handmade.
FAQ About How to Make a Full Opening Cube Toiletry Bag
1. Can beginners follow this Step by Step Tutorial?
Yes, the instructions are beginner-friendly, with clear steps to guide you through the entire process.
2. What fabric is best for a toiletry bag?
Cotton, canvas, or waterproof fabrics are ideal because they are durable, easy to clean, and simple to sew.
3. How long does it take to make one bag?
For beginners, it may take about 3–4 hours, while experienced sewists can finish in under 2 hours.
4. Can I wash the toiletry bag in a machine?
Yes, if you use washable fabrics, but always check the fabric care instructions before washing.
5. Do I need a special sewing machine?
No, a basic sewing machine works well, though a zipper foot makes sewing zippers easier.
6. Can I resize the toiletry bag?
Absolutely, just adjust the measurements of the panels to create a larger or smaller version.
Conclusion
In this article, we learned how to make a full opening cube toiletry bag- Step by Step Tutorial from start to finish.
We covered materials, cutting, sewing techniques, customization tips, and a full FAQ to help you succeed in making your own toiletry bag.
Now it’s your turn to create one that matches your style and needs. Leave your honest opinion and suggestions below—we would love to hear about your experience and any creative ideas you used in your project!