
Learning how to create a Handmade crochet scarecrow- Step by Step Tutorial is a rewarding experience for crochet lovers of all skill levels. Scarecrows have always been symbolic figures of harvest and autumn, and turning them into cute crochet projects makes them perfect for home décor, gifts, or even seasonal displays. When you make a crochet scarecrow by hand, you add your personal touch and creativity to every detail, making each piece unique and special.
This Step by Step Tutorial will guide you through the entire process, from choosing the right materials to finishing off the final stitches. Whether you are a beginner who wants to learn the basics of crocheting or someone experienced looking for a creative challenge, this project offers something for everyone. The best part is that crochet scarecrows can be made in different sizes, colors, and styles, so you can customize them for any occasion.
Another advantage of making a Handmade crochet scarecrow is that it allows you to practice various crochet techniques while creating a fun and decorative item. You will learn how to shape the head, body, arms, and hat of the scarecrow while mastering color changes, stuffing, and sewing parts together. By the end of this tutorial, you will have not only a charming crochet scarecrow but also improved skills for future projects.
Materials Needed for the Handmade Crochet Scarecrow
Before starting this Handmade crochet scarecrow- Step by Step Tutorial, it is essential to gather all the necessary materials. Preparing everything beforehand will make the process smooth and enjoyable.
First, you will need yarn in several colors. Traditional scarecrows often have a straw hat, a colorful shirt, and simple pants, so choose shades like brown, yellow, blue, and orange for a classic look. However, feel free to be creative with colors if you want a more playful or modern design.
A suitable crochet hook is also essential. Check the yarn label for the recommended hook size, as this will help you achieve the right tension for your project. Using the correct hook ensures your stitches look neat and consistent throughout the scarecrow.
Other tools you will need include scissors for cutting yarn, a yarn needle for sewing pieces together, and stitch markers to keep track of rounds or sections in the pattern. These small accessories make the crocheting process easier and more organized.
For stuffing the scarecrow, you will need fiberfill or any soft stuffing material. This gives the scarecrow its shape and allows it to stand or sit nicely as part of your home décor. Be sure to stuff evenly so that your scarecrow maintains a balanced appearance.
Optional items include small buttons, felt pieces, or embroidery thread for adding facial details and decorative touches. These extras help bring your crochet scarecrow to life and make it truly unique.
Lastly, prepare a comfortable workspace with good lighting. Having a clean, organized area will make crocheting more enjoyable and help you focus on creating your Handmade crochet scarecrow step by step.
Step by Step Instructions to Crochet the Scarecrow
Now that you have your materials ready, let’s begin the Handmade crochet scarecrow- Step by Step Tutorial. Follow these steps carefully to create a beautifully detailed scarecrow.
Start by making the head using basic crochet techniques. A magic ring or chain circle is usually the starting point, followed by rounds of single crochet stitches to form a neat sphere. This will become the base for the scarecrow’s face.
Next, crochet the body of the scarecrow. You can create a cylindrical or slightly triangular shape, depending on the design you prefer. Color changes are often added here to represent the scarecrow’s shirt and pants, making it look more realistic and colorful.
The arms and legs are typically made as separate pieces. They can be simple tubes or slightly tapered shapes. Once completed, they will be sewn onto the body later. Adding small details like cuffs or patches makes the scarecrow even more charming.
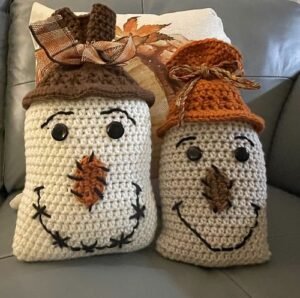
The hat is one of the most recognizable features of any scarecrow. Crochet a wide-brimmed hat using basic stitches, starting with the top and working outward. You can stiffen the brim if desired so that it keeps its shape.
After completing all the main parts, it is time to assemble the scarecrow. Use a yarn needle to sew the arms, legs, and hat to the body securely. Take your time to align everything neatly so the scarecrow looks balanced and well-made.
Finally, add facial features and decorations. Embroider eyes, nose, and mouth or use small buttons for a playful look. You can also attach patches, scarves, or even tiny crochet flowers to give your scarecrow extra personality.
Customizing Your Crochet Scarecrow
One of the best things about learning the Handmade crochet scarecrow- Step by Step Tutorial is the freedom to customize your project in countless ways.
You can experiment with different yarn textures to create unique effects. For example, using a slightly fuzzy yarn for the hat gives it a rustic, straw-like appearance, while smooth cotton yarn creates a cleaner, more modern look.
Color choices also play a big role in customization. While traditional scarecrows often feature autumn-inspired colors, you can choose bright and cheerful hues to make them suitable for spring or summer decorations as well.
Consider adding accessories to make your scarecrow stand out. A small crochet pumpkin, a tiny basket, or even a miniature bird sitting on its arm can bring extra charm to your finished piece.
Another fun idea is to make different sizes of scarecrows. A set of small, medium, and large scarecrows can be arranged together as a delightful seasonal display for your home.
You can also personalize your scarecrow by giving it a unique outfit. Try stripes, polka dots, or even rainbow colors for the shirt or pants. Creativity is the only limit when it comes to designing your scarecrow’s wardrobe.
Lastly, if you plan to give the scarecrow as a gift, consider adding a name tag or a tiny crochet heart to make it even more special and meaningful to the recipient.
Tips for Beginners and Maintenance Advice
If you are new to crocheting, don’t worry—this Handmade crochet scarecrow- Step by Step Tutorial is beginner-friendly and easy to follow with a bit of patience.
Start by practicing basic stitches like single crochet, double crochet, and slip stitch before beginning the project. Familiarity with these stitches will make the tutorial easier to follow.
Keep your tension consistent throughout the project. Uneven stitches can cause parts of the scarecrow to look lopsided, so take your time and relax as you work.
Use stitch markers to keep track of your rounds, especially when working on the head or body. This prevents mistakes and helps maintain the correct shape.
When stuffing the scarecrow, add small amounts at a time. Overstuffing can stretch the stitches, while too little stuffing may cause the scarecrow to lose its shape.
For maintenance, most crochet scarecrows can be gently hand-washed if they get dusty. Use mild soap and cold water, then let them air dry completely before displaying them again.
Finally, store your crochet scarecrow in a cool, dry place when not in use to prevent any damage from moisture or pests, keeping it beautiful for many years to come.
FAQ About Handmade Crochet Scarecrow
1. How long does it take to make a crochet scarecrow?
It depends on the size and complexity, but most people finish a small scarecrow in 6–8 hours spread over a few days.
2. Is this project suitable for complete beginners?
Yes, the tutorial uses simple stitches, and beginners can follow along with practice and patience.
3. Can I use leftover yarn for this project?
Absolutely! Scarecrows look great in mismatched colors, making them perfect for using yarn scraps.
4. How do I make the scarecrow stand up?
You can add a small weighted base or insert a stick inside while assembling the body for extra stability.
5. What is the best yarn type for a crochet scarecrow?
Cotton or acrylic yarns work well because they are easy to crochet and maintain their shape nicely.
6. Can I sell the scarecrows I make using this tutorial?
Yes, as long as the pattern is your own work, you can sell the finished products at craft fairs or online shops.
Conclusion
In this article, we explored the Handmade crochet scarecrow- Step by Step Tutorial in detail, covering materials, instructions, customization options, and beginner tips.
By following this guide, you can create a charming crochet scarecrow that adds warmth and personality to any space.
We hope this tutorial inspires you to start your own project—please leave your honest opinion and suggestions so we can continue bringing you creative and enjoyable crochet ideas.