
If you are looking for an easy and creative project, then this Fabric slippers- Step by Step Tutorial will be perfect for you. Handmade fabric slippers are not only fun to make but also a wonderful way to personalize your comfort at home. In this article, we will walk you through every single step needed to create your own pair, making sure that even beginners can follow along. The best part is that you will end up with something cozy, stylish, and unique.
Learning how to make fabric slippers from scratch can be surprisingly relaxing and satisfying. Many people love crafting, sewing, and creating things that carry a personal touch. These slippers can be customized with different fabrics, colors, and decorations, turning each pair into a little work of art. By following this step by step tutorial, you will soon have the confidence to make not just one, but many pairs for yourself, friends, and family.
This tutorial has been carefully designed with beginners in mind, so you do not need to worry about complicated techniques or expensive materials. We will keep things simple while still achieving beautiful results. Let’s explore everything you need to know, from materials and measurements to sewing tips and finishing touches. Once you complete this project, you will be surprised at how professional your handmade fabric slippers can look.
Materials and Preparation for Fabric Slippers
To start making your fabric slippers, the first thing you need to do is gather the right materials. You will need fabric, padding or batting for comfort, a sewing machine or needle and thread, scissors, pins, and a measuring tape. Choosing the right fabric is essential because it will determine how comfortable and durable your slippers will be. Cotton, flannel, or fleece fabrics are popular choices because they are soft and easy to sew.
Next, it is important to measure your feet correctly. Place your foot on a piece of paper and trace around it, adding about half an inch around the outline for seam allowance. This will serve as your slipper pattern. Remember that comfort comes first, so do not make your slippers too tight. You can even add an extra layer of fabric or batting to make them softer and warmer.
Before you start cutting the fabric, make sure to wash and iron it. Pre-washing prevents shrinking after the slippers are completed, while ironing ensures that your fabric lays flat and smooth, making the sewing process easier. This small step can make a big difference in the final look of your slippers.
Another helpful tip is to use fabric clips or pins to keep everything in place when cutting and sewing. This will prevent the fabric from slipping and give you a cleaner finish. Beginners often skip this step, but it can save you from making mistakes later on.
It is also a good idea to choose a thread color that blends well with your fabric. Matching thread gives a professional look, while contrasting thread can be used if you want decorative stitching. The choice is yours depending on the style you want to achieve.
Finally, prepare a comfortable and well-lit working area. Having all your materials ready before starting will make the entire process smoother and more enjoyable.
Step by Step Sewing Process for Fabric Slippers
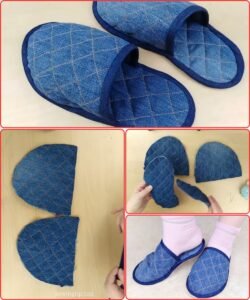
Now that you have everything prepared, let’s begin the Fabric slippers- Step by Step Tutorial sewing process. Start by cutting two pieces of fabric for each foot, one for the inside lining and one for the outside. If you are adding padding, cut it to the same size as the fabric pieces.
The next step is to sew the lining and the outer fabric together. Place them right sides facing each other, with the padding on top if you are using it. Sew along the edges, leaving a small opening so you can turn the fabric right side out later.
Once you have sewn the pieces, turn them right side out and press the edges with an iron to give them a neat finish. This step makes the slippers look much more professional. You can then close the small opening by hand or with a sewing machine.
Now it is time to shape the slippers. Fold the piece so that the heel and toe sections come together, forming a slipper shape. Sew along the back seam for the heel and partially along the top, leaving enough room for your foot to slip in comfortably.
If you want to add a sole for extra comfort and durability, cut out a piece of thicker fabric or felt in the same shape as your foot outline and sew it to the bottom of the slippers. This will make them last longer and feel more supportive.
Finally, try on your slippers to make sure they fit well. If they feel loose or tight, you can make small adjustments along the seams. This is one of the advantages of making your own slippers—you can customize the fit perfectly for your feet.
Decorating and Personalizing Fabric Slippers
Once your fabric slippers are sewn, you can have fun decorating and personalizing them. This is where creativity comes in, and the possibilities are endless.
You can add bows, buttons, or embroidery to the slippers for a more stylish look. Some people even use fabric paint to create unique patterns or initials on the slippers.
If you want to make the slippers warmer, you can sew a soft lining such as faux fur or fleece inside. This makes them extra cozy for winter days.
Adding a non-slip sole is also a good idea, especially if you have smooth floors at home. You can use ready-made non-slip fabric or apply small dots of fabric glue on the bottom to prevent slipping.
For a personalized touch, consider using fabric with fun prints or colors that reflect your personality. This makes the slippers unique and special.
Another creative idea is to make matching slippers for the whole family using different fabrics for each person. It is a fun way to bring everyone together with a handmade project.
Tips for Beginners and Common Mistakes to Avoid
If this is your first time making fabric slippers, there are some tips that can make the process easier.
Always start with simple patterns before trying complex designs. This way, you build confidence and learn the basics of sewing.
Take your time when cutting and sewing. Rushing often leads to mistakes such as uneven seams or slippers that do not fit properly.
Do not skip the step of pressing the fabric with an iron. This makes sewing easier and the final product much neater.
Use quality thread and needles. Cheap materials can break easily and make sewing frustrating.
If you make a mistake, do not worry. Most sewing errors can be fixed by removing the stitches and trying again.
Finally, practice makes perfect. The more slippers you make, the better you will become at sewing and designing them.
FAQ About Fabric Slippers- Step by Step Tutorial
1. Can I make fabric slippers without a sewing machine?
Yes, you can hand sew them using a strong needle and thread. It will take more time, but the result can be just as good if you sew carefully.
2. What is the best fabric for slippers?
Cotton, fleece, and flannel are popular choices because they are soft, comfortable, and easy to sew.
3. How can I make the slippers non-slip?
You can add a non-slip sole or use fabric glue on the bottom to prevent slipping.
4. Can I wash handmade fabric slippers?
Yes, but it is best to wash them gently by hand or use a delicate cycle in the washing machine.
5. How long does it take to make fabric slippers?
For beginners, it might take two to three hours. With practice, you can finish them much faster.
6. Can I sell handmade fabric slippers?
Absolutely! Many people sell handmade slippers online or at local craft fairs.
Conclusion
In this article, we shared a complete Fabric slippers- Step by Step Tutorial for beginners and sewing enthusiasts.
You learned about materials, measurements, sewing techniques, and creative decorating ideas. With a little time and practice, anyone can make beautiful, comfortable, and personalized slippers at home.
We hope this guide inspired you to try sewing your own slippers. Please share your honest opinion about this tutorial and let us know what other projects you would like to learn next!