
If you are looking for a creative and eco-friendly craft project, this Crochet carts using tin seals- Step by Step Tutorial will inspire you to transform simple materials into beautiful handmade creations. This project combines crochet skills with recycled tin seals to create charming carts that can be used as decorative pieces or small storage organizers. By following this tutorial, you will learn not only how to crochet but also how to repurpose materials that would otherwise be discarded, giving them a new life in a sustainable way.
The Crochet carts using tin seals- Step by Step Tutorial is perfect for beginners and experienced crafters alike. It teaches you basic crochet techniques while introducing creative ways to work with unconventional materials. Tin seals, often found on cans and bottles, make an excellent base for the structure of the cart, adding durability and an interesting texture to your project.
By the end of this tutorial, you will have a unique handmade cart that reflects your creativity and commitment to sustainability. Whether you want to use it as a decorative centerpiece, a gift basket, or simply as a craft display piece, this project offers endless possibilities for customization and personalization.
Materials and Preparation for Crochet Carts Using Tin Seals
Before we begin the Crochet carts using tin seals- Step by Step Tutorial, let’s gather all the materials you need. The essential supplies include tin seals, cotton or acrylic yarn, a crochet hook, scissors, a yarn needle, and some glue for added stability if needed. You might also want to prepare small embellishments like ribbons, buttons, or beads to decorate your cart later.
Choosing the right yarn is important for this project. Cotton yarn works well because it gives the finished cart a sturdy structure and a neat look. Acrylic yarn is a good alternative if you want a softer finish or if you have leftover yarn from other projects. The color choice depends entirely on your preference—you can opt for bright colors for a playful look or neutral tones for a minimalist style.
Before you start crocheting, clean and dry the tin seals thoroughly. This ensures they are safe to handle and free from sharp edges or dirt. If necessary, you can sand the edges lightly with sandpaper to avoid any risk of injury during the crafting process.
Next, plan the size and shape of your cart. Decide how many tin seals you will use for the base and sides, and arrange them in the desired pattern before you begin crocheting. This step helps you visualize the final product and ensures that all pieces fit together perfectly.
Having a clean and organized workspace is also important. Lay out your materials, keep your tools within reach, and have good lighting so you can see your stitches clearly. A comfortable workspace makes the crafting experience much more enjoyable.
Finally, if you are new to crochet, it might be helpful to practice basic stitches like chain stitch, single crochet, and slip stitch before starting the main project. These stitches form the foundation of most crochet projects, including this one.
Crocheting the Base and Sides of the Cart
Now we move to the main part of the Crochet carts using tin seals- Step by Step Tutorial: creating the base and sides of the cart using tin seals and crochet stitches. The tin seals serve as a sturdy framework, while the crochet stitches hold everything together and add decorative detail.
Start by arranging the tin seals in the shape of a rectangle or square for the base. Use your crochet hook to work single crochet stitches around each seal, connecting them together at the edges. This creates a stable foundation for the cart and gives it a neat appearance.
Once the base is complete, begin working on the sides. Attach tin seals vertically along the edges of the base, again joining them with crochet stitches. This step requires a bit of patience because you want to ensure the sides are even and securely attached.
As you work your way up, you can decide how tall you want the sides of the cart to be. Some people prefer shallow carts for decorative purposes, while others make taller versions for holding small items like yarn, stationery, or even snacks.
One of the benefits of this project is its flexibility. You can add as many rows of tin seals as you like, depending on the desired size. The crochet stitches keep everything firmly connected, so the final product will be both functional and visually appealing.
If you want to add extra strength to the structure, you can run a line of glue along the seams before crocheting the final row. This step is optional but useful if you plan to carry heavier items in the cart.
Finally, finish the sides with a decorative row of crochet stitches along the top edge. This not only hides any rough edges but also gives the cart a polished and professional look.
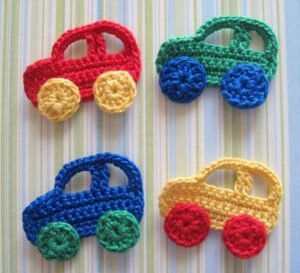
Adding Wheels, Handles, and Decorative Details
The next step in the Crochet carts using tin seals- Step by Step Tutorial is adding the fun elements: wheels, handles, and decorations. These features bring the cart to life and make it look like a real miniature version of a functional cart.
For the wheels, you can crochet small circles using basic stitches and attach them to the bottom corners of the cart. Some crafters prefer using buttons or bottle caps for the wheels if they want a more realistic effect. Either way, make sure the wheels are securely attached so they stay in place.
Handles can be made by crocheting a simple chain and then reinforcing it with a row of single crochet stitches for strength. Attach the handle to both sides of the cart, making sure it is even and comfortable to hold if you plan to use the cart as a small carrying basket.
Decorating the cart is where your creativity can shine. You can add ribbons, crochet flowers, or small beads to give the cart a personalized touch. Seasonal decorations like tiny crochet pumpkins for autumn or flowers for spring make the cart suitable for different occasions.
Another idea is to line the inside of the cart with fabric or felt for a softer look. This is especially useful if you plan to store delicate items inside. The lining also hides the interior seams, giving the cart a cleaner finish.
If you want the cart to be purely decorative, you can even add miniature accessories like crochet fruits or small toys to create a themed display. The possibilities are endless, limited only by your imagination.
Once all the decorative elements are attached, give the entire cart a final inspection. Make sure all seams are secure, the edges are neat, and the decorations are firmly in place before using or displaying your creation.
Creative Uses and Gift Ideas for Crochet Carts
One of the best things about the Crochet carts using tin seals- Step by Step Tutorial is that the finished product can be used in so many ways. These handmade carts are both practical and decorative, making them suitable for various purposes around the home or as thoughtful gifts.
For example, you can use the cart as a small storage container for craft supplies like yarn, buttons, or beads. It keeps everything organized while adding a charming handmade touch to your workspace.
The cart also works well as a decorative centerpiece for parties or seasonal displays. Fill it with flowers, fruits, or holiday decorations to create a unique table arrangement that guests will admire.
If you enjoy giving handmade gifts, the crochet cart can be filled with treats, candles, or small goodies and presented as a gift basket. Personalize the colors and decorations to suit the occasion, whether it’s a birthday, wedding, or holiday celebration.
Children love miniature items, so a crochet cart can also be used as a toy accessory. Just make sure all decorations are securely attached and safe for little hands to handle.
For eco-conscious crafters, this project is a wonderful way to promote sustainability. By repurposing tin seals and leftover yarn, you reduce waste and create something beautiful at the same time.
Finally, selling handmade crochet carts at craft fairs or online shops can be a small business idea. People appreciate unique, eco-friendly handmade items, and these carts definitely stand out.
FAQ About Crochet Carts Using Tin Seals
1. Can I use any type of tin seals for this project?
Yes, most tin seals from cans or bottles work well, as long as they are cleaned and free of sharp edges.
2. What crochet stitches are best for beginners?
Simple stitches like chain stitch, single crochet, and slip stitch are perfect for beginners and work well for this project.
3. How long does it take to make one crochet cart?
Depending on the size and decorations, it usually takes between two to four hours to complete one cart.
4. Is this project safe for children to help with?
Children can assist with decorations, but adults should handle the cutting and any steps involving sharp tools.
5. Can I wash the crochet cart if it gets dirty?
Yes, but hand washing is recommended, especially if the cart has glued elements or delicate decorations.
6. Do I need a pattern to follow this tutorial?
No, the instructions are flexible, and you can adjust the size and shape as you go along, making it easy for beginners.
Conclusion
In this Crochet carts using tin seals- Step by Step Tutorial, we explored how to turn simple recycled materials into beautiful, functional, and decorative crochet carts.
From preparing materials and crocheting the base to adding wheels, handles, and decorations, each step was explained clearly so anyone can follow along.
We hope you feel inspired to try this eco-friendly project and add your creative touch to every detail. Please share your honest opinion and suggestions for future tutorials—we would love to hear your feedback!