
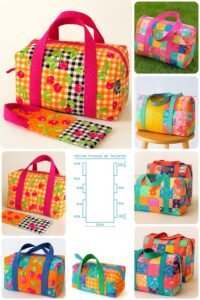
If you have been looking for a how to sew a carry-on bag- step by step tutorial, you have come to the right place. Sewing your own carry-on bag can be an exciting and rewarding project that combines creativity with practicality. A handmade carry-on bag not only saves money but also allows you to customize every detail according to your needs and style preferences. With this how to sew a carry-on bag- step by step tutorial, you will learn everything you need to know to make a functional and beautiful bag from scratch.
This guide is perfect for beginners and experienced sewists alike. Even if you have never sewn a bag before, you will find the instructions simple and easy to follow. The key is to break the process down into manageable steps, which is exactly what we will do in this article. By the end, you will feel confident enough to make your own stylish and durable carry-on bag.
In addition to being practical for travel, a handmade carry-on bag can be a wonderful personalized gift. You can choose fabrics and colors that reflect your personality or match the preferences of someone you care about. Throughout this how to sew a carry-on bag- step by step tutorial, you will also find tips for customizing your bag, so it turns out both functional and unique.
Materials and Tools Needed for Sewing a Carry-On Bag
The first part of this how to sew a carry-on bag- step by step tutorial focuses on gathering all the necessary materials and tools. Preparing everything in advance will make the sewing process much smoother and more enjoyable.
You will need sturdy fabric for the exterior of the bag. Cotton canvas, denim, or upholstery fabric are excellent choices because they are durable and can handle heavy use. For the lining, a lighter fabric like cotton or polyester works well, giving your bag a neat finish inside.
In addition to fabric, you will need interfacing to add structure and strength to the bag. Interfacing helps the carry-on hold its shape and makes it look more professional. Fusible interfacing is particularly easy to use because it adheres to the fabric when ironed.
Other essential items include a good pair of scissors or a rotary cutter for precise fabric cutting, thread that matches your fabric colors, and a reliable sewing machine. While some parts can be sewn by hand, a machine will make the process much faster and give cleaner seams.
Do not forget about zippers or magnetic snaps for closures. A carry-on bag needs secure fastening to keep your belongings safe while traveling. Handles or straps can be made from the same fabric or purchased pre-made for extra durability.
Finally, gather basic sewing tools such as pins, a measuring tape, a seam ripper for fixing mistakes, and an iron for pressing seams. With everything ready, you are now prepared to begin the next part of this how to sew a carry-on bag- step by step tutorial.
Cutting and Preparing the Fabric Pieces
Now that we have all our materials, the next part of this how to sew a carry-on bag- step by step tutorial is cutting and preparing the fabric pieces. Accuracy here will save you time later and ensure your bag turns out neat and symmetrical.
Start by measuring and marking the main pieces for the bag’s front, back, sides, bottom, and lining. Standard carry-on dimensions work well, but you can adjust the size according to your needs. Use chalk or a washable fabric marker to outline each piece before cutting.
Next, cut the interfacing pieces to match the fabric pieces. If you are using fusible interfacing, iron it onto the wrong side of the exterior fabric pieces following the manufacturer’s instructions. This step gives your bag a professional look and sturdiness.
If your bag design includes pockets, now is the time to cut those pieces as well. Pockets can be added inside or outside for organizing small items like passports, keys, or pens. Fold the edges of each pocket piece, press them with an iron, and topstitch the top edge to give it a finished look.
Handles or straps can also be prepared at this stage. Cut fabric strips, fold them lengthwise with the right sides together, sew along the edge, then turn them right side out and press flat. For extra strength, you can topstitch along both sides of the handles.
Finally, lay out all your cut pieces to double-check you have everything you need: the main body panels, lining pieces, pockets, handles, and closures. Being organized at this stage will make the rest of the how to sew a carry-on bag- step by step tutorial flow smoothly.
Sewing the Bag Step by Step
With all pieces ready, the main part of the how to sew a carry-on bag- step by step tutorial is assembling the bag. This is where you bring everything together into a functional, stylish travel companion.
Start with the pockets if you have included them. Pin each pocket onto the appropriate panel, then sew along the sides and bottom edges, leaving the top open. Backstitch at the beginning and end to reinforce the seams.
Next, sew the exterior panels together. Begin by sewing the front and back panels to the side panels, then attach the bottom panel. Use a straight stitch with a ½ inch seam allowance for durability. Press the seams open with an iron as you go to reduce bulk.
Once the outer shell is assembled, repeat the same steps with the lining pieces, leaving a small opening at the bottom. This opening will later be used to turn the bag right side out.
For the handles, pin them to the top edges of the bag, ensuring they are evenly spaced and the same length on both sides. Baste them in place with a long temporary stitch so they stay secure while you attach the lining.
Place the lining inside the exterior bag with right sides facing each other. Sew along the top edge, catching the handles in the seam. After sewing, turn the bag right side out through the opening in the lining, then close the opening with a small topstitch.
Finally, topstitch around the top edge of the bag for a professional finish and added durability. At this stage, your how to sew a carry-on bag- step by step tutorial project will look like a real travel-ready bag.
Customizing and Finishing Touches
One of the best parts of this how to sew a carry-on bag- step by step tutorial is adding personal touches that make your bag unique. This is where creativity truly comes to life.
You can use contrasting fabrics for the lining or add decorative stitching along the edges for a stylish look. Embroidery or fabric appliqués can also personalize the exterior with initials, patterns, or even travel-themed designs.
Another idea is to add extra compartments inside for better organization. Elastic bands, mesh pockets, or even small zippered sections can make packing easier and more efficient.
Adjustable straps can also be added if you want the option of carrying your bag over the shoulder or across the body. This feature makes the bag even more versatile for different types of trips.
For travelers who carry electronics, consider sewing a padded section inside the bag to protect items like tablets or small laptops. Using foam or quilted fabric can provide cushioning while keeping the bag lightweight.
Finally, give your bag one last press with the iron to smooth out seams and wrinkles. This final step ensures your how to sew a carry-on bag- step by step tutorial project looks polished and professional.
FAQ About How to Sew a Carry-On Bag
1. Is this project suitable for beginners?
Yes, this how to sew a carry-on bag- step by step tutorial is beginner-friendly, as long as you can sew basic straight stitches on a sewing machine.
2. How long does it take to sew a carry-on bag?
It usually takes between 3–5 hours, depending on your sewing speed and any custom features you add.
3. What is the best fabric for a carry-on bag?
Sturdy fabrics like canvas, denim, or upholstery fabric are ideal because they provide durability and structure.
4. Can I wash the bag after it is finished?
Yes, if you use washable fabrics and pre-shrink them before sewing, your bag can be machine-washed on a gentle cycle.
5. Do I need a special sewing machine for this project?
No, a standard home sewing machine is sufficient. However, a heavy-duty needle may be helpful when sewing through thick layers.
6. Can I make the bag in different sizes?
Absolutely! You can adjust the dimensions of the fabric pieces to create smaller or larger versions depending on your travel needs.
Conclusion
We have now completed the how to sew a carry-on bag- step by step tutorial, covering everything from gathering materials to sewing and adding finishing touches.
By following each stage carefully, you can create a durable, stylish, and personalized carry-on bag perfect for your next trip.
I hope this guide has been helpful and inspiring. If you try this project, please leave your honest opinion and share any suggestions for future tutorials. Your feedback helps us improve and create even more useful sewing guides for readers like you!