
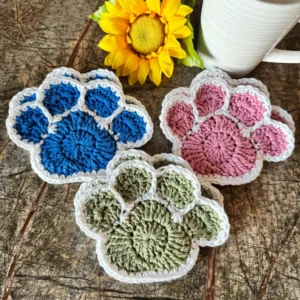
Learning how to make Crochet paw coasters- Step by Step Tutorial is a delightful project for anyone who loves crochet and enjoys adding a personal handmade touch to their home decor. These charming coasters are shaped like adorable little paws, making them perfect for pet lovers or anyone looking to bring a bit of fun and creativity into their living space. Whether you are crafting for yourself, creating gifts for friends, or even considering selling handmade items, this tutorial will guide you through every stage of the process.
The great thing about this Crochet paw coasters- Step by Step Tutorial is that it is suitable for beginners and experienced crocheters alike. If you are new to crochet, you will learn basic techniques while working on a fun, small-scale project. If you already have some experience, you can experiment with different colors and embellishments to make your paw coasters truly unique.
Another reason why many people love this Crochet paw coasters- Step by Step Tutorial is that it is practical as well as decorative. Coasters protect your furniture from water rings and heat marks while adding a cozy, homemade vibe to your table setting. By the end of this guide, you will have a set of adorable paw-shaped coasters that combine functionality with creativity.
Materials Needed for Crochet Paw Coasters
Before starting the Crochet paw coasters- Step by Step Tutorial, you need to gather the right materials to make the crafting process smooth and enjoyable. Choosing the right supplies will help ensure that your finished coasters look neat, professional, and long-lasting.
First, you will need some yarn. Cotton yarn is the best choice for coasters because it absorbs moisture well, is heat resistant, and keeps its shape after washing. Acrylic yarn can also be used for decorative coasters but is less absorbent.
Next, select an appropriate crochet hook. The size of the hook usually depends on the thickness of the yarn. A smaller hook will make tighter stitches, giving your paw coasters a denser texture that is ideal for durability.
You will also need a pair of sharp scissors for cutting yarn and a yarn needle for weaving in the loose ends once your coasters are complete. Having these tools ready before you start will save you time later.
A stitch marker can be helpful, especially if you are a beginner. It will help you keep track of the beginning of each round so your coaster stays symmetrical as you work in the round.
Finally, prepare a flat surface where you can block your coasters after finishing them. Blocking involves gently shaping the coasters while damp to give them a neat and polished look.
With all your materials ready, you are set to begin the exciting process of following the Crochet paw coasters- Step by Step Tutorial and creating your first adorable paw coaster.
Step by Step Tutorial for Making Paw Coasters
The Crochet paw coasters- Step by Step Tutorial is designed to be easy to follow, even for those new to crochet. Take your time with each step, and before long, you will have a perfect little paw-shaped coaster ready to use or gift.
Start by making a magic ring or a small chain that you join into a circle. This will form the center of your paw coaster and ensure a neat, closed middle without gaps.
Next, work several rounds of basic stitches such as single crochet or half-double crochet, gradually increasing the number of stitches in each round. This will create a flat circle that forms the base of the paw.
Once the base circle is complete, it is time to add the toes of the paw. Each toe is typically made by crocheting small circles or ovals that are then attached to the top edge of the main circle. You can make them separately and sew them on, or crochet them directly onto the coaster for a seamless look.
Continue by outlining the paw shape with a round of contrasting color if desired. This will make the paw design stand out more and give your coaster a polished appearance.
After finishing the basic shape, weave in any loose ends using a yarn needle to keep your coaster tidy and secure. Make sure all threads are neatly hidden on the back side.
Finally, block your paw coaster by dampening it slightly and pinning it to a flat surface in the correct shape. Let it dry completely so it holds its form beautifully.
Creative Variations for Paw Coasters
One of the most enjoyable parts of the Crochet paw coasters- Step by Step Tutorial is customizing your coasters to match your style or the preferences of those who will receive them as gifts. There are countless ways to make your paw coasters unique and eye-catching.
You can use different yarn colors to match holidays, seasons, or even the colors of your favorite pet. For example, pastel colors work well for spring, while reds and greens look great for Christmas.
Adding embroidery details like small hearts or initials can personalize the coasters further, making them wonderful handmade gifts for friends and family.
Experimenting with textured stitches can give your paw coasters a more interesting look and feel. Try using puff stitches or popcorn stitches to create a three-dimensional effect for the paw pads.
You can also make double-layered coasters for extra thickness. This is especially useful if you want coasters that protect your table from very hot cups or mugs.
If you like sparkle, consider adding a thin strand of metallic yarn alongside your main yarn to give your coasters a subtle shimmer without compromising their durability.
Finally, try turning your paw coasters into small hanging decorations or even appliqués for bags and cushions. The possibilities are endless once you master the basic Crochet paw coasters- Step by Step Tutorial design.
Tips for Perfecting Your Paw Coasters
Even though the Crochet paw coasters- Step by Step Tutorial is beginner-friendly, following a few tips can help you achieve a professional finish and ensure your coasters look their best.
Always keep your stitch tension consistent. Uneven tension can cause the coaster to warp or curl, so aim for smooth, even stitches throughout the project.
Count your stitches regularly, especially when increasing rounds or adding the paw toes. Missing a stitch can change the shape of the coaster, so keeping track avoids frustration later.
Choose high-quality cotton yarn for durability and easy washing. Coasters are likely to get dirty over time, so using a washable yarn makes them practical as well as pretty.
Don’t skip the blocking step. Taking the time to block your coasters makes a huge difference in how flat and neat they look when finished.
If you want to sell or gift your paw coasters, consider making them in sets of four or six. Coordinated sets look more attractive and are easier to package nicely.
Finally, practice makes perfect! The more paw coasters you make, the faster and neater your stitches will become, allowing you to experiment with colors and designs confidently.
FAQ About Crochet Paw Coasters- Step by Step Tutorial
1. Are crochet paw coasters suitable for beginners?
Yes, the Crochet paw coasters- Step by Step Tutorial is designed with beginners in mind. It uses basic stitches and simple shapes, making it a great first project.
2. How long does it take to make one paw coaster?
Most people can complete one coaster in about an hour, depending on skill level and chosen design complexity.
3. What is the best yarn for making paw coasters?
Cotton yarn is recommended because it is absorbent, heat resistant, and easy to wash, making it ideal for practical use.
4. Can I sell paw coasters made using this tutorial?
Absolutely! Handmade paw coasters are popular at craft fairs and online marketplaces, especially among pet lovers.
5. How do I keep my coasters flat?
Blocking them after finishing helps keep coasters flat and prevents curling edges. Always follow the blocking step for best results.
6. Can I make larger or smaller versions?
Yes, you can adjust the size by using thicker or thinner yarn and changing the number of rounds in the base circle.
Conclusion
We have reached the end of this Crochet paw coasters- Step by Step Tutorial, covering everything from materials and basic instructions to creative variations and expert tips.
By following this tutorial, you can create adorable paw-shaped coasters that are both functional and decorative.
I hope this guide inspires you to try making your own paw coasters at home. Please share your honest opinions and suggestions—I would love to hear about your experiences and see the beautiful creations you make using this tutorial!