
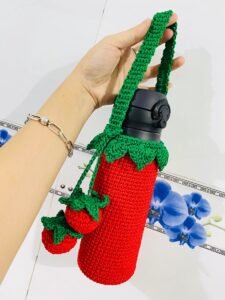
Crochet bottle holder with strawberry- Step by Step Tutorial is a charming and practical DIY project that combines creativity, functionality, and a touch of summer sweetness. If you are looking for a fun and useful accessory to carry your water bottles, this crochet bottle holder with strawberry is perfect for you. In this tutorial, we will guide you through each step to create a unique bottle holder that is not only practical but also visually appealing. This pattern is suitable for beginners who have basic knowledge of crochet and for advanced crafters who enjoy adding cute details to their projects.
Crocheting a bottle holder with strawberry allows you to personalize your accessory with your favorite colors, yarn types, and details. The strawberry design adds a playful and eye-catching element that can make your handmade project stand out. Whether you are making it for yourself, as a gift, or even to sell, this tutorial will give you all the guidance you need to complete your project with confidence. The beauty of this DIY project is that it can be easily adapted to fit bottles of different sizes, making it versatile and practical for daily use.
By following this step-by-step tutorial, you will not only improve your crochet skills but also create a functional piece that is perfect for outings, picnics, or even as a decorative item for your kitchen. The combination of functionality and aesthetic appeal makes the crochet bottle holder with strawberry an ideal project for crafters of all levels. In this article, we will cover materials needed, detailed instructions for crocheting the bottle holder and strawberry, tips for finishing, and frequently asked questions to ensure you have a smooth crafting experience.
Materials Needed for the Crochet Bottle Holder with Strawberry
To start your crochet bottle holder with strawberry, you need to gather all the necessary materials. Using high-quality yarn and suitable crochet hooks ensures your project will be durable and beautiful.
First, select cotton or acrylic yarn in your preferred colors. Red yarn is ideal for the strawberry, green for the leaves, and any color you like for the bottle holder base. Cotton yarn is recommended for a sturdier holder that can comfortably support a water bottle.
Next, you will need a crochet hook that matches your yarn weight. Typically, a 4.0mm or 4.5mm hook works well for medium-weight yarn. Using the right hook ensures your stitches are tight and even, which is important for a bottle holder that needs to be sturdy.
You will also need scissors, a yarn needle for sewing pieces together, and stitch markers to keep track of rounds. Optional embellishments like small beads or buttons can be used to add extra charm to your strawberry design.
It’s also helpful to have a water bottle on hand while crocheting to measure the holder as you go. This ensures that the bottle holder fits snugly without being too tight or too loose.
Finally, make sure your workspace is comfortable and well-lit. Good lighting helps you see your stitches clearly and reduces the chance of mistakes. Organizing your materials before starting will make your crochet bottle holder with strawberry project more enjoyable.
Step-by-Step Instructions for the Bottle Holder Base
Starting with the bottle holder base is the first crucial step in creating your crochet bottle holder with strawberry. A well-constructed base ensures the holder is functional and sturdy.
Begin by creating a magic ring and crocheting a few single crochets into it. This will form the bottom of the holder. Gradually increase the stitches in each round until the circle is wide enough to fit the bottom of your bottle comfortably.
Once the base is complete, continue crocheting in rounds without increasing. This builds the sides of the bottle holder. Make sure your stitches are tight and even to support the bottle’s weight.
Check the height of the holder periodically by placing the bottle inside. The sides should reach just below the bottle neck to ensure it fits snugly. Adjust the height by adding or reducing rounds as needed.
When the holder reaches the desired height, fasten off and weave in the ends neatly. A clean finish ensures your project looks professional and polished.
Finally, consider adding a strap to your holder for easy carrying. Crochet a long chain or a strap in your preferred style and attach it securely to the sides of the holder. The strap adds convenience and completes the functional design.
Crocheting the Strawberry Detail
The strawberry detail is the highlight of this crochet bottle holder with strawberry. This small embellishment adds color, texture, and personality to your project.
Start by crocheting a small red oval or teardrop shape using single crochets. This forms the body of the strawberry. Keep your stitches tight to maintain the shape.
Next, crochet the green leaves by creating small chain loops attached to the top of the strawberry. You can add a few layers of leaves for a fuller, more realistic effect.
Add small yellow or white embroidery stitches to represent the seeds of the strawberry. This simple detail makes the strawberry look more realistic and eye-catching.
Once the strawberry is complete, sew it securely onto the side of your bottle holder. Position it where it will be most visible and balanced, usually near the center of the holder.
Ensure that all ends are woven in neatly and that the strawberry is firmly attached. A well-secured strawberry prevents it from coming loose during use.
Finally, if desired, add small embellishments like beads or tiny flowers around the strawberry to enhance the overall design. These little touches make your crochet bottle holder with strawberry even more unique and decorative.
Tips and Tricks for a Professional Finish
Finishing your crochet bottle holder with strawberry professionally enhances its appearance and durability. Paying attention to details makes a big difference in the final result.
One tip is to block your crochet pieces before assembling them. Blocking helps even out stitches and gives the holder a polished look.
Use stitch markers to keep your rounds consistent and avoid losing track of your stitches. This is especially helpful when crocheting the cylindrical sides of the bottle holder.
Weaving in ends carefully ensures a clean finish and prevents your yarn from unraveling over time. Hide the ends inside the holder for a seamless look.
When attaching the strawberry, sew it with small, tight stitches to secure it firmly. This prevents it from wobbling or detaching during use.
Experiment with different yarn colors or add small patterns to your bottle holder base for a custom look. Stripes or polka dots can make your holder playful and unique.
Finally, regularly check the fit of your bottle holder as you crochet. A snug but not tight fit ensures the holder is functional and comfortable to carry.
FAQ About Crochet Bottle Holder with Strawberry
Q1: What type of yarn is best for a crochet bottle holder?
A: Cotton or acrylic yarn is ideal. Cotton is durable and absorbs moisture well, while acrylic is lightweight and comes in many colors.
Q2: Can I make the holder for different bottle sizes?
A: Yes! Measure your bottle before starting and adjust the base circle and height accordingly to ensure a snug fit.
Q3: Is this project suitable for beginners?
A: Absolutely. With basic knowledge of single crochet, magic ring, and chaining, beginners can follow this step-by-step tutorial successfully.
Q4: How do I attach the strawberry securely?
A: Sew the strawberry with small tight stitches using a yarn needle. Ensure it is positioned correctly and all ends are woven in.
Q5: Can I add a handle or strap?
A: Yes, crochet a chain strap and attach it securely to the sides. This makes carrying the bottle easier and adds style.
Q6: How can I make my crochet bottle holder more decorative?
A: Add embellishments like beads, small flowers, or color patterns to personalize your design. The strawberry detail alone adds charm and creativity.
Conclusion
Creating a crochet bottle holder with strawberry is a rewarding and enjoyable project that combines practicality with creative expression. From gathering materials to crocheting the base, adding the strawberry detail, and finishing your holder professionally, each step enhances your skills and produces a functional accessory. This tutorial has provided detailed instructions, tips, and guidance to ensure success, no matter your skill level.
Now that you have completed your project, you can proudly use your handmade bottle holder or gift it to someone special. The combination of charm, utility, and personalization makes this DIY project truly special. Don’t forget to experiment with colors, sizes, and embellishments to create unique variations.
We would love to hear your thoughts! Please leave your honest opinion and suggestions about this crochet bottle holder with strawberry tutorial. Your feedback helps us create even more enjoyable and creative projects for crafters like you.