
Fabric charger holder- Step by Step Tutorial is a practical and creative DIY project designed to organize your electronic accessories while adding a personal touch to your workspace or home. With the increasing number of devices we use daily, having a neat and accessible way to store chargers and cables is essential. This fabric charger holder not only keeps your cords organized but also provides a stylish solution that can match your personal taste and decor. In this tutorial, we will guide you through every step, from selecting the right fabric to completing a fully functional and beautiful charger holder.
Making a fabric charger holder is a fun and engaging craft that combines sewing skills with practical design. This project is perfect for both beginners and experienced crafters because it focuses on simple techniques while allowing creative freedom in choosing fabrics, patterns, and sizes. By creating your own holder, you can avoid tangled cables, extend the life of your chargers, and enjoy the satisfaction of a handmade accessory tailored specifically to your needs.
This step-by-step tutorial will cover everything you need to know to make a professional-looking fabric charger holder. We will discuss materials required, detailed sewing instructions, tips for finishing, and frequently asked questions to make sure your project turns out perfectly. Whether you are making one for yourself or as a gift, this tutorial ensures you achieve a functional and aesthetically pleasing product.
Materials Needed for the Fabric Charger Holder
Before starting your fabric charger holder- Step by Step Tutorial, it is important to gather all the necessary materials to ensure a smooth crafting process. Having everything ready will save time and make the project more enjoyable.
You will need fabric of your choice for the outer layer and lining. Cotton or canvas works best because it is durable and easy to sew. Consider choosing fabrics with fun patterns or coordinating colors to make your holder visually appealing.
Additional materials include fusible interfacing to give structure to your holder, thread that matches your fabric, and a sewing needle or sewing machine. Using interfacing ensures your holder maintains its shape while keeping chargers secure.
You will also need scissors, pins or clips to hold fabric layers together while sewing, and a ruler or measuring tape to ensure accurate cuts. Accurate measurements are key to making a holder that is functional and neat.
Optional accessories such as Velcro, snaps, or buttons can be used to create closures. This allows you to keep chargers safely inside the holder and prevents them from falling out during travel.
Lastly, consider having a pressing iron handy. Pressing seams as you go not only gives a polished finish but also makes sewing easier by keeping the fabric flat and manageable. These simple materials and tools will help you complete your fabric charger holder successfully.
Step-by-Step Instructions to Sew the Charger Holder
Starting your fabric charger holder requires precise cutting and careful sewing to ensure a functional and neat final product. Begin by measuring the dimensions of your chargers and cables. This ensures that the holder will accommodate all your accessories without being too tight or too loose.
Cut your outer fabric, lining, and interfacing to the required size. Make sure all pieces are even and aligned. Fusible interfacing should be ironed onto the wrong side of the outer fabric according to the manufacturer’s instructions.
Next, place the outer fabric and lining right sides together and pin along the edges. Sew around the perimeter, leaving a small opening to turn the fabric right side out. Use a straight stitch for a strong seam.
After sewing, turn the fabric right side out through the opening. Press all edges flat with an iron, and topstitch around the perimeter to give a clean, professional finish. Closing the opening with small hand stitches ensures a seamless look.
Divide the interior space into sections by sewing vertical lines to create compartments for different chargers or cables. This helps keep items organized and prevents tangling.
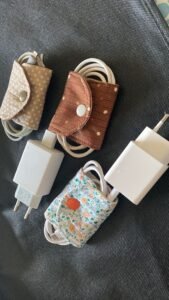
Finally, add a closure method such as Velcro, a button, or a snap. Ensure it is securely attached and aligned correctly. Your fabric charger holder is now complete and ready to keep your electronic accessories organized.
Tips to Customize Your Fabric Charger Holder
Customizing your fabric charger holder- Step by Step Tutorial allows you to create a unique and personalized product that fits your style and needs. Begin by experimenting with fabric patterns, colors, and textures to reflect your personality.
Adding decorative elements such as embroidery, appliqués, or fabric paint enhances the visual appeal of your holder. Simple designs like initials or small motifs can make your project special.
Consider adjusting the size of compartments to accommodate various types of chargers, cables, or even small gadgets. Tailoring the sections ensures everything fits snugly and remains organized.
For a more professional finish, press seams as you go. Pressing helps keep fabric smooth and shapes crisp, resulting in a polished and attractive final product.
If you plan to gift your charger holder, adding a small personalized tag or a decorative ribbon can elevate the presentation and make the gift extra thoughtful.
Finally, experiment with different closure options. Magnetic snaps, buttons, or fold-over flaps each give a unique look and functionality to your fabric charger holder. These small touches make a big difference in usability and style.
Common Mistakes to Avoid and Finishing Tips
When making a fabric charger holder, avoiding common mistakes ensures a smooth sewing process and a professional-looking final product. One common mistake is inaccurate measurements. Always double-check your dimensions before cutting fabric.
Another mistake is skipping the interfacing. Without it, the holder may lack structure and fail to protect your chargers properly. Fusible interfacing provides the necessary support and durability.
Uneven seams can detract from the overall appearance. Using pins or clips and sewing slowly can help maintain straight and consistent seams throughout the project.
Ensure compartments are evenly spaced to avoid uneven sections that can affect the functionality of the holder. Use a ruler or measuring tape to mark lines before sewing.
Finishing edges with a topstitch adds both durability and a polished look. This small step strengthens seams and gives the holder a professional appearance.
Lastly, inspect your holder for loose threads or missed stitches. Tidying these up before use ensures your fabric charger holder is ready for everyday use or gifting.
FAQ About Fabric Charger Holder
Q1: What type of fabric is best for a charger holder?
A: Cotton, canvas, or sturdy woven fabrics are ideal. They provide durability and structure while being easy to sew.
Q2: Can this holder fit multiple chargers?
A: Yes, by adjusting the size of compartments, you can organize multiple chargers, cables, and small devices neatly.
Q3: Is this project suitable for beginners?
A: Absolutely. Basic sewing skills like straight stitching, pressing, and cutting fabric accurately are enough to complete this project.
Q4: Can I make a foldable or travel-friendly version?
A: Yes, using thinner fabrics or fewer compartments can create a lightweight and compact version for travel.
Q5: What closures work best?
A: Velcro, snaps, buttons, or fold-over flaps are all suitable. Choose based on preference and convenience.
Q6: How do I clean my fabric charger holder?
A: Hand wash or gentle machine wash using mild detergent. Avoid harsh chemicals to maintain fabric integrity.
Conclusion
Creating a fabric charger holder- Step by Step Tutorial is a rewarding project that combines functionality with creative expression. From selecting the right materials to sewing compartments and adding personalized touches, each step ensures a useful and attractive final product. Following this tutorial allows you to organize your electronic accessories efficiently while enjoying the satisfaction of a handmade creation.
This project is versatile and customizable, making it perfect for personal use or gifting. With tips for finishing, avoiding mistakes, and adding unique design elements, you can create a holder that is both practical and stylish. By completing this tutorial, you gain not only a functional product but also valuable sewing skills and a sense of accomplishment.
We would love to hear your thoughts on this fabric charger holder tutorial. Please leave your honest opinion and suggestions to help us improve and create even more enjoyable DIY projects for crafters like you.