
Crochet Halloween Ghost- Step by Step Tutorial is the perfect project for anyone who wants to add a handmade touch to their spooky seasonal decorations. This fun and creative project is ideal for beginners and experienced crocheters alike. By making your own crochet Halloween ghost, you can customize the size, color, and style while learning or practicing useful crochet techniques.
Creating a crochet Halloween ghost is not just about crafting; it’s about adding personality and charm to your Halloween celebrations. Whether you want to make cute little ghosts to hang around your house, give as gifts, or use as table decorations, this step-by-step tutorial will guide you through the entire process with simple instructions and helpful tips to make it enjoyable for everyone.
This article will explain everything from the materials needed to the crochet techniques, assembling the pieces, and even customizing your ghost for a unique look. We will also include a detailed FAQ to answer common questions and a conclusion to wrap everything up so you can confidently start your project today.
Materials Needed for the Crochet Halloween Ghost
Before you begin the Crochet Halloween Ghost- Step by Step Tutorial, gathering the right materials will make the process smooth and enjoyable. Having everything ready beforehand ensures you can focus entirely on crocheting without interruptions.
First, choose soft, durable yarn in white or off-white for the ghost’s body. Cotton yarn works well because it holds shape nicely, but acrylic yarn can also be used if you prefer a softer texture. For the eyes and mouth, you can use small pieces of black yarn or felt.
Next, you will need a crochet hook suited to your yarn weight. A 3.5mm or 4mm hook usually works well for small projects like this. Using the right hook size ensures your stitches stay tight enough so the stuffing does not show through.
You will also need stuffing material to give your ghost a cute, puffy shape. Polyester fiberfill is ideal because it is lightweight and easy to work with, giving your ghost a soft but firm structure.
Basic tools such as scissors, a yarn needle, and stitch markers are also essential. The stitch markers will help you keep track of rounds, especially since small projects can be tricky to follow.
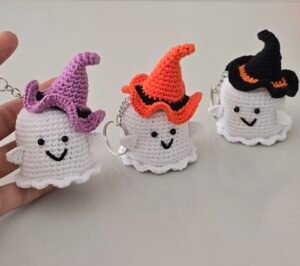
Finally, consider adding embellishments such as a tiny bow, hat, or even a small pumpkin accessory to make your crochet Halloween ghost stand out. These little details give personality and charm to your creation.
Step-by-Step Instructions to Crochet the Ghost Body
Now let’s start the main part of the Crochet Halloween Ghost- Step by Step Tutorial. The ghost’s body is simple to make, but it sets the foundation for the entire project, so take your time with this part.
Begin with a magic ring and make six single crochet stitches into it. Pull the ring tight to close the center hole completely. This will form the top of your ghost’s head.
In the next round, increase each stitch by making two single crochets in each one. This will create a small circle that begins to form the top part of the ghost’s head.
Continue working in the round, increasing gradually until you reach the desired size for the ghost’s head. Usually, after three or four rounds, you will have a nice rounded top shape.
After completing the head portion, continue crocheting without increasing to form the body tube. The body should be longer than the head so that when you add the wavy edge later, it looks like a floating ghost.
Stuff the head with polyester fiberfill as you go, making sure it holds its shape well. Do not overstuff because the ghost should look soft and lightweight rather than too firm.
Finally, finish the body section by preparing for the decorative edging that will give your crochet Halloween ghost its classic floating look.
Adding Details and Decorating the Ghost
The most enjoyable part of the Crochet Halloween Ghost- Step by Step Tutorial is adding all the details that bring your ghost to life. This includes the facial features, edging, and any accessories you want to include.
To make the ghost’s wavy bottom edge, work a series of increases and chain stitches around the last round of the body. This creates a scalloped look that gives the impression of a ghost floating in the air.
For the face, cut small circles of black felt or use black yarn to crochet tiny eyes and a mouth. Sew or glue them onto the head in a way that gives your ghost a cute or spooky expression, depending on your preference.
If you want your ghost to hang, attach a small yarn loop to the top of the head. This makes it easy to use the ghost as a decoration on doors, walls, or even your Halloween tree if you have one.
You can also crochet small accessories such as a tiny witch hat or scarf for your ghost. These extra touches make each crochet Halloween ghost unique and fun.
Finally, check all seams and edges to ensure everything is securely attached. This step ensures your ghost will last through many Halloween seasons without falling apart.
Tips for Customizing Your Crochet Halloween Ghost
One of the best things about this Crochet Halloween Ghost- Step by Step Tutorial is how easy it is to customize. You can change colors, sizes, and details to make each ghost truly your own.
Try using glow-in-the-dark yarn for a fun and spooky effect when the lights go out. This simple change can make your decorations stand out even more during Halloween night.
Experiment with different sizes by increasing or decreasing the number of rounds in the head and body sections. You can make a whole family of ghosts in various sizes for a cute display.
Add themed accessories like a tiny crochet pumpkin, a broomstick, or a Halloween banner for your ghost to hold. These small additions make your decorations more festive and playful.
If you want to give your ghost as a gift, consider adding a small tag with a Halloween message. Handmade gifts with personal touches are always appreciated.
Finally, use leftover yarn scraps from other projects to make these ghosts. They are small enough to be a great stash-busting project while also being practical and decorative.
FAQ About Crochet Halloween Ghost
Q1: Is the crochet Halloween ghost suitable for beginners?
A: Yes, this project uses basic stitches like single crochet and simple increases, making it ideal for beginners looking to practice their skills.
Q2: How long does it take to make one ghost?
A: Depending on your speed, a small ghost can be completed in about one to two hours, including stuffing and decorating.
Q3: Can I wash the crochet Halloween ghost?
A: If made with washable yarn and fiberfill, you can gently hand wash it and let it air dry. Avoid harsh detergents to preserve its shape.
Q4: What kind of yarn is best for this project?
A: Cotton yarn works best for structure, but acrylic yarn is also fine if you want a softer look.
Q5: Can I sell the ghosts I make from this tutorial?
A: Yes, handmade crafts like these are often sold at markets or online, but always credit the original pattern if required.
Q6: How do I make the ghost stand instead of hang?
A: Crochet a flat bottom and stuff it firmly, or insert a small weighted pouch inside so the ghost can sit upright on surfaces.
Conclusion
This Crochet Halloween Ghost- Step by Step Tutorial has shown you how to create a fun and festive decoration perfect for the Halloween season. From gathering materials to crocheting the body, adding details, and customizing each ghost, this guide provides everything you need to get started.
By following these steps, you can create adorable handmade ghosts that add charm and personality to your home or make thoughtful gifts for friends and family. The project is beginner-friendly, quick to complete, and highly customizable, making it a perfect craft for the holiday season.
We hope you enjoyed this tutorial and found it helpful. Please share your honest opinions and suggestions so we can continue to bring you fun, creative, and easy DIY projects like this one.