
Learning how to sew a drawstring bag – step by step tutorial is an excellent way to start your sewing journey. This project is perfect for beginners who want to practice basic sewing techniques while creating something useful and beautiful. A drawstring bag can be used for multiple purposes such as storing accessories, organizing small items, or even as a gift bag. With just a few materials and simple steps, you can make your own customized drawstring bag and feel proud of your creation.
The great thing about this how to sew a drawstring bag – step by step tutorial is that it allows you to express your creativity. You can choose fabrics in your favorite colors, add decorations, or even make several bags in different sizes. The process is simple, and once you understand the basics, you can create a wide variety of bags for different needs. Sewing is not only practical but also relaxing, making this project perfect for a weekend hobby.
Before we start the how to sew a drawstring bag – step by step tutorial, it is important to gather all the materials you will need. Most of the items are easy to find, and you probably already have some at home. The main materials include fabric, thread, scissors, pins, a sewing machine (or you can sew by hand if you prefer), and, of course, a drawstring cord or ribbon. Once everything is ready, you can follow the steps carefully to ensure the best results.
Materials Needed for Sewing a Drawstring Bag
When learning how to sew a drawstring bag – step by step tutorial, the first thing you need to do is gather all the necessary materials. Choosing the right materials will ensure that your drawstring bag looks beautiful and lasts for a long time.
First, select the fabric for your bag. Cotton fabric is usually recommended for beginners because it is easy to work with and comes in a variety of prints and colors. For a stronger and more durable bag, you can choose canvas or denim. The size of the fabric depends on how big or small you want your drawstring bag to be.
Next, choose a suitable thread that matches your fabric color. This will give your bag a clean and professional look. If you want a decorative finish, you can use contrasting thread colors to add some style. A basic sewing kit with needles, pins, and fabric scissors will also be necessary to make the process easier and faster.
The how to sew a drawstring bag – step by step tutorial also requires a drawstring cord or ribbon. This will be used to close the bag securely and give it the iconic drawstring style. You can find cords in different materials, such as cotton, nylon, or satin ribbons, depending on the final look you want for your bag.
Another essential item is a sewing machine, but if you don’t have one, don’t worry. You can still follow the how to sew a drawstring bag – step by step tutorial and sew everything by hand. It might take longer, but the results will be equally satisfying.
Finally, you might want to use an iron to press the fabric edges and seams as you go. Pressing the fabric makes the sewing process easier and helps create neat and professional-looking bags.
Step-by-Step Process to Sew the Drawstring Bag
Now that you have all your materials ready, it is time to follow the how to sew a drawstring bag – step by step tutorial carefully. Each step builds on the previous one, so take your time and enjoy the process.
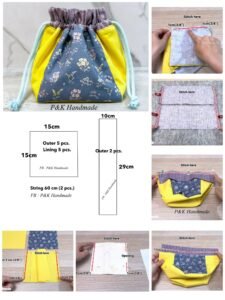
Start by cutting your fabric into the desired size. Most beginners prefer to make medium-sized bags, such as 12 inches by 14 inches, but you can adjust this according to your needs. Make sure you cut two identical pieces for the front and back of the bag.
Next, place the two fabric pieces together with the right sides facing each other. This means the sides with the patterns or designs should be touching. Pin the edges to keep the fabric in place while sewing.
Now sew along the sides and bottom edges, leaving the top open. Remember to backstitch at the beginning and end to secure the seams. This is a crucial step in the how to sew a drawstring bag – step by step tutorial because it ensures your bag is strong and durable.
After sewing the sides and bottom, you need to create a casing at the top for the drawstring. Fold the top edge of the bag about half an inch toward the inside, then fold it again about one inch to create a neat edge. Press with an iron and sew along the lower fold, leaving enough space for the cord to pass through.
Finally, turn the bag right side out and insert the drawstring cord using a safety pin to guide it through the casing. Once the cord is in place, knot the ends together. When you pull the string, the top of the bag will close securely.
Tips for Customizing Your Drawstring Bag
One of the best things about learning how to sew a drawstring bag – step by step tutorial is that you can customize the design in many ways. Adding personal touches makes your bag unique and special.
You can choose different fabric prints for the outside and lining to create a two-tone effect. For example, using a plain fabric on the outside and a colorful pattern on the inside can give your bag a surprise element when opened.
Adding pockets to the inside or outside of the bag is another great idea. Pockets are useful for storing small items like keys or coins. This step is optional, but it can make your drawstring bag even more functional.
Decorative stitching is another way to customize your project. You can use embroidery stitches or even add appliqué designs to the front of the bag. These little details give your project a creative and handmade touch.
If you are making the drawstring bag as a gift, consider personalizing it with initials or names. This adds a thoughtful element that the recipient will appreciate.
Finally, experiment with different sizes and shapes. Once you master the basic how to sew a drawstring bag – step by step tutorial, you can create small bags for jewelry, medium bags for shoes, or large bags for laundry or travel.
Common Mistakes to Avoid
Even though the how to sew a drawstring bag – step by step tutorial is beginner-friendly, there are a few common mistakes you should avoid to ensure the best results.
One mistake is not measuring the fabric correctly. Always double-check your measurements before cutting to avoid wasting fabric.
Another issue is sewing too close to the edge when making the casing for the drawstring. Make sure there is enough space for the cord to move freely.
Skipping the pressing step can also make your bag look less professional. Ironing the folds and seams helps keep everything neat and easy to sew.
Using the wrong type of thread for your fabric might cause seams to break easily. Always choose a high-quality thread suitable for your material.
Forgetting to backstitch at the beginning and end of your seams can make the stitching unravel over time. Secure all seams properly to make your bag durable.
Lastly, do not rush the process. Take your time with each step of the how to sew a drawstring bag – step by step tutorial to avoid mistakes and achieve better results.
FAQ about Sewing a Drawstring Bag
1. Can I sew a drawstring bag by hand instead of using a machine?
Yes, you can. It will take longer, but the results will be equally good if you sew carefully and use small, strong stitches.
2. What is the best fabric for a beginner to use?
Cotton is ideal because it is easy to handle, comes in many designs, and is affordable.
3. Can I wash my drawstring bag in the machine?
Yes, most fabrics used for drawstring bags are machine washable, but always check the fabric care instructions first.
4. How long does it take to sew a drawstring bag?
For beginners, it might take about one to two hours. With practice, you can finish a bag in less than 30 minutes.
5. Can I make a lined drawstring bag?
Absolutely. You just need to cut the lining fabric in the same size as the outer fabric and sew them together before assembling the bag.
Conclusion
By following this how to sew a drawstring bag – step by step tutorial, you have learned the entire process from choosing materials to sewing and customizing your bag.
This project is perfect for beginners and offers endless possibilities for creativity. Now it’s your turn to try making one yourself.
We would love to hear your honest opinion and any suggestions you might have to make this tutorial even better.