
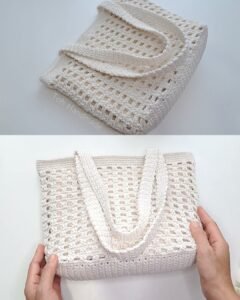
Learning how to create a simple crochet bag to make – step by step tutorial is a wonderful way to explore your creativity while making something useful and stylish. Crochet bags have become a popular fashion accessory and a practical item for everyday use. Whether you are new to crochet or already have some experience, this guide will walk you through everything you need to know to create a beautiful and functional bag.
Making a simple crochet bag to make – step by step tutorial is not only fun but also beginner-friendly. You can customize the size, color, and design to suit your personal taste. Crochet bags make great gifts for friends and family, and they are eco-friendly alternatives to plastic bags. Plus, crafting your own bag gives you a sense of accomplishment and allows you to learn or improve your crochet skills.
Before diving into the simple crochet bag to make – step by step tutorial, it is essential to gather the right materials and understand the basic techniques. Even if you have never crocheted before, this tutorial will guide you through each step clearly, so you can complete your project with confidence. Once you finish, you will have a handmade accessory that is unique, practical, and stylish.
Materials and Tools Needed
To follow this simple crochet bag to make – step by step tutorial, you need to gather a few basic materials. Choosing the right tools will make the process smoother and ensure the final result looks professional and neat.
Start with yarn. Cotton yarn is ideal for beginners because it is durable, easy to handle, and produces a strong, sturdy bag. It is also available in many colors, so you can create a bag that matches your style. If you want a more lightweight or decorative bag, you can try blended or acrylic yarns.
Next, you will need a crochet hook. The hook size depends on the yarn thickness, but most crochet bags use medium-sized hooks, such as 4mm to 5.5mm. Make sure to check the yarn label for the recommended hook size to achieve the correct tension and finish.
You will also need scissors and a yarn needle. The scissors will be used to cut the yarn, while the yarn needle will help you weave in the loose ends when finishing your project. A stitch marker can be handy if you are new to crochet, as it helps you keep track of the beginning of each round.
Handles or straps are optional but highly recommended if you want a practical bag. You can crochet your own handles or buy ready-made ones from craft stores. Some people even use wooden or leather handles for a more elegant look.
Finally, have a measuring tape nearby to check the size of your bag as you work. This ensures the finished product meets your expectations and fits your intended use perfectly.
Step-by-Step Instructions
Now let’s begin the simple crochet bag to make – step by step tutorial. These instructions are designed for beginners, so they use basic stitches and straightforward techniques.
Start by creating a foundation chain. The number of chains will determine the width of your bag. For a medium-sized bag, chain around 30 to 40 stitches. Keep your tension even to avoid loose or uneven edges.
Once your chain is complete, begin working single crochet stitches along the chain. When you reach the end, turn your work and continue on the other side of the chain to create a rounded base. This method gives your bag a solid bottom without any seams.
Continue crocheting in rounds using single or half-double crochet stitches. This forms the body of the bag. If you want a taller bag, simply add more rounds until you reach your desired height.
At this point in the simple crochet bag to make – step by step tutorial, you can experiment with patterns. For example, you can add stripes by changing yarn colors or create textured designs using different stitches like shell or puff stitches. These details add personality and style to your bag.
When you reach the top, create a few rounds using tighter stitches or add a decorative border to give your bag a clean finish. You can also crochet loops if you want to add a drawstring closure instead of traditional handles.
Finally, attach your handles. If you crocheted straps, sew them securely to the sides of the bag. For ready-made handles, follow the manufacturer’s instructions or attach them using strong yarn or thread to ensure durability.
Tips for Customizing Your Crochet Bag
The beauty of following a simple crochet bag to make – step by step tutorial is the freedom to customize your project. There are countless ways to make your bag unique and stylish.
First, play with colors. You can use a single color for a classic look or combine two or three colors for a fun, modern design. Ombre yarns that change colors gradually can also create a stunning effect without much effort.
Second, experiment with different stitch patterns. While basic stitches are perfect for beginners, learning a few textured stitches can take your bag to the next level. Stitches like the bobble, moss, or waffle stitch can add depth and interest to the design.
Third, consider adding linings. A fabric lining inside your crochet bag makes it sturdier and prevents small items from slipping through the stitches. You can hand-sew a simple lining using cotton fabric that complements your bag’s colors.
Fourth, embellishments like buttons, beads, or tassels can give your bag a unique personality. These details are optional but can make your handmade bag stand out even more.
Fifth, try different shapes. While most beginners start with rectangular or square bags, you can create round, oval, or even triangular bags once you feel comfortable with basic techniques.
Finally, adjust the size to fit your needs. Make a small clutch for evenings out, a medium tote for everyday use, or a large beach bag for summer trips. The possibilities are endless when you understand the basic structure of the simple crochet bag to make – step by step tutorial.
Common Mistakes to Avoid
Even with a simple crochet bag to make – step by step tutorial, beginners sometimes face challenges. Being aware of common mistakes helps you avoid frustration and achieve better results.
One common issue is using the wrong hook size. If your hook is too small, the bag will be stiff and difficult to work with. If it is too large, the stitches will be loose, and the bag may not hold its shape.
Another mistake is inconsistent tension. Beginners often crochet too tightly or too loosely, leading to uneven edges or misshapen bags. Practice keeping your tension steady for a neat finish.
Skipping rounds or miscounting stitches can cause your bag to look uneven. Using a stitch marker at the start of each round helps prevent this problem and keeps your work organized.
Choosing the wrong yarn type can also affect the final result. For example, very stretchy yarns may cause the bag to lose shape, while slippery yarns may be difficult to control for beginners.
Forgetting to weave in ends securely is another issue. Loose yarn tails can unravel over time, so always use a yarn needle to weave them neatly into the stitches.
Finally, rushing through the project can lead to mistakes. Take your time with each step of the simple crochet bag to make – step by step tutorial to enjoy the process and create a high-quality bag.
FAQ About Crochet Bags
1. How long does it take to crochet a simple bag?
For beginners, it usually takes one to two days, depending on the size and complexity. Smaller bags can be completed in a few hours.
2. Do I need a lining for my crochet bag?
A lining is optional, but it adds strength and prevents items from poking through the stitches.
3. Can I wash my crochet bag?
Yes, most crochet bags made with cotton or acrylic yarns are washable. Handwashing is recommended to maintain shape and color.
4. What is the best yarn for a crochet bag?
Cotton yarn is ideal because it is durable, strong, and easy to handle, making it perfect for beginners.
5. Can I sell crochet bags made from this tutorial?
Absolutely. Handmade crochet bags are popular at craft fairs and online shops. Just make sure your work is neat and durable.
Conclusion
By following this simple crochet bag to make – step by step tutorial, you have learned everything from choosing materials to creating the bag and customizing it to your style.
Crochet bags are fun, practical, and rewarding projects for beginners and experienced crafters alike.
We hope you enjoyed this guide and encourage you to leave your honest opinions and suggestions so we can continue creating helpful tutorials for crochet lovers everywhere.