
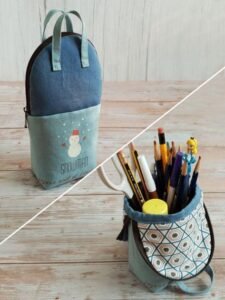
Learning how to make a pencil case pouch – step by step tutorial is a creative and fun project for anyone who enjoys sewing or DIY crafts. Pencil cases are practical items used by students, artists, and professionals to store pens, pencils, markers, and small stationery supplies. Making one by yourself not only saves money but also allows you to design a unique accessory that reflects your personal style.
One of the best things about how to make a pencil case pouch – step by step tutorial is that it is beginner-friendly. Even if you are new to sewing, this guide will teach you the basics in a clear and simple way. By the end of the tutorial, you will have a functional, handmade pencil case that you can use daily or even give as a thoughtful gift. You will also gain confidence in your sewing skills and be ready to tackle other DIY projects in the future.
In this article, we will walk you through every step of how to make a pencil case pouch – step by step tutorial. From choosing materials and cutting the fabric to sewing and adding the zipper, each step is explained in detail. We will also include tips to customize your pencil case and answer the most common questions beginners have when making this type of project.
Materials Needed for How to Make a Pencil Case Pouch – Step by Step Tutorial
Before starting the process of how to make a pencil case pouch – step by step tutorial, you need to gather all the necessary materials. Choosing the right materials ensures your pencil case will be durable, functional, and visually appealing.
First, you need fabric. Cotton fabric is an excellent choice because it is easy to work with, widely available, and comes in many colors and prints. You can also use canvas or denim for a sturdier pencil case or even recycle fabric from old clothes to make your project eco-friendly.
Second, you will need a zipper. A zipper around 8 to 10 inches long works well for most pencil cases, but you can adjust the size depending on how big you want your pouch to be. Make sure the zipper color complements or contrasts nicely with your fabric design.
Third, get some basic sewing supplies. These include scissors, pins or clips, a ruler or measuring tape, sewing thread, and a sewing machine. If you prefer hand sewing, you can still complete this project, but using a machine will give you cleaner and stronger stitches.
Fourth, you might want to add interfacing for extra stability. Interfacing is a fabric layer that you fuse or sew onto the wrong side of your fabric to make it firmer. This step is optional but highly recommended if you want your pencil case to hold its shape well.
Fifth, prepare a lining fabric. Adding a lining makes your pencil case more durable and gives it a professional finish. You can use a simple cotton fabric for this purpose.
Finally, make sure you have enough workspace. A clean, flat surface will make cutting and sewing easier and help you stay organized as you follow the steps in how to make a pencil case pouch – step by step tutorial.
Cutting and Preparing the Fabric
The next step in how to make a pencil case pouch – step by step tutorial is cutting and preparing the fabric. Accurate cutting is essential to ensure all parts fit together perfectly when you start sewing.
Begin by deciding the size of your pencil case. A common size is about 9 inches long and 4 inches tall. Cut two pieces of your main fabric and two pieces of lining fabric using these measurements. If you are adding interfacing, cut it slightly smaller so it does not add bulk to the seams.
After cutting the fabric, attach the interfacing to the wrong side of the main fabric pieces if you chose to use it. Follow the instructions on the interfacing package, usually involving ironing it on with heat. This step adds structure to your pencil case and makes it more durable.
Next, prepare the zipper. Place it on top of one main fabric piece, right sides together, and then add one lining piece on top, with the right side facing down. The zipper will be sandwiched between the two layers.
Pin or clip everything in place to prevent the layers from shifting while sewing. This preparation step is crucial because it ensures your zipper will be straight and your seams even.
Repeat the same process with the other side of the zipper, main fabric, and lining. At this point in how to make a pencil case pouch – step by step tutorial, you will have all the pieces ready for assembly.
Sewing the Pencil Case
Now comes the fun part of how to make a pencil case pouch – step by step tutorial: sewing everything together. This is where your pencil case starts to take shape.
Start by sewing along the zipper edges using a zipper foot on your sewing machine. This foot allows you to sew close to the zipper teeth for a neat finish. Sew slowly to maintain control, especially if you are new to sewing.
After sewing the zipper, open the fabric pieces so the right sides of the main fabric are facing up. Press the seams with an iron to make everything lay flat. This step gives your pencil case a professional look.
Next, topstitch along both sides of the zipper. Topstitching keeps the fabric away from the zipper teeth and adds durability to your pencil case. It also gives a nice decorative finish to the project.
Once the zipper section is complete, open the zipper halfway. This step is important because it will allow you to turn the pencil case right side out later.
Now, place the main fabric pieces right sides together and the lining pieces right sides together. Pin or clip around the edges, leaving a small opening in the lining for turning.
Sew around the entire edge, leaving the opening in the lining unsewn. Trim the corners to reduce bulk, being careful not to cut the stitches.
Finally, turn the pencil case right side out through the opening in the lining. Push out the corners gently with a blunt tool for a crisp finish. Sew the lining opening closed, then tuck it inside the pencil case. Congratulations, you have completed the main steps of how to make a pencil case pouch – step by step tutorial!
Customization Ideas and Tips
One of the best things about how to make a pencil case pouch – step by step tutorial is the opportunity to personalize your creation. There are countless ways to make your pencil case unique.
You can choose colorful fabrics or mix different patterns for a fun, playful look. For example, use a solid color for the outside and a patterned fabric for the lining to create a surprise element when the case is opened.
Adding decorative elements like appliqués, embroidery, or fabric paint can make your pencil case stand out. Personalizing it with your initials or favorite designs turns a simple project into something special.
If you want extra storage, you can sew on small pockets inside the lining or add an exterior pocket before assembling the main case. This is perfect for organizing small items like erasers or USB drives.
You can also play with the shape and size. Instead of a standard rectangular pouch, try a triangular or circular design for a more creative look.
Finally, consider making multiple pencil cases in different sizes. Small pouches can store coins or makeup, while larger ones can hold art supplies or travel essentials. The possibilities with how to make a pencil case pouch – step by step tutorial are endless once you learn the basic steps.
FAQ About How to Make a Pencil Case Pouch – Step by Step Tutorial
1. Can I make a pencil case without a sewing machine?
Yes, you can hand-sew it, but using a sewing machine gives cleaner seams and saves time.
2. What fabric is best for pencil cases?
Cotton is ideal for beginners, while canvas or denim offers extra durability.
3. How long does it take to make a pencil case?
Beginners can finish it in one to two hours, depending on the design and size.
4. Do I need a lining for my pencil case?
A lining adds strength and a professional finish, so it is highly recommended.
5. Can I wash a handmade pencil case?
Yes, most fabric pencil cases are washable. Use gentle detergent and air dry to maintain shape.
Conclusion
By following this guide on how to make a pencil case pouch – step by step tutorial, you have learned everything from choosing materials and cutting fabric to sewing and customizing your pencil case.
This project is beginner-friendly, fun, and practical, giving you a useful accessory and new crafting skills.
We hope you enjoyed this tutorial and encourage you to leave your honest opinions and suggestions so we can continue creating helpful guides for DIY lovers like you.