
If you have ever wanted to learn how to make a shark-shaped pencil case Step by Step Tutorial, this guide is perfect for you. Creating a unique pencil case shaped like a shark is not only a fun DIY project but also a practical one. You can store your pens, pencils, markers, and even small craft supplies inside it while enjoying the satisfaction of making something with your own hands.
The best part about following a how to make a shark-shaped pencil case Step by Step Tutorial is that it combines creativity with functionality. Whether you are new to sewing or have some experience with crafts, this project offers an opportunity to learn simple sewing techniques while making something truly original. The shark design adds a playful twist that kids and even adults will love.
In this article, we will break the process down into clear steps, from gathering materials to assembling and adding details to bring your shark pencil case to life. We will also share tips on fabric choices, sewing tricks, and how to personalize your pencil case so it becomes one-of-a-kind. By the end of this guide, you will feel confident enough to make several versions for friends, family, or even as gifts.
Materials and Preparation for the Shark-Shaped Pencil Case
Before you begin with the how to make a shark-shaped pencil case Step by Step Tutorial, the first step is gathering all the materials you will need. Being prepared helps you stay organized and makes the whole process smoother.
You will need fabric for the shark’s body—cotton or canvas works well because they are durable yet easy to sew. You will also need a zipper, which will act as the shark’s mouth. Make sure to choose a zipper long enough for your pencil case size so it opens wide enough to fit your supplies.
In addition to fabric and a zipper, you will need thread, scissors, pins, and a sewing machine or needle if you plan to sew by hand. A fabric marker or chalk is helpful for drawing your pattern before cutting the fabric pieces.
Stuffing material may be optional, but some people like to add a slight padding inside the shark’s fins or tail to give it a more three-dimensional look. This can make your shark-shaped pencil case even cuter and more realistic.
Having all your materials ready before you start prevents interruptions. It also ensures that once you begin sewing, you can focus entirely on the creative process.
Finally, prepare a clean and well-lit workspace. A comfortable environment makes sewing more enjoyable and helps avoid mistakes, especially when working on details like the shark’s fins or eyes.
Cutting and Sewing the Fabric Pieces
Now that you have everything prepared, it is time to start following the how to make a shark-shaped pencil case Step by Step Tutorial by cutting and sewing the fabric pieces. This is where the project really begins to take shape.
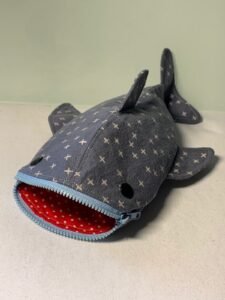
Start by drawing the shark shape on the wrong side of your fabric using fabric chalk or a washable marker. You will need two main body pieces, two side fins, one tail fin, and small pieces for the dorsal fin and eyes. Make sure the pieces match in size so that when you sew them together, the pencil case will look symmetrical.
Cut the fabric carefully along your drawn lines. Take your time because accurate cutting ensures a neater final result. If you are making this for the first time, you can even create a paper template beforehand to trace onto the fabric.
Next, prepare the zipper section. Pin the zipper between the two body pieces where the mouth will be. When you sew the zipper in place, it will allow your pencil case to open and close smoothly, functioning like a real shark’s mouth.
Sew the main body pieces together, leaving the zipper section open for now. Then attach the side fins and tail fin by sewing them between the body layers so they stick out once the pencil case is turned right side out.
After sewing all the pieces, carefully turn the pencil case right side out through the zipper opening. You should already see the basic shape of the shark forming, with its fins and tail sticking out nicely.
Adding Details and Personality
The next step in our how to make a shark-shaped pencil case Step by Step Tutorial is adding details that give the shark its personality. These small touches are what transform a simple pencil case into a fun and playful design.
Start with the shark’s eyes. You can use fabric scraps, felt, or even buttons to create eyes. Sew or glue them onto the top of the shark’s head, making sure they are evenly placed. The eyes bring your shark to life and give it a friendly or fierce expression, depending on your preference.
If you want to add teeth, cut small white felt triangles and sew or glue them along the inside edge of the zipper. When the zipper is open, the teeth will show, making it look like the shark’s mouth is ready to “bite.” This is a fun detail that kids especially love.
You can also decorate the body of the shark with fabric paint or embroidery to add gills or patterns. Some people like to stitch small lines to resemble scales or waves, giving the pencil case an extra touch of creativity.
Consider personalizing the pencil case with initials or a name stitched onto the side. This makes it a unique gift or a special item for yourself that no one else will have.
Adding stuffing to the fins or tail can also enhance the three-dimensional effect, making the shark look fuller and more realistic while still being practical as a pencil case.
Finally, give the entire pencil case a good press with an iron to smooth out wrinkles and give it a neat, finished look.
Final Assembly and Finishing Touches
The last stage of the how to make a shark-shaped pencil case Step by Step Tutorial is completing the final assembly and making sure everything is secure and functional.
Double-check the zipper to ensure it opens and closes smoothly without catching on any fabric. If the zipper edges are too close to the fabric seams, trim or adjust them slightly for a better fit.
Reinforce the seams along the body if necessary. A pencil case will be used frequently, so strong seams help it last longer and prevent fraying over time.
Look at the shark’s overall shape and symmetry. Make any small adjustments to the fins, tail, or eyes to ensure everything looks balanced and even.
Trim any loose threads for a clean finish. This small step makes a big difference in the overall appearance and professionalism of your project.
If you added decorative details like teeth or embroidery, make sure they are securely attached so they won’t come off with use.
At this point, your shark-shaped pencil case should be fully functional and ready to use. Fill it with pencils, pens, or markers and enjoy your handmade creation.
FAQ about How to Make a Shark-Shaped Pencil Case
1. Is this project beginner-friendly?
Yes, the how to make a shark-shaped pencil case Step by Step Tutorial is simple enough for beginners, especially if you follow each step carefully.
2. Do I need a sewing machine?
While a sewing machine makes the process faster, you can sew everything by hand if you prefer. It just takes a bit more time and patience.
3. What type of fabric works best?
Cotton, canvas, or denim are great choices because they are easy to sew and sturdy enough for daily use.
4. Can I wash the shark-shaped pencil case?
Yes, but it’s best to hand wash it gently and air dry to keep the shape intact.
5. How long does it take to complete the project?
For beginners, it may take 2–3 hours, while experienced sewers can finish it in about an hour.
6. Can I make different sizes?
Absolutely. Simply adjust the pattern size to create smaller or larger pencil cases depending on your needs.
Conclusion
In this complete how to make a shark-shaped pencil case Step by Step Tutorial, we covered everything from gathering materials and cutting fabric to sewing, adding details, and finishing your project.
This DIY craft is fun, practical, and customizable, making it a perfect weekend project for beginners and experienced crafters alike.
Now it’s your turn to try this tutorial. We would love to hear your honest opinion and any suggestions for improving future guides. Share your experience and let us know how your shark-shaped pencil case turned out.