
If you have been looking for a creative and fun crochet project, this Crochet square strawberry- Step by Step Tutorial is exactly what you need. Crochet squares are versatile and widely used in making blankets, bags, home décor, and other creative items. Adding a strawberry design to your crochet square makes it even more charming and perfect for a fresh, summery look. This guide will teach you everything you need to know to make a beautiful strawberry square, even if you are a beginner.
Crochet is a relaxing and rewarding hobby that allows you to create unique handmade pieces. The Crochet square strawberry- Step by Step Tutorial will help you learn how to combine basic stitches with simple techniques to create an eye-catching design. Whether you want to make a single square for a coaster or many squares for a larger project, this tutorial will provide clear instructions to ensure success.
One of the best things about this project is that it does not require advanced skills. As long as you know how to make chains, single crochets, and double crochets, you will be able to follow along easily. By the end of this Crochet square strawberry- Step by Step Tutorial, you will have a delightful piece ready to be used in your next craft project or gifted to someone special.
Materials and Preparation for the Crochet Square Strawberry
To begin this Crochet square strawberry- Step by Step Tutorial, you need to gather some basic materials. Having everything ready before you start will make the process smooth and enjoyable. The main items you will need include yarn in different colors, a suitable crochet hook, scissors, a yarn needle, and a stitch marker if necessary.
Choosing the right yarn is an important step. For a strawberry square, you will need at least three colors: red or pink for the strawberry body, green for the leaves, and white or another neutral shade for the square background. Cotton yarn is an excellent choice because it gives a clean and sturdy finish, making your square look neat and professional.
The crochet hook size depends on the yarn you choose. Most yarn labels provide recommendations for the best hook size. Typically, a 3.5 mm to 4 mm hook works well for medium-weight yarn, but always check the yarn label for guidance. Using the correct hook ensures that your stitches are even and the square turns out the right size.
Having scissors handy is important for cutting yarn cleanly, while a yarn needle will help you weave in ends neatly once you finish the project. A stitch marker can be helpful if you want to keep track of rounds or specific stitches, especially if you are new to crocheting.
Before starting the square, make sure you are comfortable with basic crochet stitches such as chains (ch), single crochet (sc), and double crochet (dc). If you are new to crochet, practicing these stitches beforehand will make the tutorial easier to follow.
Once all materials are ready, you can move on to the first steps of this Crochet square strawberry- Step by Step Tutorial and begin creating your beautiful design.
Step-by-Step Instructions for Making the Crochet Square Strawberry
Now we will begin the actual process of creating the strawberry square. This part of the Crochet square strawberry- Step by Step Tutorial will guide you through each stage, from making the strawberry to completing the square around it.
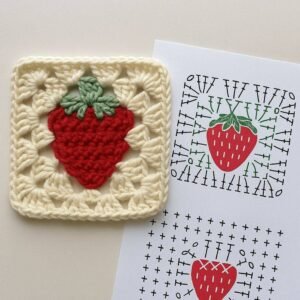
Start by making the strawberry body using red or pink yarn. Create a magic ring, then work a certain number of stitches into the ring—usually double crochets—so that they form a triangular shape. This will be the base of your strawberry design. Adjust the number of stitches depending on how large you want the strawberry to be.
Next, add the green leaves at the top of the strawberry. Switch to green yarn and crochet small pointed shapes along the top edge of the strawberry triangle. These will look like the leafy cap of a real strawberry and add charm to your design.
Once the strawberry itself is complete, it is time to create the square background. Using a neutral yarn color, begin working around the strawberry design in rounds. Add stitches evenly on all sides so that the shape turns into a neat square.
Remember to keep your tension consistent as you work. Uneven tension can cause the square to warp or lose its shape. If needed, block the finished square by gently wetting and pinning it to shape so it dries evenly.
At this stage, you can also add small details like embroidered seeds on the strawberry using black or yellow yarn. This step is optional, but it gives the strawberry a more realistic and decorative look.
By following these steps carefully, you will have a beautiful crochet square with a strawberry design at the center, ready to be used in larger projects or displayed on its own.
Creative Ways to Use Your Crochet Square Strawberry
After completing your Crochet square strawberry- Step by Step Tutorial, you might wonder how to use your finished squares. The possibilities are endless, and you can get creative with different ideas depending on how many squares you make.
One of the most popular uses for crochet squares is making blankets or throws. By creating multiple strawberry squares and joining them together, you can make a colorful and unique blanket perfect for summer décor or as a special handmade gift.
Another fun idea is to use the squares to make decorative pillow covers. Simply sew or crochet the squares together to the size you need, add a fabric backing, and you will have a charming strawberry-themed pillow for your home.
Smaller projects like table runners, placemats, or coasters are also great options. A single square can work perfectly as a coaster, while several joined together can create a larger table decoration.
If you like fashion accessories, you can even turn crochet squares into tote bags or pouches. Lining the inside with fabric adds durability, and the strawberry design will make your accessory stand out.
For those who enjoy making gifts, crochet squares can be incorporated into handmade items like aprons, wall hangings, or baby blankets. The strawberry design is cheerful and appealing, making it suitable for all ages.
By experimenting with different projects, you can turn your simple strawberry square into something functional and beautiful for everyday use.
Tips for Beginners and Common Mistakes to Avoid
As you follow this Crochet square strawberry- Step by Step Tutorial, there are some helpful tips to keep in mind to make the process smoother and more enjoyable.
First, always check your stitch count at the end of each round. A common mistake is accidentally adding or missing stitches, which can cause the square to become uneven or lopsided. Keeping track of your stitches ensures a neat and symmetrical result.
Second, practice changing yarn colors smoothly. Since the strawberry design involves multiple colors, learning how to switch colors without leaving gaps or loose ends will make your work look cleaner and more professional.
Third, pay attention to your tension. Beginners often crochet too tightly or too loosely, which can affect the size and shape of the square. Try to maintain a relaxed and even tension throughout the project.
Blocking your finished square is another useful step. This process involves lightly wetting the square and pinning it to the correct dimensions while it dries. Blocking helps the square lie flat and gives it a polished appearance.
Do not be afraid to unravel and redo a section if needed. Crochet is forgiving, and fixing mistakes early will save you frustration later in the project.
Finally, enjoy the process! Crocheting should be fun and relaxing, so take your time and appreciate the creativity involved in making each square.
FAQ About Crochet Square Strawberry
1. Is the Crochet square strawberry- Step by Step Tutorial suitable for beginners?
Yes, this tutorial is beginner-friendly and uses basic stitches that are easy to learn.
2. How long does it take to make one square?
The time varies depending on your skill level, but most people can complete one square in under an hour.
3. Can I use different yarn types for this project?
Yes, you can experiment with various yarns, but cotton yarn gives the best stitch definition.
4. How do I join multiple squares together?
You can use slip stitches, single crochet, or sewing to join the squares, depending on your preference.
5. Do I need to block the finished squares?
Blocking is optional but recommended for a professional finish and even shape.
6. Can I sell items made using this tutorial?
Yes, handmade items can be sold, especially when you add your personal touch or variations.
Conclusion
This Crochet square strawberry- Step by Step Tutorial has shown you how to create a beautiful and versatile crochet square with a fresh strawberry design.
We covered everything from materials and basic stitches to creative project ideas and tips for success.
Now it is your turn to try this project and share your results. Leave your honest opinions and suggestions so others can learn from your experience and get inspired to start their own crochet journey.