
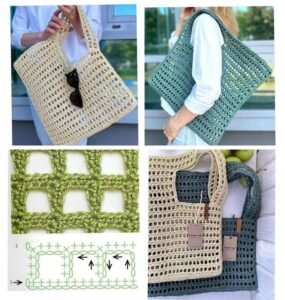
Making a Crochet beach bag- Step by Step Tutorial is a fun and creative way to combine style and practicality. A handmade beach bag not only stands out because of its unique design but also allows you to customize it according to your personal preferences. Using this tutorial, even beginners can learn to create a functional and beautiful bag for their summer adventures. The process is simple, rewarding, and a great opportunity to practice basic crochet skills.
Crocheting a beach bag offers many advantages, such as being able to choose the size, color, and type of yarn you prefer. When you follow a Crochet beach bag- Step by Step Tutorial, you will gain confidence in your crochet techniques and learn new stitches that can be used in future projects. This bag is perfect for carrying sunscreen, towels, and other beach essentials while showing off your crafting talent.
Throughout this article, we will guide you through the entire process of making your own Crochet beach bag- Step by Step Tutorial. From selecting the right materials to adding finishing touches, everything will be explained clearly and simply. This tutorial is designed to be beginner-friendly, ensuring that even someone who has never crocheted before can complete it successfully.
Choosing Materials for Your Crochet Beach Bag
The first step in any Crochet beach bag- Step by Step Tutorial is gathering the right materials. Your choice of yarn and hook size will affect the final look, texture, and durability of the bag. Cotton yarn is usually the most recommended because it is strong, washable, and holds its shape well. It also resists moisture, which is important for a beach accessory.
For the crochet hook, check the yarn label to see the recommended size. A medium to large hook works well for this project because it creates a slightly looser fabric, giving the bag some flexibility and space for carrying items. You will also need a pair of scissors, a yarn needle for weaving in ends, and optional accessories like wooden handles or lining fabric if you want a more polished finish.
Color selection is completely up to you. Some people prefer bright, summery colors like yellow, blue, or pink, while others go for neutral tones like beige or gray. The beauty of making a Crochet beach bag- Step by Step Tutorial is that you can personalize it according to your style. You might even want to add stripes or color-block sections to make the design more interesting.
Choosing strong and high-quality materials ensures your bag will last longer. This is especially important because beach bags often carry heavier items like water bottles or books. Make sure the yarn you choose does not stretch too much; otherwise, the bag might lose its shape over time.
Handles are another essential part of your beach bag. You can crochet them directly as part of the design or attach ready-made handles made of wood, bamboo, or leather for a stylish touch. Both options work well; it just depends on the look you want to achieve.
Finally, before starting, make sure you have all your supplies in one place. Being organized will make the whole process smoother and more enjoyable. When everything is ready, you can move on to creating the base of your bag.
Making the Base of the Crochet Beach Bag
The base is one of the most important parts of the Crochet beach bag- Step by Step Tutorial because it determines the shape and size of your bag. Most beginners start with a simple oval or rectangular base using basic stitches like single crochet or half double crochet. These stitches are easy to learn and create a strong foundation.
To begin, make a chain that matches the length you want for your bag. For example, if you want a medium-sized bag, you might start with 25–30 chains. Work single crochet stitches along the chain, then continue around the opposite side to create an oval shape. This method gives you a seamless base without sharp corners.
After completing the first round, continue crocheting around the base, increasing stitches at each end to keep the oval shape. The more rounds you add, the larger the base becomes. Stop increasing once the base reaches your desired size. Remember that the size of the base directly affects the capacity of the bag.
Maintaining even tension is important when making the base. Uneven stitches can cause bumps or an irregular shape. Take your time to ensure every stitch is the same size. This will make the rest of the bag look neat and professional.
If you prefer a flat bottom, you can use a denser stitch pattern. On the other hand, a looser pattern creates a more flexible base, which some people like for a casual beach style. Choose the one that matches your preference.
Once the base is complete, you are ready to start working upwards to form the body of the bag. This is where the project starts to take shape and becomes exciting to watch grow.
Building the Body of the Crochet Beach Bag
The body of the Crochet beach bag- Step by Step Tutorial is where you can get creative with stitch patterns and colors. For beginners, using simple stitches like half double crochet or double crochet makes the process easy and quick. These stitches create a nice texture while allowing the bag to remain lightweight.
Start crocheting in rounds without increasing stitches so the sides grow straight up from the base. This technique gives the bag depth and height. Decide in advance how tall you want the bag to be. Most beach bags are around 12–15 inches tall, but you can adjust according to your needs.
Adding color changes is a fun way to make your bag more interesting. For example, you could crochet several rows in one color, then switch to another for a striped effect. This simple technique gives the bag a stylish, modern look without making the project more difficult.
If you want extra strength, consider adding a round of slip stitches occasionally. This tightens the fabric and prevents the bag from stretching too much when it’s full. It’s a small detail that can make a big difference in durability.
You can also experiment with decorative stitches like shells or clusters if you feel confident. These patterns add texture and beauty but require a bit more attention to detail. Beginners might want to stick with basic stitches at first before trying more complex designs.
Continue crocheting until the bag reaches your desired height. At this point, it will already look like a functional bag, but adding handles will complete the project.
Adding Handles and Finishing Touches
The final part of the Crochet beach bag- Step by Step Tutorial is attaching handles and adding any finishing details. Handles can be crocheted as part of the final rounds or attached separately using strong yarn or thread. Make sure they are securely fastened since they will carry most of the weight.
For crocheted handles, leave gaps on each side of the bag where the handles will go. Chain the desired length, then skip the same number of stitches on the bag before continuing with regular stitches. On the next round, work over the chain to make it thicker and stronger.
If you prefer ready-made handles, sew them onto the bag using a yarn needle and sturdy thread. Wooden or bamboo handles give a natural, beachy look, while leather handles offer a more elegant style.
Adding a lining is optional but recommended if you plan to carry small items like keys or coins. A simple fabric lining prevents things from falling through the crochet holes and gives the bag a more professional finish.
Some people like to decorate their beach bags with tassels, pom-poms, or even crochet flowers. These accessories are easy to make and add a fun, personalized touch.
Finally, weave in all loose ends neatly with a yarn needle. This step might seem small, but it makes the bag look polished and ensures it lasts longer without unraveling.
Your Crochet beach bag- Step by Step Tutorial is now complete and ready to use on your next beach trip.
FAQ About Crochet Beach Bags
1. Can beginners really make a crochet beach bag?
Yes, this Crochet beach bag- Step by Step Tutorial is designed for beginners. It uses simple stitches and clear instructions so anyone can follow along.
2. How long does it take to finish a beach bag?
The time depends on your crochet speed and the size of the bag. Most people finish within a few days of casual crocheting.
3. What is the best yarn for a crochet beach bag?
Cotton yarn is ideal because it is strong, washable, and holds its shape well, making it perfect for carrying heavier items.
4. Can I wash my crochet beach bag?
Yes, if you use cotton yarn, the bag is usually machine washable. However, always check the yarn label for specific care instructions.
5. How can I make my bag stronger?
Using tighter stitches, adding a lining, or occasionally working a round of slip stitches will make the bag sturdier and longer-lasting.
6. Can I customize the size of the bag?
Absolutely! Just adjust the base size and the number of rounds for the body to make a smaller or larger bag.
Conclusion
In this Crochet beach bag- Step by Step Tutorial, we covered everything from choosing materials to making the base, building the body, and adding handles.
By following these simple steps, anyone can create a beautiful and functional beach bag.
Now it’s your turn to try making one. Share your honest opinion about this tutorial and let us know if you have suggestions for future projects. Your feedback helps us improve and create even better guides for crochet lovers everywhere.