
Learning How to make a fabric bag- Step by Step Tutorial is a wonderful way to explore your creativity while making something practical and beautiful. A fabric bag is not only environmentally friendly but also a versatile accessory that can be customized in countless ways. By making your own bag, you can choose the size, colors, and style to perfectly suit your needs and personality. Whether you want a casual tote for everyday use or a stylish gift for a friend, this tutorial will guide you through every detail.
The great thing about learning How to make a fabric bag- Step by Step Tutorial is that it does not require advanced sewing skills. Even if you are a beginner, you can achieve professional-looking results with just a few basic tools and techniques. Fabric bags are simple projects, making them ideal for those who want to practice sewing while creating something useful. Plus, handmade bags are sustainable alternatives to plastic or synthetic options, helping reduce waste and promoting eco-friendly habits.
In this article, we will take you through every step of the process. From choosing the right fabric and materials to cutting, sewing, and adding final touches, everything will be explained in detail. By the end of this How to make a fabric bag- Step by Step Tutorial, you will have the knowledge and confidence to create your own unique bags and perhaps even experiment with different styles and designs in the future.
Choosing the Right Materials for Your Fabric Bag
Before you start learning How to make a fabric bag- Step by Step Tutorial, the first step is gathering the right materials. The type of fabric you choose will greatly influence the appearance, durability, and purpose of your bag. Cotton is one of the most popular choices because it is easy to work with, affordable, and available in countless colors and patterns.
If you want a stronger bag for carrying heavier items, canvas or denim might be a better option. These fabrics provide sturdiness and hold their shape well, making them perfect for shopping bags or backpacks. For a more elegant look, you can use linen or lightweight upholstery fabrics, which give a stylish and professional finish.
In addition to fabric, you will need basic sewing supplies such as scissors, measuring tape, pins, thread, and a sewing machine. While it is possible to sew by hand, using a sewing machine will save time and create stronger seams. Beginners often find straight stitches easiest to manage, which are perfect for this project.
Handles are another important consideration. You can make fabric handles using the same or a contrasting material, or you can use ready-made options like leather straps or rope handles for a unique touch. Whatever you choose, make sure they are comfortable to hold and securely attached.
Lining fabric is optional but highly recommended if you want a professional finish. A lining prevents raw fabric edges from showing and adds durability. It can also be a chance to use a fun, colorful fabric inside the bag, giving it a surprise element when opened.
Finally, gather any decorative elements you might want to add, such as buttons, patches, or embroidery. These small details can transform a simple bag into a truly personalized accessory.
Cutting and Preparing the Fabric
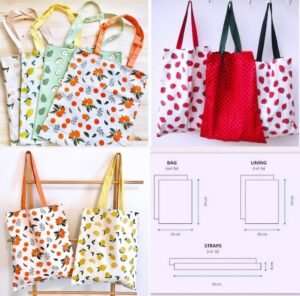
Now that you have chosen your materials, the next step in How to make a fabric bag- Step by Step Tutorial is cutting and preparing the fabric. Start by deciding the size of your bag. A standard tote bag often measures about 15 inches wide and 16 inches tall, but you can adjust these dimensions according to your needs.
Begin by cutting two identical rectangles for the main body of the bag. Make sure your measurements are accurate to avoid uneven edges later. If you are adding a lining, cut two more rectangles of the same size using the lining fabric. Precision at this stage ensures that everything fits together smoothly when sewing.
If you want to include pockets, now is the time to cut them out as well. Pockets can be made from leftover fabric and sewn onto the main body pieces before assembling the bag. They add functionality and style, giving you extra storage space for small items.
For the handles, cut two long strips of fabric, typically about 2 inches wide and 20 inches long. If you prefer thicker handles, cut wider strips or use interfacing for added strength. Pressing the strips with an iron before sewing will help them hold their shape better.
Pin all pieces together where needed, especially if you are adding pockets or decorations. Taking time to organize your fabric pieces before sewing helps prevent mistakes and ensures a smoother sewing experience.
Lastly, double-check all your fabric pieces to confirm you have everything ready: main body pieces, lining, handles, and any extras. With proper preparation, the sewing process will be much easier and faster.
Sewing the Fabric Bag Together
This is the most exciting part of How to make a fabric bag- Step by Step Tutorial because you will start seeing the bag take shape. Begin by sewing the two main body pieces together along the sides and bottom, leaving the top open. Use a straight stitch and backstitch at the beginning and end to secure the seams.
If you have chosen to add a lining, repeat the same process with the lining fabric pieces. Sew them together along the sides and bottom, also leaving the top open. Later, the lining will be inserted inside the bag to hide raw seams and create a neat finish.
Next, prepare the handles by folding each strip of fabric lengthwise with the right sides facing in. Sew along the edge, then turn them right side out using a safety pin or turning tool. Press with an iron to flatten them for a clean look.
Before attaching the lining, place the handles on the main bag, positioning them evenly on each side. Pin them securely, making sure they are not twisted. Then place the lining inside the main bag, with the right sides facing each other and the handles sandwiched in between.
Sew around the top edge of the bag, leaving a small gap for turning it right side out. Once sewn, pull the bag through the opening so the right sides are visible and the handles are sticking out. Press the edges flat for a polished finish.
Finally, close the opening by topstitching around the entire top edge of the bag. This not only seals the gap but also reinforces the handles, making them stronger for carrying heavy items.
Adding Final Touches and Personalization
The last part of How to make a fabric bag- Step by Step Tutorial is adding final touches to make your bag unique. At this stage, you can add buttons, decorative stitching, embroidery, or even fabric paint to give your bag a personalized look.
Topstitching around the edges is a simple way to add strength and style. It keeps the seams flat and creates a professional finish. You can use matching thread for a subtle effect or contrasting thread for a bold design.
If you want to add a closure, consider sewing on a magnetic snap, Velcro, or even a zipper. These options help keep your belongings secure, especially if you plan to use the bag for shopping or travel.
Some people like to box the corners of their bags for a flat bottom. To do this, fold the bottom corners of the bag into triangles and sew across them. This technique creates extra space inside the bag, making it roomier and more practical.
Adding interior pockets is another great idea. You can create one or two small compartments inside the lining for items like keys, phones, or wallets. This keeps things organized and easy to find.
Finally, give your bag a final press with an iron to smooth out any wrinkles. Your handmade fabric bag is now complete and ready to use or gift to someone special.
FAQ About Making Fabric Bags
1. Do I need a sewing machine to make a fabric bag?
No, but a sewing machine makes the process faster and creates stronger seams. Hand sewing is possible but takes more time.
2. What type of fabric is best for beginners?
Cotton is the easiest fabric to work with because it is soft, easy to cut, and widely available in many designs.
3. Can I wash my handmade fabric bag?
Yes, most fabric bags can be machine washed, especially if you use cotton or similar fabrics. Just check the care instructions for the materials used.
4. How long does it take to make a fabric bag?
A simple tote bag can be completed in one to two hours, depending on your sewing experience and design complexity.
5. Can I make fabric bags to sell?
Absolutely! Handmade fabric bags are popular at craft fairs and online shops because they are eco-friendly and customizable.
6. How do I make my bag stronger?
Use sturdy fabrics like canvas, reinforce the seams, and consider adding a lining or interfacing for extra durability.
Conclusion
In this How to make a fabric bag- Step by Step Tutorial, we covered everything from choosing fabrics and preparing materials to sewing, adding handles, and personalizing the final design.
By following these steps, even beginners can create beautiful and functional fabric bags with ease.
Now that you have learned how to make your own fabric bag, we would love to hear your honest opinion and suggestions. Share your thoughts and ideas for future tutorials so we can keep improving and inspiring creativity!