
Learning how to crochet a witch hat- Step by Step Tutorial is a fun and creative way to prepare for Halloween, themed parties, or even as a unique fashion accessory for costume lovers. This guide will walk you through the entire process of making a stylish and charming witch hat using only basic crochet skills. Whether you are a beginner or an experienced crocheter, this project will be easy to follow and enjoyable from start to finish.
The best part about this how to crochet a witch hat- Step by Step Tutorial is that you can customize your hat in different sizes and colors. From the classic black witch hat to vibrant purple or orange versions, the possibilities are endless. Adding decorative elements such as ribbons, flowers, or even little stars will make your handmade hat truly one-of-a-kind. This flexibility allows you to create a piece that fits your personality or matches the theme you have in mind.
Crocheting a witch hat is also a fantastic way to improve your crafting skills while making something useful. You will practice stitches, shaping techniques, and learn how to give structure to a project. Plus, handmade items always carry a personal touch that store-bought accessories can’t match. By following this how to crochet a witch hat- Step by Step Tutorial, you will not only create a beautiful hat but also gain confidence in your crochet abilities.
Materials and Tools for Crocheting a Witch Hat
Before we start the how to crochet a witch hat- Step by Step Tutorial, let’s gather the necessary materials. Having everything ready will make the process smoother and more enjoyable.
First, you will need yarn in the color of your choice. For a traditional witch hat, black yarn is the classic option, but don’t be afraid to experiment with bold or pastel shades for a modern twist. Acrylic or cotton yarn works well because both are sturdy yet comfortable to wear.
Second, choose a crochet hook size appropriate for your yarn thickness. Check the yarn label for recommendations. Generally, a 4mm to 5mm hook is a good size for hats because it creates a dense and structured fabric without being too stiff.
You will also need scissors and a yarn needle to cut and weave in ends neatly. A measuring tape is useful for ensuring your hat reaches the correct size, especially if you are making it for children or adults with specific head measurements.
Optional materials include decorative ribbons, buttons, or crocheted appliqués. These details can turn a simple witch hat into a stylish accessory or a themed costume piece.
Finally, keep some stitch markers handy if you are new to crocheting in the round. They help you keep track of increases and decreases, ensuring your hat maintains the right shape throughout the process.
Step-by-Step Instructions for Crocheting the Witch Hat
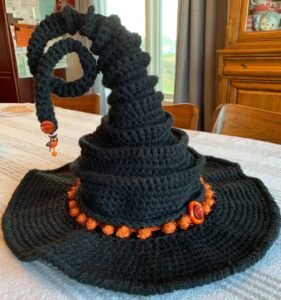
The how to crochet a witch hat- Step by Step Tutorial involves three main sections: the crown, the body, and the brim. Each part builds upon the previous one to create a tall, pointy, and structured hat that holds its shape well.
Begin with the crown by making a magic ring and working single or double crochet stitches in the round. Increase gradually in each round to form a cone shape. The taller you want the hat, the more rounds you will need before reaching the body section.
Once the crown is complete, continue crocheting evenly to form the body of the hat. This section is usually worked without increases so the hat keeps its height and doesn’t flare out prematurely. Measuring as you go will help you achieve the right proportions.
After the body, it’s time to create the brim, which gives the hat its iconic look. Start increasing stitches again so the fabric begins to flare outward. The more increases you make, the wider and floppier the brim will be, while fewer increases keep it narrow and structured.
Blocking the finished hat is recommended, especially for larger sizes. This process involves shaping the hat with steam or water and letting it dry in the desired shape. It helps the crown stay pointy and the brim stay flat.
At this point, you can add decorative elements such as ribbons tied around the base or crocheted flowers for a softer, whimsical look. Personalization makes each project unique, so feel free to be creative with colors and embellishments.
Tips for Customizing Your Witch Hat
One of the best things about the how to crochet a witch hat- Step by Step Tutorial is that it can be easily customized to suit different tastes, occasions, and styles. Even beginners can adapt the basic pattern to create something special.
Changing the yarn type or hook size can dramatically alter the final look. For example, using bulky yarn and a larger hook creates a softer, slouchier hat, while thinner yarn gives a more delicate and structured appearance.
Color choices also make a big difference. A classic black witch hat is perfect for Halloween, but experimenting with purple, green, or even multicolored yarns adds a playful twist. Metallic yarns can give the hat a magical sparkle under the light.
Adding embellishments is another way to personalize your project. Crochet small pumpkins, stars, or bats to sew onto the brim for a festive look. Alternatively, wrap a wide satin ribbon around the base of the crown and tie it into a bow for elegance.
For a witchy aesthetic, consider attaching long crocheted braids or tassels to the sides. They not only look fun but also add texture and movement to the design.
If you want a dramatic effect, make the brim extra wide by continuing to increase stitches for several more rounds. This creates a theatrical, fairy-tale style perfect for costumes or photo shoots.
Benefits of Learning to Crochet a Witch Hat
Following this how to crochet a witch hat- Step by Step Tutorial offers more than just a finished accessory. It also provides valuable crafting and personal benefits that go beyond the final product.
First, crocheting improves hand-eye coordination and fine motor skills. Working with yarn and hooks requires precision, and regular practice strengthens these abilities over time.
Second, crochet is known for its calming and stress-reducing effects. The repetitive motions help many people relax and focus, making it an ideal hobby for mental well-being.
Third, completing a project like a witch hat gives a sense of accomplishment. Wearing or gifting something handmade always feels rewarding because of the time and care invested in it.
Another benefit is cost-effectiveness. A handmade witch hat is often cheaper than buying a store-bought version, especially if you already have leftover yarn from previous projects.
Finally, crocheting opens the door to a supportive crafting community. Many people share patterns, tips, and photos online, allowing you to learn, improve, and connect with others who share your interests.
FAQ – How to Crochet a Witch Hat
Q1: Is this project beginner-friendly?
Yes, this how to crochet a witch hat- Step by Step Tutorial uses basic stitches and simple shaping, making it perfect for beginners.
Q2: How long does it take to make a witch hat?
It depends on your speed, but most people complete it in a few hours or over a weekend.
Q3: Can I wash the crocheted witch hat?
Yes, hand wash gently in cold water and let it air dry to maintain its shape.
Q4: How can I make the hat stiffer?
You can use fabric stiffener or spray starch on the brim and crown after crocheting for extra structure.
Q5: Can I resize the hat for children?
Absolutely. Simply reduce the number of rounds when making the crown and body for a smaller version.
Q6: What stitches work best for this project?
Single crochet or half-double crochet stitches are commonly used because they create a dense and sturdy fabric.
Conclusion
In this guide on how to crochet a witch hat- Step by Step Tutorial, we explored everything from gathering materials to customizing and finishing the hat with creative details.
You learned about shaping the crown, body, and brim, as well as tips for personalization and practical advice for beginners.
Now it’s your turn to try this fun and rewarding project. Share your honest opinions and suggestions after making your own witch hat so others can learn from your experience and get inspired to start crocheting too!