
Learning How to Crochet a Beautiful Butterfly- Step by Step Tutorial is a delightful way to combine creativity, relaxation, and craftsmanship into one enjoyable project. Crochet butterflies are small, colorful, and versatile, making them perfect for decorating clothes, bags, home décor, or even as gifts for loved ones. Whether you are new to crochet or have some experience, this tutorial will help you create stunning butterflies that can brighten up any project.
The best part about crocheting butterflies is that they require only a small amount of yarn and can be completed in a short amount of time. This makes them ideal for using leftover yarn from other projects, helping you reduce waste while creating something beautiful. As we go through this step-by-step tutorial, you will learn the basic stitches needed, how to shape the wings perfectly, and how to add creative touches to make your butterfly unique.
In addition to being a fun craft, learning How to Crochet a Beautiful Butterfly- Step by Step Tutorial can be a relaxing hobby. Many people find that crocheting helps relieve stress, improves focus, and provides a sense of accomplishment. By the end of this article, you will have all the knowledge you need to make your own butterflies and possibly inspire others to try this rewarding craft.
Materials Needed for How to Crochet a Beautiful Butterfly- Step by Step Tutorial
Before starting the How to Crochet a Beautiful Butterfly- Step by Step Tutorial, it is important to gather all the necessary materials. Having everything prepared will make the process smooth and enjoyable.
The first thing you will need is yarn. For beginners, medium-weight yarn is ideal because it is easy to handle and provides a good structure for the butterfly. You can choose any color you like, but bright and contrasting colors often work best to highlight the beauty of the wings.
Next, you will need a crochet hook. The size of the hook depends on the thickness of the yarn you choose. A commonly used hook size for medium-weight yarn is 4 mm or 5 mm, but always check the yarn label for recommendations.
You will also need a pair of scissors to cut the yarn neatly when finishing your project. A yarn needle is essential for weaving in the loose ends and attaching different parts if needed.
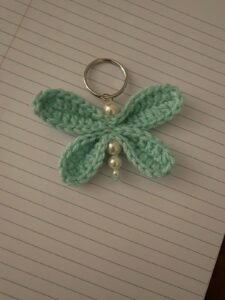
If you want to decorate your butterfly, consider adding beads, sequins, or embroidery to the wings after crocheting. These details can make each butterfly unique and special.
Finally, having a comfortable and well-lit workspace will make crocheting easier and more enjoyable. A small basket or container to keep your tools organized is also helpful.
Once you have gathered all your materials, you are ready to begin creating your crochet butterfly.
Basic Stitches for How to Crochet a Beautiful Butterfly- Step by Step Tutorial
To follow this How to Crochet a Beautiful Butterfly- Step by Step Tutorial, you need to know a few basic crochet stitches. These stitches form the foundation of most crochet patterns and are simple to learn.
The first stitch is the chain stitch, often abbreviated as “ch” in crochet patterns. It creates a simple chain of loops and is usually the starting point for most projects. Practice making a few chain stitches until you feel comfortable with the motion.
Next is the slip stitch, abbreviated as “sl st.” This stitch is used to join different parts of the crochet work or to move the yarn without adding height to the row. It is quick and easy to learn, making it very useful for shaping your butterfly.
The single crochet stitch, abbreviated as “sc,” is one of the most common stitches. It creates a dense and tight fabric, which is great for the butterfly’s body and small details.
The half double crochet stitch, abbreviated as “hdc,” is slightly taller than the single crochet. It provides a nice balance between tightness and height, making it perfect for creating the wings of the butterfly.
The double crochet stitch, abbreviated as “dc,” is taller than both the single and half double crochet stitches. It is often used to create larger shapes and patterns, such as the rounded edges of butterfly wings.
Finally, learning how to increase and decrease stitches will help shape your butterfly properly. Increasing adds stitches to make the work wider, while decreasing removes stitches to make it narrower.
With these basic stitches, you will be ready to follow the step-by-step instructions to create your beautiful butterfly.
Step by Step Instructions for How to Crochet a Beautiful Butterfly- Step by Step Tutorial
Now let’s go through the actual How to Crochet a Beautiful Butterfly- Step by Step Tutorial so you can start creating your first butterfly. We will break it down into easy steps to ensure you understand the entire process.
Start by making a slip knot and chaining six stitches. Join the chain with a slip stitch to form a small ring. This ring will be the center of your butterfly.
Next, chain three stitches to start the first wing. Work three double crochet stitches into the center ring, followed by two chain stitches and a slip stitch to complete the first small wing.
For the second wing, chain three again, then work five double crochet stitches into the ring. Add two chains and a slip stitch to finish this larger wing. You should now have one small and one large wing on one side of the butterfly.
Repeat the process on the opposite side of the ring to create the third and fourth wings. Remember to mirror the pattern so that the butterfly looks symmetrical.
After completing all four wings, cut the yarn and pull it through the final loop to secure it. Use the yarn needle to weave in any loose ends and tidy up your work.
Finally, to create the butterfly’s antennae, cut a small piece of yarn, fold it in half, and tie it around the center of the butterfly. Trim the ends to the desired length, and your crochet butterfly is complete.
Creative Ideas and Uses for How to Crochet a Beautiful Butterfly- Step by Step Tutorial
Once you have mastered the How to Crochet a Beautiful Butterfly- Step by Step Tutorial, you can explore endless creative possibilities. Crochet butterflies can be used in many ways, adding charm and color to various projects.
One popular idea is to use crochet butterflies as appliqués on clothing, bags, or hats. Simply sew or glue the butterflies onto the fabric to create a personalized design.
Another idea is to attach a small magnet to the back of the butterfly and use it as a decorative fridge magnet. This is a fun way to display your crochet creations around the house.
You can also use crochet butterflies to decorate gift packages or greeting cards. Handmade decorations always add a special touch to presents and show thoughtfulness.
If you enjoy home décor projects, consider making a garland of crochet butterflies to hang on walls, windows, or doorways. String several butterflies together using yarn or ribbon for a cheerful decoration.
Crochet butterflies also make wonderful embellishments for baby blankets, headbands, or cushions. Their soft texture and bright colors add a playful element to any handmade item.
Lastly, you can sell or gift sets of crochet butterflies to friends and family. Handmade crafts are always appreciated, and butterflies symbolize beauty and transformation, making them meaningful gifts.
FAQ About How to Crochet a Beautiful Butterfly- Step by Step Tutorial
1. Is this tutorial suitable for beginners?
Yes, this How to Crochet a Beautiful Butterfly- Step by Step Tutorial is beginner-friendly and uses only basic stitches.
2. How long does it take to make one butterfly?
On average, it takes about 20–30 minutes to make a single butterfly, depending on your skill level.
3. Can I use different yarn types for this project?
Absolutely! Cotton, acrylic, or even blended yarns can be used to create different textures and effects.
4. How do I make the butterfly larger or smaller?
You can adjust the size by using thicker or thinner yarn and changing the number of stitches in each wing.
5. Can I wash crochet butterflies?
Yes, most yarn types are washable, but always check the yarn label for care instructions.
6. What can I do if my butterfly shape looks uneven?
Blocking the butterfly by pinning it into shape and lightly steaming it can help achieve a more symmetrical look.
Conclusion
In this article on How to Crochet a Beautiful Butterfly- Step by Step Tutorial, we covered everything from gathering materials and learning basic stitches to following detailed instructions and exploring creative uses for your crochet butterflies.
This project is perfect for beginners and experienced crafters alike, offering a quick and enjoyable way to create beautiful decorations.
We hope you enjoyed this tutorial and feel inspired to make your own crochet butterflies. Please share your honest opinion and suggestions in the comments so we can continue improving and providing helpful crafting guides for everyone.