
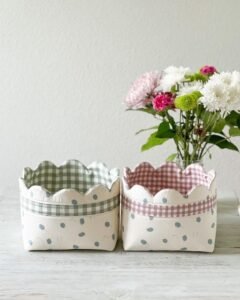
Learning how to sew a Large Scalloped Basket- Step by Step Tutorial is an exciting and creative project for anyone who enjoys sewing and home organization. This charming basket design combines practicality with a touch of elegance, making it ideal for storing household items while adding decorative flair to any room. Whether you are new to sewing or have years of experience, this tutorial will guide you through the entire process with clear instructions and helpful tips.
The great thing about sewing your own scalloped basket is the ability to customize it according to your personal style and needs. You can choose fabrics that match your home décor, select sizes that fit your storage requirements, and add embellishments to create a truly unique piece. By the end of this how to sew a Large Scalloped Basket- Step by Step Tutorial, you will have a beautiful, functional basket that you can proudly display or gift to someone special.
Before we begin, it’s important to note that this tutorial is beginner-friendly and designed to be easy to follow. Even if you have never sewn a scalloped edge before, the instructions will help you master the technique step by step. As you work through this how to sew a Large Scalloped Basket- Step by Step Tutorial, you will not only learn to create the basket but also gain confidence in your sewing skills, opening the door to many other creative projects in the future.
Materials and Tools for the Project
The first step in how to sew a Large Scalloped Basket- Step by Step Tutorial is gathering all the materials and tools you will need. Having everything prepared beforehand will make the sewing process smoother and more enjoyable.
You will need fabric for both the outer layer and the lining of your basket. Cotton or canvas fabrics work best because they provide structure and durability while still being easy to sew. For a decorative touch, consider using patterned fabric for the outside and a coordinating solid color for the lining.
Fusible interfacing is essential for giving your basket stiffness so it can hold its shape. Without interfacing, the fabric may collapse, and the basket won’t look as polished. Choose a medium to heavy-weight interfacing depending on how sturdy you want the final product to be.
Basic sewing tools like scissors, pins, measuring tape, and a sewing machine are also required. If you prefer, you can sew the basket by hand, but a machine will make the process faster and neater.
You will also need thread that matches your fabric colors for a seamless finish. Using a good-quality thread ensures your basket stays strong and lasts longer.
Finally, a fabric marker or chalk will help you mark cutting lines and scallop shapes accurately. This makes it easier to follow the pattern and achieve consistent results.
Cutting and Preparing the Fabric Pieces
Once all materials are ready, the next step in how to sew a Large Scalloped Basket- Step by Step Tutorial is cutting and preparing the fabric pieces. Precision is key here because neat cutting ensures the final basket looks professional.
Start by cutting two large rectangles of fabric for the basket body—one for the outer layer and one for the lining. The size depends on how big you want your basket to be, but both pieces should be the same dimensions for a perfect fit.
Next, cut matching pieces of fusible interfacing for each fabric layer. This will later be ironed onto the wrong side of the fabric to give it stiffness and structure. Follow the manufacturer’s instructions for applying interfacing properly.
For the scalloped edge, you can either draw freehand curves along the top of the outer fabric or use a template for perfectly even scallops. A simple round object, like a small bowl, can help you trace uniform curves easily.
Once the scallops are drawn, cut along the curves carefully. Sharp scissors are important for achieving smooth edges without fraying or jagged lines. Take your time with this step to ensure accuracy.
After all the pieces are cut, press them with an iron to remove wrinkles. Flat, smooth fabric pieces are much easier to sew and produce a more polished final basket.
Finally, layer the outer fabric, interfacing, and lining together to prepare for the next step—assembling the basket. This organization will save time and keep everything in order as you sew.
Sewing the Basket Together
Now comes the exciting part of how to sew a Large Scalloped Basket- Step by Step Tutorial: assembling and sewing the basket pieces together.
Begin by sewing the scalloped edge first. Place the outer fabric and lining with right sides together and stitch along the scalloped line you drew earlier. Take your time sewing around each curve for smooth, even scallops.
Once sewn, clip small notches along the curves without cutting through the stitches. This allows the fabric to turn smoothly when flipped right side out, giving the scallops a clean finish.
Turn the fabric right side out and press the scalloped edge with an iron. This will help define the curves beautifully and make the basket look neat and professional.
Next, sew the side seams of the basket. Fold the fabric in half with right sides together and stitch along the sides, leaving the top scalloped edge open. Repeat the same process for the lining fabric.
To create the basket’s bottom, pinch the lower corners so the side seam lines up with the bottom fold, forming a triangle. Measure a few inches from the point, mark a line across, and stitch. This creates a flat base that allows the basket to stand upright.
Finally, insert the lining into the outer basket with wrong sides together, matching the scalloped edges. Stitch around the top once more to secure everything in place, and your basket structure is complete.
Adding Details and Finishing Touches
The last stage in how to sew a Large Scalloped Basket- Step by Step Tutorial is adding final details and decorative touches. This step makes your basket unique and tailored to your personal style.
Consider sewing handles onto the basket for easy carrying. Fabric straps or even leather handles can be attached to the sides for a functional yet stylish addition.
You can also add interior pockets to store smaller items neatly inside the basket. These are easy to sew onto the lining before assembling the basket pieces together.
For a decorative flair, attach buttons, bows, or fabric flowers along the scalloped edge. These small details can transform a simple basket into a charming home accessory.
Embroidery is another creative option. Adding initials, patterns, or small designs gives the basket a personalized touch and makes it perfect for gifting.
If you plan to use the basket for seasonal décor, choose fabrics and embellishments that match the holiday theme, such as festive prints for Christmas or pastel colors for Easter.
Finally, give the entire basket one last press with the iron to smooth out any wrinkles and set the stitches. This ensures your finished basket looks neat and professional.
FAQ – How to sew a Large Scalloped Basket- Step by Step Tutorial
1. Can I sew a scalloped basket by hand instead of using a sewing machine?
Yes, it is possible, but it will take longer. A sewing machine provides cleaner stitches and saves time, especially for beginners.
2. What is the best fabric for a sturdy scalloped basket?
Cotton canvas or heavy-weight cotton works best because it is durable yet easy to sew.
3. How do I make the basket larger or smaller?
Simply adjust the measurements of your fabric pieces before cutting. Keep proportions consistent for best results.
4. Can I wash the fabric basket?
Yes, if you use washable fabrics and interfacing, the basket can be hand-washed or machine-washed on a gentle cycle.
5. Do I need a special template for the scallops?
No, you can draw freehand curves or use any round household item as a guide for uniform scallops.
Conclusion
We have covered how to sew a Large Scalloped Basket- Step by Step Tutorial from start to finish, including materials, cutting, sewing, and adding decorative touches.
This project is a fun and practical way to improve your sewing skills while creating something beautiful for your home.
Now it’s your turn to give it a try! Once you finish, share your honest opinions and suggestions—was the tutorial easy to follow? Did you enjoy making the basket? Your feedback helps us improve future guides and inspires others to start their own creative projects.