
If you have ever searched for How To Make Travel Neck Pillow- Step by Step Tutorial, you are probably looking for a practical, affordable, and personalized way to create your own travel pillow. Store-bought pillows can be expensive, and sometimes they do not fit your neck perfectly. Making your own neck pillow at home ensures maximum comfort while allowing you to choose your favorite fabric, size, and style. This guide will show you everything you need to know to make a functional and cozy travel neck pillow.
In this article, we will explain how to make a travel neck pillow from scratch, using simple materials and easy techniques. Whether you are a beginner or someone with sewing experience, you will find this tutorial easy to follow. We will break everything down into simple steps so that anyone can make a neck pillow without confusion.
The best part is that this How To Make Travel Neck Pillow- Step by Step Tutorial will also help you save money. Instead of buying an expensive pillow, you can make your own using fabric scraps or affordable materials found at home. Plus, you can personalize it with fun colors, patterns, and even add a removable cover for easy washing.
Materials Needed for Making a Travel Neck Pillow
Before starting the How To Make Travel Neck Pillow- Step by Step Tutorial, let’s list the materials you need. Having everything ready before you begin makes the process faster and more enjoyable.
You will need soft fabric for the pillow body, such as cotton or fleece. Fleece is ideal because it is warm and soft, but cotton works well if you prefer a cooler option. Make sure the fabric is washable, so your pillow stays fresh even after many trips.
Next, you will need filling material. The most common choice is polyester fiberfill, which is light and provides a soft, cushiony feel. You can also use memory foam pieces if you want a firmer pillow. Both options work well depending on your comfort preference.
A pair of fabric scissors is essential for cutting the fabric into the right shape. Make sure they are sharp to create clean edges. A measuring tape or ruler is also helpful to ensure accuracy when marking your pattern.
You will need a sewing machine or a needle and strong thread if you prefer hand sewing. A sewing machine will make the process faster, but hand sewing works perfectly fine if you are patient and want a relaxing DIY project.
Finally, a fabric marker or chalk will help you trace the pattern on the fabric before cutting. This ensures both sides of the pillow are symmetrical and properly aligned.
Having all these materials ready will make following this How To Make Travel Neck Pillow- Step by Step Tutorial much easier and more organized.
Step-by-Step Guide to Making a Travel Neck Pillow
Now that you have all the materials, let’s start the How To Make Travel Neck Pillow- Step by Step Tutorial. Each step is simple and easy to follow, even if you are a complete beginner.
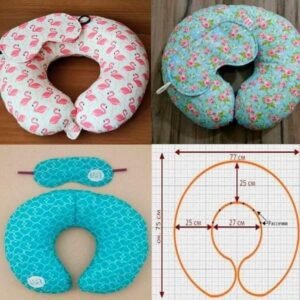
Start by creating the pillow pattern. A travel neck pillow usually has a U-shape to fit comfortably around your neck. You can draw this shape on paper first and then cut it out to use as a template. Make sure the size fits your neck well before cutting the fabric.
Place the fabric on a flat surface and fold it in half with the right sides facing each other. Pin the paper pattern onto the fabric and carefully cut around it. Since the fabric is folded, you will get two identical pieces for the front and back of the pillow.
Next, place the two fabric pieces together with the right sides facing each other. Pin the edges so they do not shift while sewing. Leave a small opening of about 3 inches on one side to turn the pillow right side out and fill it later.
Sew around the edges using a straight stitch, keeping the seam allowance even all around. If you are hand sewing, use a backstitch for strength. Remember to leave the small opening unsewn for now.
Once you finish sewing, carefully turn the pillow right side out through the opening. Use a pencil or a blunt stick to push out the corners so the shape looks neat and even.
Now it’s time to add the filling. Take small handfuls of polyester fiberfill or memory foam pieces and stuff the pillow evenly. Make sure you fill all areas so there are no empty spots. The pillow should be firm but still soft enough for comfort.
Finally, close the opening with a ladder stitch or by topstitching neatly along the edge. Your travel neck pillow is now complete and ready to use.
Tips for Personalizing Your Travel Neck Pillow
The beauty of this How To Make Travel Neck Pillow- Step by Step Tutorial is that you can customize your pillow any way you like. Personalization makes your pillow unique and more enjoyable to use.
Consider using fun printed fabrics that reflect your personality. For example, floral patterns, geometric prints, or even cartoon designs can make your pillow stand out.
You can also add a removable cover. To do this, simply make a second pillowcase with a zipper or buttons. This allows you to wash the cover without cleaning the entire pillow each time.
Another idea is to use different fabrics for each side. For instance, one side could be soft fleece for warmth, while the other side could be cool cotton for summer trips.
If you travel frequently, you might want to attach a small loop or handle to one side of the pillow. This makes it easy to carry or hang on your luggage.
Adding decorative stitching or embroidery is another way to make your pillow look special. You can sew your initials, a favorite quote, or even a small travel-themed design.
Lastly, consider making multiple pillows in different sizes for family members or friends. Personalized gifts like this are always appreciated and useful.
Benefits of Making Your Own Travel Neck Pillow
Making your own neck pillow offers many advantages beyond just saving money. This How To Make Travel Neck Pillow- Step by Step Tutorial provides both practical and creative benefits.
First, homemade pillows are fully customizable. You control the size, shape, and firmness, ensuring the pillow perfectly fits your needs.
Second, DIY pillows are usually cheaper than store-bought ones. Most materials are affordable, and you can even use fabric scraps left from other projects.
Third, making something by hand can be very relaxing and rewarding. Sewing or crafting helps reduce stress and gives you a sense of accomplishment when you finish a project.
Fourth, a homemade pillow is eco-friendly. You can reuse old fabrics or upcycle materials instead of buying new ones, reducing waste.
Fifth, it is a great activity to share with kids or friends. Making a travel pillow together can be a fun weekend project for the whole family.
Lastly, you end up with a high-quality product made with care and attention to detail, something mass-produced pillows cannot always offer.
FAQ About How To Make Travel Neck Pillow- Step by Step Tutorial
1. Do I need a sewing machine to make a travel neck pillow?
No, you can sew the pillow by hand using a needle and thread. It will take longer, but the results will be just as good.
2. What fabric is best for a neck pillow?
Soft fabrics like fleece, cotton, or flannel are ideal. They feel comfortable against the skin and are easy to wash.
3. How much filling do I need for one pillow?
It depends on the size, but usually about half a bag of polyester fiberfill is enough for a standard U-shaped pillow.
4. Can I wash the pillow in a washing machine?
If you make a removable cover, you can wash the cover easily. For the pillow itself, hand washing is recommended unless the filling is machine-safe.
5. Can I make the pillow in different sizes?
Yes, you can adjust the pattern to make small pillows for kids or larger ones for extra support.
6. How long does it take to make a travel neck pillow?
For beginners, it may take about 2 hours, but with practice, you can finish one in less than an hour.
Conclusion
In this How To Make Travel Neck Pillow- Step by Step Tutorial, we learned how to gather materials, cut the pattern, sew the pillow, add filling, and personalize it in creative ways. Making your own travel neck pillow is easy, affordable, and fun.
Now that you know the complete process, why not try it yourself? Share your honest opinion about this tutorial and leave suggestions for future DIY projects. We would love to hear your feedback and ideas!