
If you want to decorate your home with a cozy and festive touch this October, this Crochet Halloween Pumpkins- Step by Step Tutorial is perfect for you. Halloween decorations do not always have to be spooky; sometimes, a handmade crochet pumpkin can add the warmth and charm your space needs. In this guide, you will learn exactly how to crochet beautiful pumpkins step by step, even if you are new to crocheting.
The beauty of this Crochet Halloween Pumpkins- Step by Step Tutorial is that it uses simple stitches and beginner-friendly techniques. With just a few supplies and a little time, you can make decorative pumpkins in different sizes and colors to brighten up your home. You can even turn them into centerpieces, gifts, or seasonal ornaments.
As we go through this Crochet Halloween Pumpkins- Step by Step Tutorial, you will learn everything from choosing the right yarn and hook to shaping your pumpkin and adding final details. By the end of the tutorial, you will have a beautiful handmade decoration that you can proudly display year after year.
Materials and Tools Needed
Before you start working on your Crochet Halloween Pumpkins- Step by Step Tutorial, it is essential to gather all the necessary materials. Having everything ready makes the process smoother and more enjoyable.
First, you will need yarn. Cotton yarn is often recommended because it provides a nice texture and is easy to work with. However, you can also use acrylic yarn if you prefer brighter colors or a softer feel.
Second, you need a crochet hook that matches your yarn size. Usually, a 4 mm or 5 mm hook works well for this project. The hook size affects the tightness of your stitches, so make sure to choose the correct one for your yarn.
Third, you will need a tapestry needle for sewing the edges and shaping your pumpkin. This is important for closing the top and bottom neatly.
Fourth, stuffing material is required to give your pumpkin its shape. You can use polyester fiberfill, cotton scraps, or even fabric leftovers.
Fifth, you may want to add decorative elements such as cinnamon sticks, felt leaves, or twine for the pumpkin stem to give it a more natural and rustic look.
Finally, a pair of scissors will help you cut yarn ends and finish off your project neatly.
Step-by-Step Crochet Instructions
Now let’s dive into the Crochet Halloween Pumpkins- Step by Step Tutorial itself. We will go through each step carefully so even beginners can follow along with ease.
Start by making a slip knot and chaining a row long enough to match the desired circumference of your pumpkin. Remember, the longer the chain, the bigger the pumpkin.
Next, work single crochet stitches across each chain. Continue to build rows using the same stitch until you have a rectangular piece of fabric. This rectangle will form the body of your pumpkin.
Once your rectangle is complete, fold it in half and use your tapestry needle to sew the two short sides together. This creates a tube-like shape, which will become the main structure of your pumpkin.
With one open side, use a running stitch around the edge and pull tight to close the top. This creates the first rounded end of your pumpkin.
Now stuff the pumpkin firmly with your chosen filling. The amount of stuffing will determine how plump your pumpkin looks, so adjust according to preference.
Finally, close the remaining open side using the same running stitch technique. Pull tight, secure the yarn, and weave in the ends neatly.
Adding Details and Final Touches
At this point in the Crochet Halloween Pumpkins- Step by Step Tutorial, your pumpkin shape is complete, but a few extra details can make it even more realistic and festive.
Start by adding ridges to your pumpkin. To do this, take a long piece of yarn, thread it through the center from top to bottom, and pull tight around the outside. Repeat this process several times, spacing the yarn evenly to create sections like a real pumpkin.
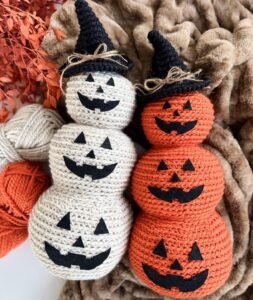
Next, attach a stem to the top. You can crochet a small cylinder, use a cinnamon stick, or wrap twine around a small piece of fabric. This step adds a charming rustic touch to your pumpkin.
For leaves, you can crochet small green shapes or cut them out of felt fabric. Glue or stitch them near the stem for extra decoration.
If you want to personalize your pumpkin, consider adding a small bow or a tag with a festive message. These little details make your pumpkins perfect as gifts for family and friends.
You can also experiment with different yarn colors. Traditional orange looks great for Halloween, but white, gray, or even pastel colors can give your pumpkins a modern twist.
Lastly, display your pumpkins creatively. Arrange them in a basket, line them along your mantel, or use them as table centerpieces for your Halloween party.
Tips for Beginners and Variations
This Crochet Halloween Pumpkins- Step by Step Tutorial is beginner-friendly, but a few tips can make your experience even better.
First, practice your basic crochet stitches before starting. Getting comfortable with single crochet and slip stitches will make the process easier and faster.
Second, start with a smaller pumpkin if you are a beginner. Smaller projects require less time and yarn, allowing you to practice without feeling overwhelmed.
Third, use stitch markers to keep track of your rows. This is especially helpful if you are working on a larger pumpkin and want to keep the size consistent.
Fourth, experiment with textures by using different stitch patterns such as half double crochet or ribbing stitches for a unique look.
Fifth, do not worry if your first pumpkin is not perfect. Handmade items have character, and small imperfections add to their charm.
Finally, once you master the basic pattern, try making a set of pumpkins in different sizes to create a beautiful fall display.
FAQ About Crochet Halloween Pumpkins
Q1: Can I make Crochet Halloween Pumpkins without much crochet experience?
Yes, this project is very beginner-friendly and uses basic stitches that are easy to learn.
Q2: How long does it take to make one pumpkin?
It depends on the size, but a small pumpkin can be completed in less than two hours.
Q3: What type of yarn works best for these pumpkins?
Cotton yarn provides great structure, while acrylic yarn offers vibrant colors and softness.
Q4: How do I clean crochet pumpkins?
Spot cleaning with a damp cloth is recommended, especially if you use fiberfill stuffing inside.
Q5: Can I sell the pumpkins I make using this tutorial?
Yes, handmade crochet pumpkins are popular at craft fairs and online shops, especially during the fall season.
Q6: Can I add faces to make them look like Jack-o’-lanterns?
Absolutely! You can sew or glue felt pieces to create fun Halloween faces on your pumpkins.
Conclusion
In this article, we explored the Crochet Halloween Pumpkins- Step by Step Tutorial in detail, covering everything from materials and instructions to tips and creative variations.
By following these simple steps, you can create beautiful, festive decorations for your home or gifts for loved ones.
Now it is your turn to try this tutorial. Once you finish your pumpkins, leave your honest opinion and share any suggestions for future projects so we can keep bringing more fun and creative ideas for everyone to enjoy.