
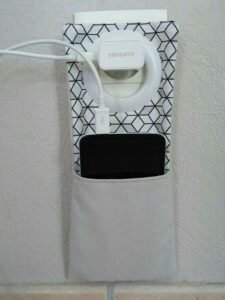
Making a Fabric phone holder- Step by Step Tutorial is a fun and practical sewing project that anyone can try, whether you are a beginner or an experienced crafter. With just a few materials and some basic sewing skills, you can create a stylish and functional phone holder to keep your device safe and accessible. This tutorial will guide you through each stage, helping you make a phone holder that suits your personal taste and needs.
One of the best things about the Fabric phone holder- Step by Step Tutorial is how customizable it is. You can choose fabrics that match your home décor, add pockets for accessories like earbuds, or even adjust the size to fit different phone models. Whether you prefer bright colors, modern patterns, or simple, neutral tones, you can design a phone holder that is both beautiful and useful.
Additionally, this Fabric phone holder- Step by Step Tutorial is perfect for those looking to create handmade gifts. A fabric phone holder makes a thoughtful present for friends and family, and it can be completed in just a few hours. Plus, since you can use leftover fabric scraps, it’s a cost-effective way to make something both creative and practical.
Materials Needed for the Fabric Phone Holder
Before you start the Fabric phone holder- Step by Step Tutorial, it’s important to gather all the necessary materials. First, you will need some sturdy fabric for the main body of the phone holder. Cotton canvas or quilting fabric works well because they provide durability and structure while still being easy to sew.
Next, choose a lining fabric to give the inside a neat and finished appearance. Lightweight cotton is ideal because it doesn’t add bulk but provides a smooth surface to protect your phone from scratches.
You will also need some interfacing to add structure and strength to the fabric phone holder. Fusible interfacing is recommended because it can be ironed onto the fabric, making it easy to work with while keeping the final product sturdy and professional-looking.
A basic sewing kit is essential. This should include scissors, thread, pins or clips, a ruler or measuring tape, fabric chalk for marking, and of course, a sewing machine. If you prefer, you can hand sew the project, but a sewing machine will save time and ensure straight, even seams.
Optional materials include Velcro, snaps, or a magnetic button for closures. These fasteners help keep your phone secure inside the holder, especially if you plan to carry it in a bag or use it while traveling.
Lastly, you might want to add a small pocket for accessories like headphones or a charging cable. For this, you will need a small piece of extra fabric to attach to the front or back of the phone holder.
Cutting and Preparing the Fabric Pieces
The first step in the Fabric phone holder- Step by Step Tutorial is to cut and prepare all your fabric pieces. Start by measuring your phone to determine the right size for your holder. Add about one inch to each measurement to account for seams and ease, ensuring your phone will fit comfortably inside.
Cut two pieces of outer fabric according to your measurements. These will form the front and back of the phone holder. Make sure the pieces are even and cut neatly to give the final product a professional finish.
Next, cut two pieces of lining fabric in the same size as the outer pieces. These will create a smooth interior and hide any seams inside the holder.
Cut interfacing pieces to match the outer fabric pieces. Fuse the interfacing to the wrong side of the outer fabric using an iron. This step provides extra stability and ensures the phone holder maintains its shape.
If you plan to add a pocket for accessories, cut an additional piece of fabric smaller than the main panels. Fold and hem the top edge of this piece before sewing it onto the front panel of the outer fabric.
Once all pieces are cut and prepared, use fabric chalk or pins to mark seam allowances, placement lines, and any other sewing guides needed before moving on to the next step.
Sewing the Fabric Phone Holder
Now it’s time to begin assembling the Fabric phone holder- Step by Step Tutorial. Start by placing the outer fabric pieces right sides together. Pin or clip the edges to hold them in place, leaving the top edge open for turning later.
Sew around the sides and bottom edges with a straight stitch, keeping a consistent seam allowance. For extra strength, backstitch at the beginning and end of each seam. This ensures the holder will withstand regular use without seams coming undone.
Repeat the same process with the lining fabric pieces, again leaving the top edge open. If you added a pocket earlier, make sure it is positioned correctly on the outer fabric before sewing the panels together.
After sewing both the outer and lining sections, trim any excess fabric from the corners to reduce bulk. This will make it easier to turn the holder right side out later and give the corners a cleaner finish.
Turn the outer fabric right side out and press it flat with an iron. Insert the lining fabric inside the outer shell with wrong sides together, aligning the seams and edges neatly.
If you are adding a closure like Velcro, snaps, or a magnetic button, attach it now according to the instructions provided with the fastener. This will help keep your phone secure inside the holder.
Finishing Touches and Personalization
The final stage of the Fabric phone holder- Step by Step Tutorial is to add finishing touches and customize your holder. Start by folding the raw edges of the top opening inward and pressing them flat. Pin or clip the layers together to keep them in place.
Topstitch around the top edge to close the opening and give the holder a polished look. This also adds extra durability, especially if you plan to use the holder frequently.
Consider adding decorative elements like ribbon, embroidery, or fabric appliqués to make the phone holder unique. Personal touches can transform a simple project into a stylish accessory or a thoughtful handmade gift.
If you want to make the holder portable, sew a fabric loop or strap to one corner. This makes it easy to attach the holder to a bag or carry it on your wrist when you’re on the go.
For those who prefer a stand-up phone holder, you can insert a small piece of cardboard or stiff interfacing into the back panel before closing the top. This will help the holder stay upright on a desk or table.
Once all the details are complete, give the holder a final press with an iron to smooth out any wrinkles and set the seams. Your handmade fabric phone holder is now ready to use or gift.
FAQ about Fabric Phone Holder
1. Can beginners make a fabric phone holder?
Yes, the Fabric phone holder- Step by Step Tutorial is beginner-friendly and requires only basic sewing skills.
2. What fabric works best for phone holders?
Cotton canvas or quilting fabric is ideal because it is sturdy yet easy to sew.
3. Can I make the holder in different sizes?
Absolutely. Simply adjust the measurements to fit your phone or tablet dimensions.
4. How do I keep the holder clean?
Most fabric phone holders can be hand washed or machine washed on a gentle cycle, depending on the fabric used.
5. Do I need a sewing machine for this project?
While a sewing machine speeds up the process, you can sew the holder by hand using a backstitch for strong seams.
6. Can I sell fabric phone holders I make?
Yes, handmade phone holders are popular at craft fairs and online marketplaces, especially when personalized.
Conclusion
In this Fabric phone holder- Step by Step Tutorial, you learned how to gather materials, cut and prepare the fabric pieces, sew the holder together, and add final details for a personalized finish.
This project is simple, practical, and perfect for creating a useful accessory or a thoughtful gift.
Now it’s your turn to try making your own fabric phone holder. Share your honest opinions and suggestions so we can continue improving tutorials and inspiring more creative projects.