
If you have been looking for a creative fall project, this Pumpkin Witch Crochet Pattern- Step by Step Tutorial is exactly what you need. Combining the charm of pumpkins with the fun Halloween vibe of witches, this crochet pattern is perfect for making adorable home decor pieces or small gifts for the season. Whether you are an experienced crocheter or just starting out, this tutorial will walk you through every detail so you can complete your project with confidence.
One of the best things about the Pumpkin Witch Crochet Pattern- Step by Step Tutorial is that it allows you to explore your creativity. From choosing the perfect yarn colors to adding tiny details like a witch hat or a small broom, you can customize your pumpkin witch to match your style. These little crochet creations can decorate your home, be part of a Halloween centerpiece, or even work as cute keychains or party favors.
Another great advantage of following this Pumpkin Witch Crochet Pattern- Step by Step Tutorial is that it is beginner-friendly. We will explain everything in simple terms, making sure that even someone new to crochet can create something beautiful. By the end, you will have not only a festive decoration but also a sense of accomplishment from crafting something with your own hands.
Materials Needed for the Pumpkin Witch Crochet Pattern
To start this Pumpkin Witch Crochet Pattern- Step by Step Tutorial, you will need to gather a few basic crochet materials. Having everything ready before you begin will make the process much smoother and more enjoyable.
First, choose the right yarn for the project. For the pumpkin body, orange yarn works best, while green or brown can be used for the stem. For the witch hat, black yarn is ideal, but you can add purple or green accents to make it more fun and colorful. Make sure to select a yarn weight suitable for small projects so the final piece has a neat look.
Next, you will need a crochet hook that matches the yarn weight. Usually, a 3.5 mm or 4.0 mm hook works well for amigurumi-style projects like this. The right hook size will keep your stitches tight, so the stuffing does not show through.
You will also need some stuffing material to fill your pumpkin and give it shape. Polyester fiberfill is commonly used because it is soft, lightweight, and easy to work with. A yarn needle will help you sew parts together, and a pair of scissors is necessary for trimming yarn ends.
For the witch details, like the eyes or mouth, you can use small safety eyes or embroider them with black yarn. Tiny decorative pieces such as ribbons or small buttons can also be added to give your pumpkin witch more character.
Finally, keep a stitch marker handy if you are working in continuous rounds. It will help you keep track of where each round starts and ends, making the process easier and preventing mistakes in your Pumpkin Witch Crochet Pattern- Step by Step Tutorial.
Crocheting the Pumpkin Base
Now that you have gathered all materials, it is time to start the Pumpkin Witch Crochet Pattern- Step by Step Tutorial by making the pumpkin base. This part forms the body of the project and sets the foundation for all the decorative details.
Begin with a magic ring and crochet single stitches around it. The magic ring technique is perfect for projects like this because it creates a tight center with no gaps, giving the pumpkin a clean and polished look. Increase evenly in the next few rounds to form a flat circle.
As you continue, the circle will gradually turn into a small sphere as you stop increasing and work even rounds. This is where the pumpkin starts taking shape. Use orange yarn for this part to give it the classic pumpkin look.
After reaching the desired size, begin decreasing gradually to close the top of the pumpkin. Before finishing completely, add the stuffing material to give it a firm yet squeezable shape. Do not overstuff, as this can stretch the stitches.
To create the pumpkin segments, use a long piece of orange yarn and wrap it around the finished ball several times, pulling slightly to form the classic pumpkin ridges. This simple step makes your crochet pumpkin look more realistic and detailed.
Once the base is done, crochet a small green stem and sew it to the top of the pumpkin. At this point, your project will already start looking festive, bringing the Pumpkin Witch Crochet Pattern- Step by Step Tutorial to life.
Adding the Witch Details
With the pumpkin base ready, it is time to add the witch elements to complete the Pumpkin Witch Crochet Pattern- Step by Step Tutorial. These details transform a simple pumpkin into a fun Halloween decoration.
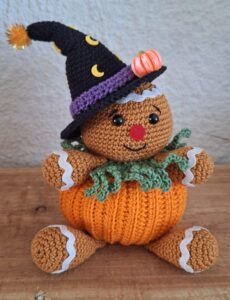
Start by crocheting a small witch hat. Begin with a magic ring using black yarn, then work in rounds, increasing gradually to form a flat circle for the brim. After the brim is wide enough, continue without increasing to build the tall, pointed part of the hat.
Once the hat is finished, you can decorate it with a small band of contrasting yarn, such as purple or green, for a classic Halloween color scheme. A tiny buckle made with yellow yarn can also be added for extra charm.
Position the hat on top of the pumpkin and sew it securely in place. Make sure it sits at a slight angle for a playful, whimsical look that fits the Halloween theme perfectly.
Next, add the eyes, mouth, or any other facial features. Safety eyes work well if you want a polished finish, but simple embroidered stitches give the pumpkin witch a handmade, cozy feeling.
If you like, crochet a miniature broom using brown yarn for the handle and tan yarn for the bristles. Attach it to the side of the pumpkin witch to complete the Halloween vibe of the Pumpkin Witch Crochet Pattern- Step by Step Tutorial.
Final Assembly and Decoration Ideas
At this stage of the Pumpkin Witch Crochet Pattern- Step by Step Tutorial, all the main parts are ready, and it is time to assemble and add final touches to your creation.
Double-check all pieces to ensure they are sewn tightly and securely. You want your pumpkin witch to last through the season without any parts coming loose.
Consider adding a small ribbon around the stem or a few embroidered stars on the hat for a magical effect. Personal touches like these make your project unique and special.
If you want to use the pumpkin witch as a hanging decoration, attach a loop of yarn to the top of the hat. This way, you can hang it on doors, windows, or even a Halloween tree.
Another idea is to make several pumpkin witches in different sizes and create a fun centerpiece for your Halloween table. Mixing larger and smaller ones adds variety and visual interest.
Lastly, you can gift these adorable creations to friends and family. Handmade decorations like this Pumpkin Witch Crochet Pattern- Step by Step Tutorial always bring smiles and show you put thought and effort into your gifts.
FAQ About the Pumpkin Witch Crochet Pattern
Q: Is this crochet pattern suitable for beginners?
A: Yes, the steps are simple and explained clearly, making it great for beginners and experienced crocheters alike.
Q: How long does it take to finish one pumpkin witch?
A: On average, it takes about 3-4 hours, depending on your skill level and the details you add.
Q: Can I use different yarn colors?
A: Absolutely. You can make pastel pumpkins, bright-colored witches, or even glittery hats for a unique look.
Q: What size should the finished pumpkin witch be?
A: The size depends on the yarn and hook used, but most turn out to be about 4-6 inches tall.
Q: Do I need safety eyes, or can I embroider the face?
A: Either works well. Safety eyes give a polished look, while embroidery adds a handmade charm.
Q: Can children help with this project?
A: Kids can help with stuffing and choosing colors, but adults should handle the crocheting and sewing.
Conclusion
This Pumpkin Witch Crochet Pattern- Step by Step Tutorial has guided you through every stage, from gathering materials to assembling the final decorative piece.
We covered crocheting the pumpkin base, adding witchy details, and offering creative ideas for displaying or gifting your project.
Now it is your turn to bring this festive crochet idea to life. Try the tutorial, enjoy the process, and share your honest opinions and suggestions—we would love to hear your thoughts on this fun Halloween crochet project!