
If you have been looking for a fun and creative crochet project, the Crochet fat chicken using granny square- Step by Step Tutorial is exactly what you need. This charming project combines the classic granny square technique with a cute and plump chicken design that is perfect for home décor or as a handmade gift. Whether you are a beginner or an experienced crocheter, this tutorial will help you create something unique and adorable.
The beauty of the Crochet fat chicken using granny square- Step by Step Tutorial lies in its simplicity. Using only basic stitches and simple construction methods, you can transform ordinary yarn into a delightful, decorative chicken that brings warmth and personality to any room. The granny square is one of the most iconic patterns in crochet, and turning it into a chicken gives it a fun twist that anyone can enjoy.
In this guide, you will learn how to make the granny squares, assemble them into the chicken shape, add the necessary details, and customize your design. By the end of the Crochet fat chicken using granny square- Step by Step Tutorial, you will not only have a lovely finished piece but also gain new skills and confidence in your crochet journey.
Materials and Tools for the Crochet fat chicken using granny square- Step by Step Tutorial
Before starting the Crochet fat chicken using granny square- Step by Step Tutorial, it is important to gather all the materials and tools you will need. Having everything ready will make the process much smoother and more enjoyable.
First, you will need medium-weight yarn in at least two colors. Traditionally, white or cream works well for the chicken’s body, while red, yellow, and orange can be used for details like the comb, beak, and feet. However, you can get creative with colors to match your home décor or make a set of chickens in different shades for a playful look.
Next, you will need a crochet hook suitable for your yarn size. A 4mm or 5mm hook is typically ideal for this project, but always check the yarn label for guidance. Using a slightly smaller hook can make your stitches tighter and the chicken more structured, while a larger hook can create a softer and bigger piece.
You will also need a yarn needle for sewing pieces together, scissors for cutting yarn, and stuffing to give your chicken its plump shape. Fiberfill is the most common stuffing material, but you can also use fabric scraps or leftover yarn pieces as an eco-friendly alternative.
For the eyes, you can use small black buttons, safety eyes, or even crochet tiny circles with black yarn. These little details bring your chicken to life and give it a unique personality.
Finally, make sure you have some stitch markers if you are new to crocheting. They help keep track of your rows and ensure everything stays even as you follow the Crochet fat chicken using granny square- Step by Step Tutorial.
Step-by-Step Instructions for the Crochet fat chicken using granny square- Step by Step Tutorial
Now that you have all your materials ready, let’s begin the Crochet fat chicken using granny square- Step by Step Tutorial. This section will guide you through each stage of the project so you can follow along with confidence.
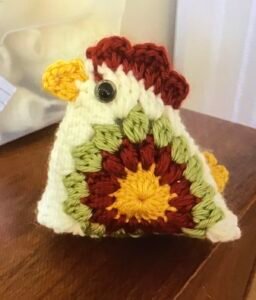
Start by making the basic granny squares. A granny square begins with a small loop, usually created with a chain of four stitches joined into a ring. From there, you work groups of double crochet stitches separated by chain spaces, forming a square shape as you go.
For the chicken body, you will need multiple granny squares depending on the size you want. Typically, four to six squares can create a small chicken, while more squares can be used for a bigger, plumper one. The key is to make all your squares the same size so they fit together evenly.
Once your granny squares are complete, it is time to join them. Lay out your squares in a cross-like shape, with one in the center, one on each side, one at the top, and one at the bottom. Fold the sides up around the center square to form a 3D shape, then sew or crochet the edges together to create the chicken’s round body.
After forming the body, stuff it with fiberfill to give it that signature plump look. Make sure the stuffing is even but not too tight, as you want your chicken to be soft and squishy. Close the top securely once you are satisfied with the shape.
Now it’s time for the fun details! Add a small crocheted beak, a red comb on top, wings on the sides, and tiny feet at the bottom. Each of these details can be made with simple shapes like triangles or ovals, then sewn onto the body. Attach eyes last to give your chicken its adorable expression.
By following each of these steps carefully, you will have completed the Crochet fat chicken using granny square- Step by Step Tutorial and made a charming decoration or gift.
Tips and Tricks for the Crochet fat chicken using granny square- Step by Step Tutorial
To make the most out of the Crochet fat chicken using granny square- Step by Step Tutorial, here are some helpful tips and tricks that can enhance your project and make the process smoother.
First, always keep your tension consistent when crocheting granny squares. Uneven tension can cause the squares to be different sizes, making assembly more difficult later. Practicing a few squares before starting the final project can help you achieve consistency.
Second, experiment with colors to make your chickens unique. While traditional chicken colors look great, bright and playful colors can create fun, decorative pieces perfect for children’s rooms or seasonal displays.
Third, consider adding small accessories to your chicken for extra personality. A tiny crochet scarf, a miniature flower on the comb, or even a little basket next to the chicken can make it stand out as a unique handmade creation.
Fourth, when stuffing your chicken, add small amounts at a time and shape it as you go. This prevents lumps and helps maintain a smooth, round appearance. Even stuffing is the secret to a professional-looking finish.
Fifth, if you are making several chickens, try creating all the granny squares first, then assemble them together in one sitting. This assembly-line method saves time and keeps your work organized.
Lastly, remember that handmade projects don’t have to be perfect. Each chicken will have its own character and charm, which is part of what makes crochet creations so special. The Crochet fat chicken using granny square- Step by Step Tutorial is as much about the process as it is about the final product.
Creative Ways to Use the Crochet Fat Chicken
After finishing the Crochet fat chicken using granny square- Step by Step Tutorial, you might be wondering how to use or display your adorable creation. Here are some creative ideas to inspire you.
You can use the chicken as a decorative centerpiece for your dining table during Easter, spring, or even year-round for a touch of farmhouse charm. Handmade decorations always add warmth and character to a home.
Another idea is to make several chickens in different sizes and colors to create a cute collection for a shelf or mantelpiece. A family of crochet chickens can brighten up any space and bring smiles to everyone who sees them.
If you have children, these crochet chickens can become soft, safe toys. Since they are lightweight and free of sharp parts, they make wonderful handmade gifts for kids to cuddle and play with.
You can also give them as gifts to friends and family. Handmade presents carry a personal touch that store-bought items often lack, and a crochet chicken is sure to be appreciated by anyone who loves cute and cozy decorations.
For those who sell crafts, these chickens are excellent items for spring fairs, Easter markets, or online shops. They are quick to make, cost-effective, and always in demand during seasonal celebrations.
Finally, small versions of the chicken can be made into keychains, bag charms, or even Christmas tree ornaments. The possibilities are endless when you use your creativity with the Crochet fat chicken using granny square- Step by Step Tutorial.
FAQ about the Crochet fat chicken using granny square- Step by Step Tutorial
Q: Is the Crochet fat chicken using granny square- Step by Step Tutorial suitable for beginners?
A: Yes, it uses simple stitches like chains and double crochet, making it a perfect project for beginners learning basic techniques.
Q: How many granny squares do I need for one chicken?
A: Usually four to six squares are enough for a small chicken, but you can adjust the number for larger or smaller sizes.
Q: Can I use leftover yarn for this project?
A: Absolutely! This project is ideal for using yarn scraps, and mixing colors can create fun, unique chickens.
Q: How long does it take to complete one chicken?
A: Most people can finish one chicken in a few hours, especially once they get comfortable with making the granny squares.
Q: Do I need special stuffing for the chicken?
A: No, regular fiberfill works fine, but you can also use fabric scraps or even old pillow stuffing for an eco-friendly option.
Q: Can the chickens be washed if they get dirty?
A: Yes, hand washing is recommended to keep the shape and details intact. Avoid machine washing unless the yarn is specifically machine-safe.
Conclusion
The Crochet fat chicken using granny square- Step by Step Tutorial is a fun and creative project that combines classic crochet techniques with a playful, modern twist. From making the granny squares to assembling the chicken and adding adorable details, every step is simple yet rewarding.
By following this tutorial, you can create unique decorations, thoughtful gifts, or even items to sell at craft fairs. We hope this guide has inspired you to pick up your hook and yarn and start crafting your own crochet chickens.
If you try this project, please leave your honest opinion and suggestions. We would love to hear about your experience and see how your creations turned out!