
If you are looking for a fun and creative project, this Crochet witch hat- Step by Step Tutorial is exactly what you need. Whether you are making it for Halloween, themed parties, or as a unique decoration piece, this project is easy to follow and perfect for crochet lovers of all skill levels. From beginners to advanced crafters, everyone will be surprised at how simple and enjoyable it is to bring this witch hat to life. Using the Crochet witch hat- Step by Step Tutorial, you can create a beautiful handmade piece that will impress your friends and family.
In this article, we will guide you through every step, ensuring you understand each part clearly. The goal is to make sure you can follow the Crochet witch hat- Step by Step Tutorial with confidence, even if this is your first time working on such a project. We will explain the materials, stitches, and techniques you need while keeping everything beginner-friendly and easy to understand. By the end, you will have a lovely witch hat ready to wear or display.
Before diving into the details, it is important to note that this Crochet witch hat- Step by Step Tutorial focuses on being practical, creative, and fun. We will break everything into manageable steps so you can enjoy the process without feeling overwhelmed. Keep reading to learn how to crochet this charming hat and discover helpful tips along the way.
Materials Needed for the Crochet Witch Hat
To start this Crochet witch hat- Step by Step Tutorial, you will need some basic materials. Gathering everything in advance makes the process smoother and more enjoyable. The most important thing is to choose quality yarn, as it will determine the look and durability of your finished hat. Acrylic yarn is often recommended for beginners because it is affordable and easy to work with.
Next, you will need a suitable crochet hook size that matches your yarn. The Crochet witch hat- Step by Step Tutorial usually suggests checking the yarn label for guidance on hook size. Having the correct hook ensures that your stitches are even and your hat has the right shape and structure.
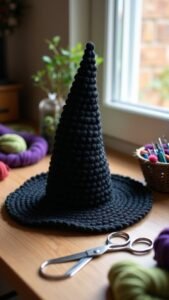
Do not forget about scissors and a yarn needle. These small tools are essential for trimming yarn ends and weaving them into your work. The Crochet witch hat- Step by Step Tutorial will guide you on how to finish your hat neatly so that it looks professional and well-made.
You might also want to use stitch markers, especially if you are a beginner. They help you keep track of your rounds and stitches. Following the Crochet witch hat- Step by Step Tutorial becomes easier when you mark your starting points accurately.
Finally, keep some stuffing or decorative elements nearby if you plan to use the hat for decoration purposes. These extras can add personality and charm to your finished project, making the Crochet witch hat- Step by Step Tutorial even more exciting.
With all materials ready, you can start following the steps confidently, knowing you have everything you need to complete your crochet witch hat successfully.
Step-by-Step Instructions for the Crochet Witch Hat
The most exciting part of the Crochet witch hat- Step by Step Tutorial is learning how to create the hat itself. We begin with the crown of the hat, which is the pointed top part. This is usually made using simple increases that gradually expand the shape as you work downward. Beginners often enjoy this part because it is repetitive yet relaxing.
As you follow the Crochet witch hat- Step by Step Tutorial, you will notice that counting your stitches is very important. Missing a stitch can change the shape of your hat. Take your time and check your work after each round to avoid mistakes.
Once the crown is complete, you will move on to the body of the hat. Here, the Crochet witch hat- Step by Step Tutorial will guide you on how to create a smooth transition from the pointy top to the wider part that sits on your head or surface. This involves crocheting evenly for several rounds.
After that, you will work on the brim, which gives the witch hat its classic look. The Crochet witch hat- Step by Step Tutorial shows you how to make the brim stiff or floppy depending on your preference. Adding extra rounds or adjusting stitch types can change the style completely.
Do not worry if the hat looks a bit uneven at first. As the Crochet witch hat- Step by Step Tutorial explains, blocking or shaping the hat at the end helps it look neat and professional. This step is optional but highly recommended for the best results.
By carefully following each instruction, you will see your witch hat coming together beautifully, step by step, just as described in the Crochet witch hat- Step by Step Tutorial.
Tips and Tricks for Beginners
While working on the Crochet witch hat- Step by Step Tutorial, beginners might face small challenges. One common issue is keeping tension consistent. If your stitches are too tight, the hat may become stiff and hard to shape. Too loose, and it may lose structure. Practice holding the yarn comfortably to solve this problem.
Another helpful tip from the Crochet witch hat- Step by Step Tutorial is to use stitch markers generously. They prevent confusion, especially when counting rounds or increasing stitches in the crown area.
If you make a mistake, do not panic. The Crochet witch hat- Step by Step Tutorial encourages beginners to unravel stitches and redo them. Crochet is very forgiving, and practice makes perfect.
Experimenting with colors is also fun. The Crochet witch hat- Step by Step Tutorial does not limit you to black yarn. Purple, green, or even orange can give your witch hat a festive touch for Halloween or themed events.
For those who want a sturdier hat, the Crochet witch hat- Step by Step Tutorial suggests using a slightly smaller hook size or adding a thin wire around the brim for extra support. These small adjustments can make a big difference.
Lastly, take breaks when needed. Crocheting for long periods can tire your hands. Enjoy the process as recommended in the Crochet witch hat- Step by Step Tutorial, and you will love the final result even more.
Decorating and Customizing Your Crochet Witch Hat
Once you finish the main structure, the Crochet witch hat- Step by Step Tutorial opens the door to endless creativity. Adding decorations like ribbons, buttons, or small crocheted flowers can make your witch hat unique.
Some people follow the Crochet witch hat- Step by Step Tutorial and add a band around the hat using contrasting yarn colors. This simple detail can completely change the hat’s appearance, making it more stylish.
Others like to sew on sequins or beads for a sparkly effect. As the Crochet witch hat- Step by Step Tutorial explains, these embellishments give the hat a fun and festive look.
If you are using the hat for decoration, you can even add small charms or bells to make it more eye-catching. The Crochet witch hat- Step by Step Tutorial encourages creativity and personalization.
For Halloween costumes, the Crochet witch hat- Step by Step Tutorial suggests pairing the hat with matching accessories like a crocheted broom or cape for a complete handmade outfit.
Remember, customizing your witch hat allows you to express your style and personality while following the Crochet witch hat- Step by Step Tutorial to create a one-of-a-kind piece.
FAQ About Crochet Witch Hat- Step by Step Tutorial
1. Can beginners follow this Crochet witch hat- Step by Step Tutorial easily?
Yes, the tutorial is beginner-friendly with clear instructions and basic stitches.
2. How long does it take to complete the hat?
Depending on your skill level, it can take anywhere from a few hours to a weekend.
3. What type of yarn works best?
Acrylic yarn is recommended because it is affordable, easy to work with, and holds shape well.
4. Can I make the hat in different sizes?
Yes, by adjusting the number of rounds and increases, you can create small or large hats.
5. How do I make the brim stiffer?
You can use a smaller hook size, tighter stitches, or add a thin wire for extra support.
6. Is this hat washable?
Most acrylic yarns are machine washable, but always check the yarn label for care instructions.
Conclusion
In this article, we explored the Crochet witch hat- Step by Step Tutorial in detail, covering materials, instructions, beginner tips, and decoration ideas.
By following the steps carefully, you can create a beautiful handmade witch hat perfect for costumes or home décor.
We hope this guide inspires you to pick up your crochet hook and start crafting today. Please share your honest opinions and suggestions in the comments so we can continue bringing you helpful tutorials like this one.