
Creating a Patchwork Star Ornament for Christmas- Step by Step Tutorial is a wonderful way to combine creativity, tradition, and festive charm in one project. Handmade ornaments have always held a special place in holiday celebrations because they add a personal touch to decorations and can be passed down for years to come. A patchwork star is not only visually appealing but also gives you the chance to use fabric scraps, mix colors, and showcase your quilting or sewing skills. This tutorial focuses on making the process simple and enjoyable for everyone, regardless of skill level.
When making a Patchwork Star Ornament for Christmas- Step by Step Tutorial, you will find that it blends two timeless crafts: patchwork quilting and ornament making. The star design symbolizes light, hope, and the joy of the season, while patchwork allows you to experiment with patterns and textures. Whether you choose traditional holiday colors like red, green, and gold, or prefer a modern twist with pastels and metallics, your star ornament will stand out as a unique creation. The process also provides an opportunity to upcycle leftover fabrics into something meaningful.
Another reason why the Patchwork Star Ornament for Christmas- Step by Step Tutorial is a delightful project is that it can be adapted for different uses. You can hang these ornaments on your Christmas tree, attach them to gift packages, or use them as part of a festive garland. They also make thoughtful handmade gifts, showing friends and family the effort and love put into each stitch. Now let’s dive into the materials, techniques, and steps to create this charming holiday project.
Materials Needed for Patchwork Star Ornament
To begin the Patchwork Star Ornament for Christmas- Step by Step Tutorial, gathering the right materials will make your work much easier. Proper preparation ensures that the sewing process runs smoothly and that your ornament looks polished and professional.
Start by selecting fabrics in your desired colors and patterns. Quilting cotton works best because it is easy to cut and sew. Choose at least three complementary fabrics to highlight the patchwork effect. You can mix solids, stripes, polka dots, or festive prints for variety.
You will also need a rotary cutter or fabric scissors for precise cutting. A cutting mat and quilting ruler are helpful tools to ensure your pieces are even and accurate, which is essential for the star design to come together neatly.
Thread is another important material. Select a color that blends well with your fabric choices, or use metallic thread for a decorative touch. Make sure it is strong enough to hold the seams securely.
For stuffing, polyester fiberfill is commonly used. It helps the ornament hold its shape and gives it a soft, plump appearance. If you prefer a flatter ornament, you can use a thin layer of batting instead.
Additional supplies include sewing pins or clips, a sewing machine or needle for hand stitching, and ribbon or twine for hanging. These finishing touches will make your star ornament ready to display or gift.
Finally, have an iron handy. Pressing fabric pieces before and after sewing makes your project look crisp and professional. Proper pressing is a small step that makes a big difference in patchwork projects.
Step by Step Tutorial for Patchwork Star Ornament
Now let’s move into the detailed part of the Patchwork Star Ornament for Christmas- Step by Step Tutorial. Following each step carefully ensures that your ornament turns out symmetrical and festive.
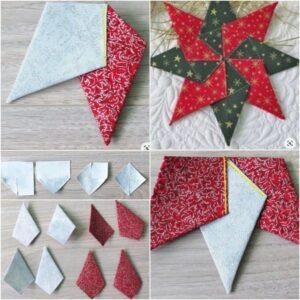
Start by cutting your fabric into small squares or triangles, depending on the star design you choose. For a classic patchwork star, half-square triangles are a great option. Cut carefully to maintain consistency in size.
Next, arrange your fabric pieces on a flat surface before sewing. Play with color placement until you are satisfied with the design. This step helps visualize the finished star and prevents mistakes later.
Sew the pieces together row by row, pressing each seam as you go. Accurate seam allowances are essential to keep the star aligned. Most patchwork projects use a quarter-inch seam, so stick to this measurement for best results.
Once the star block is complete, trim any uneven edges. Cut a backing fabric of the same size and place it right sides together with the star block. Pin or clip them securely in place.
Sew around the edges, leaving a small opening for turning and stuffing. After stitching, carefully turn the ornament right side out and press the edges flat. This step prepares the ornament for stuffing.
Finally, fill the ornament with fiberfill to your desired fullness. Stitch the opening closed using a ladder stitch or topstitching. Add a loop of ribbon at the top, and your patchwork star is ready to shine on your Christmas tree.
Creative Ideas for Decorating with Patchwork Star Ornaments
Once you’ve finished your Patchwork Star Ornament for Christmas- Step by Step Tutorial, you may wonder how best to use your creation. Thankfully, there are many creative ways to incorporate these ornaments into your holiday décor.
The most traditional use is hanging them on your Christmas tree. Handmade stars add charm and a warm, nostalgic feeling that store-bought ornaments cannot replicate. Mixing them with lights and garlands enhances their beauty.
Another great idea is to use patchwork stars as gift toppers. Instead of bows, tie one of these ornaments onto wrapped presents. It adds a personal touch and doubles as a keepsake for the recipient.
You can also string multiple patchwork stars together to make a festive garland. Hang it across a mantel, along a staircase railing, or even in a window. The repetition of stars creates a cheerful and eye-catching display.
For table settings, patchwork star ornaments can be used as napkin holders or placed on each plate as a decorative surprise. Guests can even take them home as favors after a holiday dinner.
Another creative option is to make mini patchwork stars and attach them to keychains or bags. This way, the festive spirit extends beyond Christmas décor and becomes part of everyday life.
Lastly, consider customizing your stars with embroidery or embellishments. Adding initials, beads, or sequins makes each star unique and more festive. Personalized stars can become treasured heirlooms.
Tips for Success with Patchwork Star Ornaments
To get the best results from your Patchwork Star Ornament for Christmas- Step by Step Tutorial, it helps to keep a few expert tips in mind. These small adjustments can make your project easier and more enjoyable.
Always prewash your fabrics before starting. This prevents shrinkage and color bleeding, which can affect the look of your finished ornament. Prewashed fabric is also easier to work with.
Press your seams as you go. Many beginners skip this step, but pressing ensures that your patchwork pieces lie flat and align properly. It gives your star ornament a neat, professional look.
Don’t overstuff your ornament. While it’s tempting to make it plump, too much stuffing can distort the star shape. Use just enough to give it volume without stretching the seams.
Take your time with cutting. Accurate cutting is the foundation of patchwork, and even small mistakes can throw off the symmetry of your star. Use a ruler and cutting mat whenever possible.
Experiment with different sizes. Patchwork stars can be made small for tree ornaments or larger for wall hangings. Adjusting the size lets you create a variety of decorations with the same technique.
Finally, enjoy the process. Crafting is not just about the finished product but also about the joy of creating. Play with colors, textures, and styles to make each ornament reflect your personality.
FAQ about Patchwork Star Ornament for Christmas
1. Is the patchwork star ornament suitable for beginners?
Yes, this project is beginner-friendly. As long as you know how to sew basic seams, you can create a beautiful ornament.
2. How much fabric do I need?
Small scraps are enough for one ornament. A fat quarter bundle can make several stars in different color combinations.
3. Can I sew the ornament by hand instead of using a machine?
Absolutely. Hand stitching takes longer but adds a special handmade charm to the ornament.
4. What is the best stuffing for this project?
Polyester fiberfill works best because it is lightweight, easy to use, and keeps its shape over time.
5. How can I make my star ornament more durable?
Use strong thread, reinforce seams, and avoid overstuffing. Storing them carefully after the holidays also helps.
6. Can I customize the ornament for other occasions?
Yes, you can change the colors and fabrics to suit birthdays, weddings, or other celebrations. The star design is versatile and timeless.
Conclusion
In this Patchwork Star Ornament for Christmas- Step by Step Tutorial, we covered everything from choosing materials to sewing and decorating your ornament.
You learned how to cut and arrange fabrics, assemble a star, stuff and finish it, and even discovered creative ideas for using your handmade stars during the holiday season. With practice and creativity, you can make ornaments that reflect your style and spread festive cheer.
Now it’s your turn to bring this project to life. Try making a patchwork star ornament, and don’t forget to share your experience. Leave your honest opinion and suggestions so that others can be inspired by your crafting journey.