
Learning how to make a Crochet Mini Pumpkin Keychain!- Step by Step Tutorial is a delightful way to combine creativity, functionality, and seasonal charm. This little project is perfect for fall, especially during Halloween and Thanksgiving, but it’s also cute enough to use year-round. The keychain is small, practical, and fun to crochet, making it an excellent craft for beginners and experienced makers alike. With just a few materials and some patience, you can create a tiny pumpkin that doubles as an adorable accessory.
The beauty of the Crochet Mini Pumpkin Keychain!- Step by Step Tutorial lies in its simplicity. You don’t need advanced crochet skills to complete it, yet the end result looks impressive and professional. These mini pumpkins can be used not only as keychains but also as bag charms, car mirror decorations, or even party favors. Their versatility makes them a favorite project among crafters, and because they require little yarn, they are a great way to use up leftover scraps from other projects.
Another advantage of making a Crochet Mini Pumpkin Keychain!- Step by Step Tutorial is the opportunity to personalize your work. While traditional pumpkins are orange with green stems, you can choose any color combination you like. Imagine creating pastel pumpkins for spring, bold neon pumpkins for a modern look, or classic orange ones for autumn festivities. This flexibility allows you to create unique gifts for friends and family or to craft seasonal collections to sell at craft fairs.
Materials Needed for the Crochet Mini Pumpkin Keychain
To begin the Crochet Mini Pumpkin Keychain!- Step by Step Tutorial, you will need to gather your materials. Fortunately, this project requires only a handful of items, making it inexpensive and accessible. Choosing the right supplies ensures that your pumpkin will be sturdy, colorful, and durable enough for daily use.
Start with worsted weight yarn, which is ideal for small crochet projects. Orange yarn is the classic choice, but you can experiment with any colors you like. A small amount of green or brown yarn will also be needed to create the pumpkin stem. If you want to personalize your pumpkin further, consider using variegated yarns for a multicolored effect.
A crochet hook in the size range of 3.5mm to 4mm works best for this project. This size allows you to make tight stitches, which is important so that the stuffing does not show through. Using the right hook helps the pumpkin maintain its round shape and prevents gaps in the fabric.
You will also need some polyester fiberfill or another type of soft stuffing material. This filling is what gives the pumpkin its plump and adorable shape. Be careful not to overstuff, as that can stretch the stitches and change the design.
Additional tools include scissors, a yarn needle, and a keychain ring. The scissors will help you trim excess yarn neatly, while the yarn needle will be used for sewing the pumpkin closed and attaching the stem. The keychain ring completes the project, turning your tiny pumpkin into a portable accessory.
If you want to add extra flair, you can also include small embellishments like beads, ribbons, or even embroidered details. These touches can make your pumpkin more unique and eye-catching.
Step by Step Instructions for Crochet Mini Pumpkin Keychain
Now that your materials are ready, it’s time to follow the Crochet Mini Pumpkin Keychain!- Step by Step Tutorial. The process involves crocheting a simple base, shaping it into a pumpkin, and adding the finishing details like the stem and keychain ring. Each step is easy to follow and can be completed in just a short amount of time.
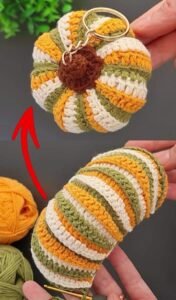
Start by crocheting a small rectangle using single crochet stitches. This flat piece will be the base of your pumpkin. Once you have the desired size, fold the rectangle in half and stitch the sides together to form a tube. This creates the pumpkin’s body.
Next, close one end of the tube by sewing it shut. After this step, stuff the pumpkin with fiberfill until it is plump but still soft. Be sure to distribute the stuffing evenly so the pumpkin keeps a round shape. Once stuffed, close the other end of the tube to complete the main body.
To create the signature pumpkin ridges, use a piece of yarn and wrap it around the body several times. Pull the yarn tightly enough to form visible segments, but not so tight that it distorts the pumpkin’s shape. This step is what transforms a simple ball into a realistic mini pumpkin.
For the stem, crochet a small green or brown piece, such as a short tube or rectangle. Attach it securely to the top of the pumpkin using a yarn needle. This detail completes the pumpkin’s recognizable appearance and adds character to the keychain.
Finally, attach a keychain ring to the top of the stem. You can loop yarn or use a metal chain to secure it. Once this step is done, your crochet mini pumpkin is ready to be used as a keychain or gifted to someone special.
Creative Ways to Personalize Your Mini Pumpkin Keychain
The Crochet Mini Pumpkin Keychain!- Step by Step Tutorial can be customized in countless ways. By changing colors, sizes, and details, you can create unique designs that stand out and reflect your personal style.
One popular option is to experiment with yarn colors. Instead of sticking to the classic orange, try making pumpkins in white, purple, or even glittery yarn for a festive look. This makes your keychain suitable for different holidays or seasons.
Adding decorative details is another way to personalize your project. You could sew on tiny crochet leaves to the stem, attach beads for sparkle, or use embroidery to add faces to your pumpkins. This can turn them into Halloween jack-o’-lanterns or cheerful cartoon-like charms.
You can also play with size. By adjusting the starting rectangle, you can make larger pumpkins for bag charms or smaller ones for delicate keychains. A collection of pumpkins in varying sizes can look adorable together.
For a more rustic look, consider using natural-colored yarns like beige, brown, or muted greens. These pumpkins can blend well with farmhouse or vintage-themed decorations.
If you’re making the keychains as gifts, you could personalize them with initials or small tags. Adding the recipient’s favorite color or symbol makes the gift more meaningful and unique.
Finally, for those who sell handmade crafts, offering seasonal sets of pumpkin keychains can attract customers. Bundling several colors together makes them appealing as holiday gifts or party favors.
Common Mistakes and Helpful Tips
Even with a simple project like the Crochet Mini Pumpkin Keychain!- Step by Step Tutorial, there are common mistakes beginners should watch out for. Knowing these ahead of time will help you avoid frustration and achieve better results.
One mistake is using the wrong hook size. If your stitches are too loose, the stuffing may peek through, which can make the pumpkin look messy. Always use a smaller hook for tighter stitches.
Another issue is uneven stuffing. If the fiberfill is clumped in certain areas, the pumpkin will look lopsided. To avoid this, insert the stuffing in small amounts and spread it evenly.
Some crafters forget to secure the yarn tightly when creating the pumpkin ridges. If the yarn is too loose, the segments won’t be visible, and the pumpkin will just look like a ball. Pull firmly but carefully when wrapping the yarn around the pumpkin.
Attaching the stem improperly is another common error. If it isn’t secured well, the stem might come off with regular use. Always double-knot the yarn and weave in the ends to keep everything in place.
Beginners may also forget to properly fasten the keychain ring. Using weak loops or thin yarn can cause the keychain to detach. It’s best to reinforce this step to ensure durability.
Lastly, rushing through the project often leads to mistakes. Taking your time to count stitches, align details, and finish neatly will greatly improve the final result.
FAQ About Crochet Mini Pumpkin Keychain
1. Can beginners make this Crochet Mini Pumpkin Keychain?- Step by Step Tutorial?
Yes, this project is very beginner-friendly. It uses basic stitches like single crochet and simple shaping techniques.
2. How long does it take to make a mini pumpkin keychain?
Most crafters can complete one in about 1 to 2 hours, depending on their skill level.
3. What type of yarn is best for this project?
Worsted weight cotton or acrylic yarn works best because it provides durability and structure.
4. Can I wash the crochet pumpkin keychain?
Yes, you can hand wash it gently with mild soap and let it air dry. Avoid machine washing to preserve the shape.
5. How can I make the pumpkin bigger or smaller?
You can adjust the size by increasing or decreasing the number of stitches in the starting rectangle.
6. Can I sell the mini pumpkin keychains I make?
Absolutely! Handmade keychains like these are popular items for craft fairs and online shops, especially during the fall season.
Conclusion
Creating a Crochet Mini Pumpkin Keychain!- Step by Step Tutorial is a fun and rewarding project that combines seasonal charm with practical use. With simple stitches, a few materials, and a touch of creativity, you can craft a keychain that is both adorable and functional.
This tutorial has guided you through the materials needed, step-by-step instructions, personalization ideas, and common mistakes to avoid.
Now it’s your turn to try making one and enjoy the process. Please share your sincere opinion and suggestions—I’d love to hear how your pumpkin turned out and what creative variations you added!