
Learning a Mushroom Crochet Pattern- Step by Step Tutorial is an exciting journey for anyone who enjoys crochet projects that are both cute and versatile. Mushrooms are whimsical, playful, and charming, making them a popular motif for crochet enthusiasts. Whether you want to make tiny decorative mushrooms, larger ones for home décor, or even keychains and toys, this tutorial will guide you through the entire process with clarity. By the end, you’ll have the knowledge and confidence to crochet your own mushroom creations.
The appeal of working on a mushroom crochet pattern lies in its simplicity combined with creativity. It is a beginner-friendly project, yet it allows more advanced crocheters to add details, textures, and colors to make each mushroom unique. Handmade mushrooms can be used as ornaments, accessories, or thoughtful gifts. They can also be turned into functional items such as pincushions or added to amigurumi sets. With just a few basic stitches and some patience, you can bring these delightful creations to life.
This step by step tutorial will not only teach you the techniques but also inspire you to customize your mushrooms. From choosing the right yarn and hook size to shaping the cap and stem, every stage will be explained in detail. Even if you are new to crochet, you will find the instructions approachable and motivating. For experienced crafters, this project provides plenty of room for creativity and experimentation. Now let’s explore how to bring this charming design into your crochet collection.
Materials and Preparation
When starting this Mushroom Crochet Pattern- Step by Step Tutorial, it is important to gather all the necessary materials. Having everything ready ensures a smooth crocheting process without interruptions. You will typically need yarn, a crochet hook, stuffing material, scissors, a yarn needle, and stitch markers. Acrylic yarn is commonly used, but cotton yarn works wonderfully for a neat finish.
The yarn color choices are what make mushrooms so fun. A classic mushroom has a red cap with white spots and a beige or white stem, but you can explore endless combinations. Try pastel tones for a softer look, bold colors for a whimsical design, or even realistic shades if you prefer natural styles. Yarn weight also plays a role; thinner yarn creates smaller mushrooms, while thicker yarn gives you larger and chunkier ones.
Hook size should match the yarn you choose, but for amigurumi-style projects, it’s often better to use a hook one size smaller than recommended. This ensures that your stitches are tight enough to prevent stuffing from showing through. Keeping your stitches consistent is key to achieving a neat and professional result.
Stuffing is another essential element. Polyester fiberfill is the most common option as it is lightweight, fluffy, and easy to work with. For smaller mushrooms, you can even use yarn scraps as stuffing. Make sure to fill the cap and stem firmly but not overly tight to keep the shape balanced.
Stitch markers are extremely helpful when working in continuous rounds, which is often the case with amigurumi projects like mushrooms. They help you keep track of where each round begins and ends, preventing mistakes. Even experienced crocheters benefit from using them.
Lastly, organize your tools in a small pouch or container to keep them handy. Crochet projects are more enjoyable when your workspace is tidy and accessible. With materials prepared, you are ready to dive into the creative part of this tutorial.
Crocheting the Mushroom Cap
The cap is the most recognizable part of the mushroom crochet pattern, and it’s where you can have the most fun with color and texture. Most crochet mushroom caps are worked in rounds, starting from a magic ring and gradually increasing stitches to form a dome shape. The size of the cap depends on how many rounds you complete and how many increases you make.
Begin with a magic ring and a small number of single crochets inside it. This creates the foundation of your mushroom cap. From there, increase evenly around in each round to expand the circle. Keep your tension consistent, as this determines the smoothness of the cap.
As you work more rounds, the cap will start to curve naturally. If you want a flat cap, like those seen in certain mushroom varieties, stop increasing earlier. For a dome-shaped cap, continue adding increases for several rounds before working even rows without increases. This shaping step defines the overall look of your mushroom.
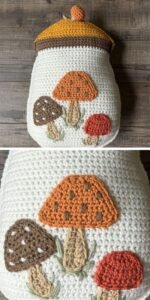
Adding color changes can create the classic mushroom look with spots or unique designs. For example, you can crochet small white circles separately and sew them onto a red cap, or you can add bobble stitches directly to mimic raised spots. These details make your mushroom more charming and visually appealing.
To give your cap extra stability, you can insert a small piece of cardboard or felt inside before attaching the stem. This is optional but helpful if you want your mushroom to hold its shape firmly, especially for larger projects.
Once the cap is the size and shape you want, stuff it lightly with fiberfill. Avoid overstuffing at this stage, as you will add more once the stem is attached. The cap is now ready to be joined with the rest of your mushroom.
Crocheting the Stem
The stem is the second major part of the Mushroom Crochet Pattern- Step by Step Tutorial, and it provides balance to the cap. Stems are usually crocheted in continuous rounds starting from a magic ring, similar to the cap, but with fewer stitches to create a cylindrical shape.
Start with a magic ring and work single crochets evenly. Unlike the cap, the stem does not require many increases. Keep working in rounds until the stem reaches the desired length. A shorter stem creates a squat mushroom, while a longer stem makes a tall and elegant one.
You can experiment with different shapes by adding slight increases or decreases as you go. A tapered stem that narrows at the bottom or widens toward the cap gives your mushroom character. Crochet allows for this flexibility, so don’t be afraid to experiment.
As you near the end of the stem, remember to stuff it firmly. The stem should be filled tightly enough to support the cap. Using a chopstick or the back of a crochet hook can help push stuffing evenly into narrow spaces.
When the stem is complete, leave a long yarn tail for sewing. Attach it securely to the cap by stitching around the opening, making sure there are no gaps. Add more stuffing before closing the seam completely to ensure your mushroom is firm and stable.
The stem can also be decorated. You can embroider tiny lines to mimic gills, or add a collar-like detail near the cap for extra realism. These finishing touches make your mushroom look more detailed and polished.
Creative Uses for Crochet Mushrooms
One of the most exciting parts of following a Mushroom Crochet Pattern- Step by Step Tutorial is exploring what you can do with your finished mushrooms. These little creations can be both decorative and functional.
Miniature mushrooms make wonderful keychains. By attaching a metal ring or clip to the top of the cap, you can turn your crochet into a portable accessory. These are perfect for gifts, and their small size makes them quick to complete.
Another use is as home décor. Place a few crochet mushrooms in a decorative bowl or create a fairy garden display. They bring a whimsical touch to shelves, tables, or children’s rooms. Their playful look makes them a favorite among those who love nature-inspired decorations.
Mushrooms also work beautifully as pincushions. The cap’s dome shape is ideal for holding sewing pins, making it a practical accessory for crafters. You can even add weight to the bottom by inserting rice or beads inside the stem so the mushroom stays upright.
For seasonal décor, crochet mushrooms fit perfectly into autumn or woodland-themed projects. Combine them with crochet leaves, acorns, or pumpkins for a cohesive seasonal display. They add warmth and charm to any space during festive times.
Lastly, mushrooms can be incorporated into larger amigurumi projects. Imagine a crochet forest scene with animals, trees, and mushrooms together. They make excellent additions to storytelling props or children’s playsets.
FAQ About Mushroom Crochet Pattern
1. Is a mushroom crochet pattern suitable for beginners?
Yes, mushrooms are beginner-friendly since they mainly use single crochet stitches and simple shaping techniques.
2. What size hook should I use?
It depends on your yarn, but generally, use a hook one size smaller than recommended to keep stitches tight for amigurumi.
3. How do I make the mushroom cap look rounder?
Add more rounds with increases, then work several rounds without increases to form a dome shape.
4. Can I wash crochet mushrooms?
Yes, if made with washable yarn like cotton or acrylic. Handwashing is best to maintain their shape.
5. How long does it take to make one mushroom?
Small mushrooms can be made in under an hour, while larger, detailed ones may take a few hours.
6. Can I sell the mushrooms I make from this pattern?
Yes, handmade items are great for selling, especially at craft fairs or online, as long as they are your own creations.
Conclusion
In this article, we explored the Mushroom Crochet Pattern- Step by Step Tutorial, covering everything from gathering materials to crocheting the cap, shaping the stem, and discovering creative uses.
Mushrooms are fun, versatile, and rewarding projects that allow you to practice crochet skills while making something truly charming.
Now it’s your turn to try creating your own mushroom crochet project. I’d love to hear your opinion about this tutorial and any suggestions for future crochet ideas. Share your thoughts and let’s keep inspiring creativity together!