
Starting your crafting journey with a Pumpkin Pie Slice Coasters Crochet Pattern Tutorial – Step by Step Tutorial is one of the most delightful ways to combine functionality and creativity. Crochet coasters are not only practical household items but also serve as adorable decorative pieces that reflect your personality and style. When shaped like slices of pumpkin pie, they instantly bring warmth, coziness, and a festive feel to your space. This project is perfect for beginners and experienced crocheters alike, offering a creative challenge while still being manageable.
The charm of pumpkin pie slice coasters lies in their versatility. They can be used to protect tables from hot drinks, gifted as handmade presents, or displayed as seasonal décor. Whether you’re creating them for Thanksgiving, autumn gatherings, or simply because you love pumpkin pie, this crochet project is sure to spark joy. The Pumpkin Pie Slice Coasters Crochet Pattern Tutorial – Step by Step Tutorial gives you all the tools you need to make them with confidence.
In this article, you will learn not only how to crochet these beautiful coasters but also how to choose the right yarn, stitches, and techniques to make your project a success. The tutorial breaks everything down into simple steps, ensuring that you can follow along even if you are new to crochet. With a little patience and creativity, you’ll soon have a set of coasters that look just like slices of delicious pumpkin pie, complete with crust and topping details.
Materials Needed for Pumpkin Pie Slice Coasters
Before you dive into the Pumpkin Pie Slice Coasters Crochet Pattern Tutorial – Step by Step Tutorial, gathering the right materials is essential. The supplies are simple, but choosing the correct ones will ensure your project turns out exactly as you envision it.
Start with yarn in three main colors: pumpkin orange for the filling, beige or light brown for the crust, and white for the whipped cream detail. Cotton yarn is recommended because it is absorbent, durable, and easy to wash, making it ideal for coasters that will come into contact with drinks. You can choose yarn weights according to your preference, but medium-weight cotton yarn is most common for this type of project.
Next, you’ll need a crochet hook that corresponds with the yarn size. Most medium-weight yarns work well with a 4.0 mm or 4.5 mm hook, but you can check the yarn label for the best suggestion. A good hook will help you maintain even stitches and keep your coasters looking neat.
Other helpful tools include scissors, a yarn needle for weaving in ends, and stitch markers if you like to keep track of your rounds. These small accessories can make the crafting process smoother and less stressful. Don’t overlook the importance of having everything ready before you begin, as it ensures you can focus on the fun part—crocheting!
Some crafters also like to add a little stiffener spray once the coasters are finished, especially if they want them to hold a very defined slice-like shape. This step is optional but can add extra polish to your project.
Finally, remember to set aside time and a comfortable space for your crafting. The beauty of this project is that it can be done in small increments. You can make one coaster in a sitting or work on several pieces of the project throughout the week. The simplicity of the Pumpkin Pie Slice Coasters Crochet Pattern Tutorial – Step by Step Tutorial makes it both beginner-friendly and adaptable to different crafting schedules.
Step by Step Instructions for the Coasters
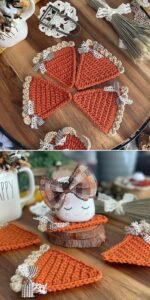
The Pumpkin Pie Slice Coasters Crochet Pattern Tutorial – Step by Step Tutorial starts with the base, which represents the pumpkin filling. To begin, create a magic ring and work double crochets in the round, gradually increasing until you reach the desired size for the triangle slice base. The goal is to form a flat, triangular piece that resembles a wedge of pie.
Once the triangle base is formed, the next step is adding the crust. This part is usually done in a light beige or tan color. By switching yarns, you crochet a border around the two straight edges of the triangle, giving it the look of a flaky pie crust. The crust can be crocheted in a simple single crochet border or a more textured stitch like scallops to make it look extra realistic.
After the crust, you can enhance the detail by adding the iconic whipped cream topping. Using white yarn, crochet a small circle or spiral and stitch it onto the top of the slice. This final touch gives the coaster a playful and finished look, making it instantly recognizable as a pumpkin pie slice.
It’s important to keep your stitches even and consistent. Beginners might feel their coasters don’t look exactly triangular at first, but with practice and careful counting of stitches, the shape becomes more precise. The tutorial’s clear steps guide you through each round, so you won’t feel lost even if this is your first time trying a shaped coaster.
You can repeat the process to make as many coasters as you’d like. A typical set includes four to six slices, but you can make more if you’re preparing for a large gathering or creating them as gifts. Each slice is quick to crochet, making them perfect for last-minute projects.
Remember that handmade projects are meant to be unique, so even if each coaster isn’t identical, that’s part of the charm. The Pumpkin Pie Slice Coasters Crochet Pattern Tutorial – Step by Step Tutorial celebrates creativity while keeping the process approachable.
Creative Uses for Pumpkin Pie Slice Coasters
One of the joys of the Pumpkin Pie Slice Coasters Crochet Pattern Tutorial – Step by Step Tutorial is that the final product has so many uses beyond just being a coaster. While protecting your tables from hot or cold drinks is their primary function, they also add a delightful decorative element to any room.
These coasters make excellent seasonal decorations, especially for fall and Thanksgiving. Imagine setting a holiday table where each guest has their own slice-of-pie coaster under their drink—it adds a personal and festive touch. They can also be placed under small pumpkins, candles, or centerpieces to tie together an autumnal theme.
They are also wonderful handmade gifts. Whether you’re making them for friends, family, or coworkers, pumpkin pie coasters bring smiles and appreciation. Handmade items show thoughtfulness and effort, making them far more meaningful than store-bought alternatives.
Another fun idea is to package them together in a set, wrap them with ribbon, and gift them as part of a Thanksgiving hostess present. It’s a practical yet creative way to say thank you to someone hosting a gathering.
These coasters are also great for craft fairs or small handmade businesses. Their cute and unique design makes them eye-catching and appealing to customers, especially during the fall season. With the easy-to-follow steps of the Pumpkin Pie Slice Coasters Crochet Pattern Tutorial – Step by Step Tutorial, they can be produced relatively quickly and in batches.
Lastly, they can be used as teaching tools for crochet workshops. Because they involve basic techniques and simple assembly, instructors can use this pattern to teach beginners how to follow along with a tutorial while ending up with something fun and useful.
Tips for Beginners and Customization Ideas
The Pumpkin Pie Slice Coasters Crochet Pattern Tutorial – Step by Step Tutorial is excellent for beginners, but there are still tips to make your process smoother. The first tip is to always count your stitches carefully. Most issues in crochet arise from accidentally skipping or adding stitches, which can distort the shape of your project.
If you’re new to crochet, practice making small swatches of stitches before starting your coaster. This gives you confidence in handling the yarn and hook. Remember that tension is important—too tight, and the coaster may curl; too loose, and it may not hold its shape. Finding a balance takes time but comes with practice.
Customization is another fun aspect of this project. While the classic pumpkin orange, beige crust, and white topping are traditional, you can experiment with other “flavors.” For example, make coasters in chocolate brown with a cream edge to resemble a chocolate pie, or a pink slice with whipped cream for a strawberry pie look.
You can also vary the size of the coasters. Make them smaller for espresso cups or larger for mugs and bowls. Adding embellishments like beads or embroidery can further personalize your coasters.
Another tip is to block your coasters once finished. Blocking means shaping and lightly steaming or dampening the crochet piece to set it into the right form. This makes the triangle edges sharper and the overall slice look more polished.
Finally, don’t forget to enjoy the process. Crochet is not just about the finished product but also the relaxation and creativity it brings. With the Pumpkin Pie Slice Coasters Crochet Pattern Tutorial – Step by Step Tutorial, you have a fun, rewarding project that’s both practical and charming.
FAQ about Pumpkin Pie Slice Coasters Crochet Pattern Tutorial – Step by Step Tutorial
1. How long does it take to make one coaster?
On average, it takes about 30 to 45 minutes to make one coaster, depending on your crochet speed and experience.
2. What is the best yarn for these coasters?
Cotton yarn is best because it is absorbent, durable, and easy to wash, making it perfect for coasters.
3. Can beginners follow this tutorial?
Yes, the Pumpkin Pie Slice Coasters Crochet Pattern Tutorial – Step by Step Tutorial is beginner-friendly and uses basic stitches that are easy to learn.
4. Do I need to block the coasters?
Blocking is optional but recommended if you want the slices to have a more defined and professional look.
5. Can I customize the coaster to look like other pie slices?
Absolutely! You can change yarn colors to create chocolate, cherry, or even key lime pie slices.
6. Are these coasters washable?
Yes, if made with cotton yarn, they can be hand-washed or machine-washed on a gentle cycle.
Conclusion
The Pumpkin Pie Slice Coasters Crochet Pattern Tutorial – Step by Step Tutorial is a delightful project that combines functionality, creativity, and festive charm.
From gathering your materials to following the step-by-step instructions, you now have the knowledge to create your very own set of pumpkin pie slice coasters. These coasters make perfect gifts, decorations, or personal items that bring joy and warmth into your home.
We hope this tutorial has inspired you to pick up your yarn and hook and start crafting. Don’t forget to share your sincere opinion about this guide and leave suggestions for future tutorials. Your feedback helps keep the creative community growing and thriving. Would you like me to also prepare a shorter social media caption version of this article for your promotions?