
If you are curious about creating something unique and charming, then this crochet bird learn how to make- Step by Step Tutorial is exactly what you need. Crochet birds are small, decorative, and versatile handmade items that can be used as toys, keychains, ornaments, or even part of larger home décor projects. By following a detailed guide, you can transform yarn into adorable little birds that carry both personality and beauty.
The joy of working on a crochet bird project is that it allows you to explore creativity while also practicing fundamental crochet techniques. Whether you are a complete beginner or someone experienced, this step by step tutorial will show you how to start from basic stitches and gradually shape them into the body, wings, and details of a lovely bird. Adding features like eyes, beaks, and small tail feathers makes each creation unique, giving you endless options to personalize them.
In this tutorial, you will learn how to prepare the necessary materials, understand the basic shapes, assemble the parts, and finish your crochet bird beautifully. The crochet bird learn how to make- Step by Step Tutorial is written in a clear and approachable style so that anyone can follow along with ease. By the end, you will have a handmade piece that can brighten your space or become a thoughtful handmade gift for someone special.
Materials and Tools for the Crochet Bird
To begin this crochet bird learn how to make- Step by Step Tutorial, the first step is gathering the right materials and tools. Having everything ready will save time and keep the process enjoyable from start to finish.
Start with yarn. Cotton or acrylic yarns are perfect because they are easy to work with and come in a wide variety of colors. Bright shades like yellow, blue, green, or red bring your crochet bird to life, while neutral colors can give a more realistic look. Always choose yarn that matches the size of your crochet hook for best results.
Next, you will need a crochet hook. For smaller projects such as birds, hooks between 2.5 mm and 3.5 mm work best. These produce tighter stitches, ensuring that the stuffing inside the bird does not show through the fabric.
You will also need stuffing material, usually polyester fiberfill. This gives your crochet bird shape and makes it soft and cuddly. If you prefer an eco-friendly option, you can reuse fabric scraps or natural fibers.
Additional materials include a tapestry needle for sewing the parts together and weaving in ends, safety eyes or small beads for the eyes, and a small piece of felt or yarn for the beak. These small details add character and personality to your finished bird.
Scissors and stitch markers are also essential tools. Stitch markers are especially useful for keeping track of your rounds, which is important since most crochet bird patterns are worked in continuous spirals.
Having these supplies ready will make your crafting experience smooth and enjoyable, preparing you to dive into the next step of shaping your crochet bird.
Step by Step Instructions for Shaping the Bird
Now that your materials are prepared, let’s continue the crochet bird learn how to make- Step by Step Tutorial with step by step instructions for shaping the bird’s body and features. Following these instructions will guide you toward building a neat and well-formed design.
Begin with the body by creating a magic ring. Work single crochet stitches into the ring, increasing each round until you reach the desired size for the bird’s body. This round shape forms the main part of your bird.
Once you have the basic body, continue crocheting without increasing for several rounds. This builds up the body length and gives it a smooth, oval-like form. The size can vary depending on whether you want a small keychain or a larger decorative bird.
To shape the head, decrease gradually after working the body, leaving a slightly smaller round section. You can choose to crochet the head separately and attach it, or work it continuously from the body for a seamless look. Both methods create beautiful results depending on your preference.
The wings are made separately. Crochet small oval shapes using the same yarn or a contrasting color to give the bird a vibrant touch. Once finished, sew them onto the sides of the body carefully. Positioning the wings symmetrically helps balance the design.
The tail can be created by crocheting small triangles or feather-like shapes. Attach them at the back of the bird, and adjust the size depending on whether you want a subtle or dramatic look.
After assembling these parts, stuff the body gently with fiberfill. Avoid overstuffing, as this can stretch the stitches. Once the stuffing is in place, close the opening securely, ensuring the bird maintains its shape.
Adding Details and Personality to Your Bird
The details are what make this crochet bird learn how to make- Step by Step Tutorial so special. Adding small touches gives each bird a unique personality and charm.
For the eyes, you can use safety eyes, beads, or small embroidery stitches. Safety eyes are secure and give a polished finish, but embroidery is safer if the bird is intended for young children. Position the eyes symmetrically for balance.
The beak can be made from felt or crocheted as a tiny triangle. A bright orange or yellow yarn makes the beak stand out, while a neutral color gives a more realistic touch. Secure it firmly so that it remains in place.
Consider adding decorative stitching to the wings or body. Small embroidery details like lines or dots can mimic feathers and add texture to your bird. This is a creative way to personalize each piece.
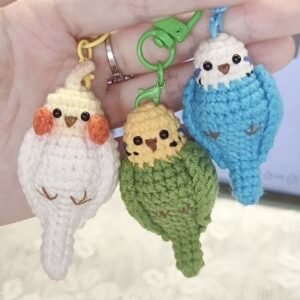
For a playful look, you can attach a small loop on the top of the bird’s head. This loop allows you to transform the crochet bird into a keychain, bag charm, or ornament. Simply insert a keyring or string through the loop.
Another idea is to use multicolored yarn or variegated yarn. This naturally creates color patterns as you crochet, resulting in a bird with unique shades and textures without having to change yarns frequently.
Adding these details transforms a simple crochet bird into a lively, character-filled creation that reflects your creativity and care.
Tips, Variations, and Creative Ideas
Once you have learned the basics of this crochet bird learn how to make- Step by Step Tutorial, it is time to explore variations and creative ideas. Customizing your bird designs keeps the craft fun and engaging.
Try experimenting with different yarn textures. For example, using fluffy or textured yarn can create a soft, feathery look. Smooth cotton yarn, on the other hand, gives a neat and polished finish.
You can also vary the size. Make a set of tiny birds to create a garland or mobile, or crochet a larger bird to use as a decorative pillow. Adjusting the hook and yarn size makes this process easy.
Consider making seasonal birds. Bright colors work well for spring, while deep reds and greens make wonderful holiday decorations. Birds can also be adapted to specific themes, such as weddings or baby showers, by choosing appropriate colors.
Another creative idea is to add accessories to your birds. Scarves, hats, or tiny flowers crocheted separately can be attached for extra charm. This makes them great gifts or personalized items.
If you enjoy practical crafts, turn your crochet birds into functional items. Attach them to keychains, magnets, or even pencil toppers. Small modifications can expand their usefulness.
Finally, think about creating a collection. By making birds in different colors and styles, you can build a set that represents various species or simply showcases your creativity. This variety keeps your crochet journey exciting and rewarding.
FAQ About Crochet Bird Learn How to Make
1. Is this project suitable for beginners?
Yes, this crochet bird learn how to make- Step by Step Tutorial is beginner-friendly. It uses basic stitches like single crochet, increases, and decreases, which are easy to learn and practice.
2. How long does it take to make one crochet bird?
The time depends on your skill level and the size of the bird. On average, small birds can be completed in one to two hours, while larger ones may take longer.
3. What yarn is best for crochet birds?
Cotton yarn gives a clean, defined look, while acrylic yarn is versatile and affordable. Choose the yarn based on the texture and finish you prefer for your project.
4. Can I make a crochet bird without safety eyes?
Yes, you can embroider the eyes using yarn or thread. This is a safer option if the bird is intended for small children or infants.
5. How do I keep the bird’s shape firm?
Use tight stitches and the right hook size for your yarn. Stuff the body gently with fiberfill, making sure not to overstuff, which can stretch the stitches.
6. Can I sell crochet birds I make using this tutorial?
Absolutely. Handmade crochet birds are popular items at craft fairs, online shops, and as custom gifts. Just ensure your work is neat and securely assembled.
Conclusion
In this article, you have learned the crochet bird learn how to make- Step by Step Tutorial, covering everything from materials and shaping techniques to details and creative variations. With yarn, a hook, and a little patience, you can create beautiful birds that showcase your creativity and bring joy to others.
This project proves that even a simple idea like crocheting a bird can turn into something special with the right guidance and attention to detail. Now that you know the process, I encourage you to try making your own crochet birds and experiment with different colors and designs.
I would love to hear your opinion about this tutorial. Please leave your honest feedback and share suggestions for new ideas you would like to see explained in future step by step guides. Your input is always valuable and inspires more creative projects.