
Starting an Amigurumi Bob Marley Crochet Gnome Pattern- Step by Step Tutorial is an exciting way to combine creativity, cultural inspiration, and the relaxing art of crochet. Amigurumi, which refers to the Japanese art of crocheting or knitting small stuffed figures, has become a beloved hobby worldwide. By combining this adorable style with the iconic image of Bob Marley, crafters can create a unique gnome that pays tribute to music, peace, and artistry. The process may look complex at first glance, but with patience and the right instructions, it becomes an enjoyable and rewarding project.
This tutorial aims to guide beginners and experienced crocheters alike in creating a handmade gnome inspired by the vibrant spirit of Bob Marley. Whether you are crocheting as a gift, for home décor, or simply for the joy of crafting, following a structured method ensures your final piece reflects both charm and personality. The best part of working with an Amigurumi Bob Marley Crochet Gnome Pattern- Step by Step Tutorial is that it allows for personal touches—color choices, accessories, and details—that make each gnome truly unique.
In this article, you will find everything you need to complete this project, including essential materials, basic stitches, construction steps, and ideas for finishing touches. To make the process easier, the tutorial is divided into sections so that you can follow along comfortably. By the end, you will not only have a completed gnome but also a stronger understanding of amigurumi techniques. With consistent practice, this project can even inspire you to explore other creative crochet designs in the future.
Materials and Tools for the Project
When starting an Amigurumi Bob Marley Crochet Gnome Pattern- Step by Step Tutorial, the first thing to prepare is the correct set of tools and yarn. Choosing quality materials makes a big difference in how the final product looks and lasts. Soft cotton or acrylic yarn is recommended since it holds shape well and is comfortable to work with. Selecting the right hook size is also essential, usually smaller than the yarn recommends, so that the stitches are tight enough to hold stuffing securely.
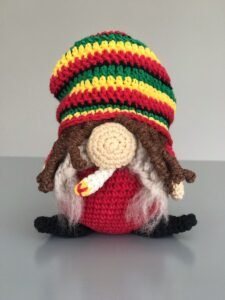
You will need a few colors of yarn to bring your Bob Marley gnome to life. Black yarn works well for the body and base, while vibrant red, yellow, and green shades are perfect for the iconic Rastafarian-inspired hat and details. Brown or tan yarn can be used for the skin tone of the gnome, while darker shades can form the hair and beard. Adding these colorful elements will make the gnome both recognizable and visually appealing.
Stuffing is another important material. Polyester fiberfill is commonly used and gives the gnome a soft yet structured form. You should also have safety eyes or small beads for the eyes, though embroidered eyes work perfectly for a safer option if the gnome is intended for children. A tapestry needle will be necessary to sew the parts together and to weave in loose ends once the crocheting is complete.
Scissors are another simple yet crucial tool for this project. Sharp scissors help trim yarn neatly, preventing frayed ends that can make assembly messy. Additionally, stitch markers come in handy, especially when working in continuous rounds. They ensure you do not lose track of your stitches and help maintain consistent shaping throughout the project.
When preparing your work area, it is best to keep all tools organized and within reach. Having everything ready before you start helps maintain focus and makes the process smoother. Whether you are following this Amigurumi Bob Marley Crochet Gnome Pattern- Step by Step Tutorial for the first time or repeating it later, preparation saves time and avoids mistakes.
Finally, consider personalizing your toolset. Some crocheters like ergonomic hooks that reduce hand strain, while others prefer basic aluminum hooks. Choosing tools that make you feel comfortable will enhance your crafting experience and help you enjoy the process more fully.
Step by Step Instructions for the Gnome Body
The base of the Amigurumi Bob Marley Crochet Gnome Pattern- Step by Step Tutorial begins with creating the gnome’s body. The body is typically worked in continuous rounds starting with a magic ring. This technique ensures there is no hole at the bottom of the figure. Working in spirals rather than joined rounds also helps maintain the smooth cylindrical shape needed for the gnome’s structure.
The body should gradually increase in width and then decrease toward the top to create a solid base. This tapering shape allows the gnome to stand firmly without wobbling. Using single crochet stitches throughout ensures the fabric remains tight and sturdy. Stuffing is gradually added as you work upward, which helps maintain even filling and prevents lumps.
Next comes the shaping of the legs or bottom edge. Some crafters prefer to leave the base plain, while others add small details for stability. Since the gnome is inspired by Bob Marley, keeping the focus on the hat, face, and beard is more important than on the feet. However, a well-shaped bottom ensures the piece does not tip over when displayed.
After completing the body, it’s time to make the arms. These are usually small cylindrical shapes that attach to the sides. Using the same yarn as the body or a slightly different tone helps add subtle contrast. The arms should be stuffed lightly so they can remain flexible when attached. Positioning them symmetrically is key to maintaining balance in the final design.
The nose is another defining feature of gnomes. It is typically a small round ball crocheted separately and sewn onto the face area. This adds to the traditional gnome look while giving character to the figure. In this Amigurumi Bob Marley Crochet Gnome Pattern- Step by Step Tutorial, the nose will sit below the hat brim and above the beard, making it central to the overall facial expression.
By carefully following these steps, you will have the foundation of your gnome complete. Once the body, arms, and nose are done, you are ready to move on to the more decorative elements that will make your Bob Marley gnome stand out.
Adding the Bob Marley-Inspired Details
One of the most enjoyable parts of the Amigurumi Bob Marley Crochet Gnome Pattern- Step by Step Tutorial is adding the signature details that make it instantly recognizable. The hat, for example, is a key element that symbolizes Bob Marley’s style and Rastafarian culture. Crocheting a slouchy beanie in bold red, yellow, and green stripes will bring vibrancy and cultural meaning to the gnome.
The beard and hair are also essential features. Using black or dark brown yarn, you can create strands of hair that mimic Marley’s iconic dreadlocks. Attaching these individually may take some patience, but the result is rewarding and authentic. The beard can be crocheted directly or added with strands of yarn for a fuller texture. This adds charm and personality to the gnome’s face.
Clothing details can be customized, but keeping with the reggae-inspired theme works best. A simple tunic or shirt shape in neutral tones balances the boldness of the hat. Small accents, like a crocheted guitar or microphone, can also be added if you want to highlight Marley’s musical influence. These accessories are optional but make the piece even more unique.
Another fun detail is the addition of accessories, such as a peace symbol or music note embroidered onto the body. These small touches enhance the tribute to Bob Marley and make the gnome a conversation piece when displayed. This project allows plenty of room for personal creativity, so feel free to explore different ideas.
Paying attention to placement is very important. The hat should sit comfortably over the top of the head, slightly slouched for the authentic look. The hair should peek out from underneath, framing the gnome’s face and blending naturally with the beard. Proper placement of these details ensures the final product looks polished and cohesive.
In the end, these signature details are what transform a simple gnome into a Bob Marley-inspired piece of art. Each feature tells part of the story and contributes to the overall personality of the gnome.
Assembly and Finishing Touches
The last section of the Amigurumi Bob Marley Crochet Gnome Pattern- Step by Step Tutorial involves assembling the parts and adding finishing touches. This stage requires patience and precision because how you join the pieces affects the overall look. Using a tapestry needle and matching yarn, carefully sew the arms, nose, and beard into place. Taking time to stitch neatly makes the difference between a homemade look and a professional finish.
Stuffing should be checked before closing up any final seams. Make sure the gnome is evenly filled, with no lumps or loose areas. Adjusting stuffing at this stage ensures the gnome will hold its shape over time. Once satisfied, secure the stitches firmly to keep everything in place.
After attaching the hat, adjust it so it rests naturally on the head. This accessory is one of the defining features of the project, so positioning it correctly is important. The brim should frame the nose, while the slouch adds character. You can lightly stitch the hat in place to prevent it from shifting.
The eyes are another final detail that brings the gnome to life. Safety eyes can be inserted earlier, but embroidered eyes added at this stage give a softer and customizable look. Some crafters even choose to leave the eyes hidden beneath the hat, which adds mystery and keeps the focus on the hat and beard.
Once the gnome is fully assembled, you may add optional decorations like embroidered music notes or peace signs. These are not necessary but can add charm and a personal touch to the finished piece. Taking the time to refine these small details makes your gnome a unique keepsake.
Finally, give your gnome a last inspection. Straighten the hat, fluff the beard, and smooth out the stuffing. With these steps complete, your Amigurumi Bob Marley Crochet Gnome Pattern- Step by Step Tutorial is finished, and you now have a handmade figure that reflects both creativity and cultural inspiration.
FAQ About Amigurumi Bob Marley Crochet Gnome Pattern
What level of crochet skill is required for this project?
This project is beginner-friendly with clear instructions, but having some basic knowledge of stitches like single crochet and working in rounds will be helpful.
How long does it take to complete the gnome?
On average, it may take 6–10 hours depending on your skill level and the amount of detailing you add, such as accessories or extra decoration.
Can I use different yarn types for this project?
Yes, you can use cotton, acrylic, or blended yarn. Just make sure the yarn thickness matches the hook size you are using to maintain the right tension.
Is it safe for children?
If you plan to give the gnome to a child, avoid using safety eyes or small beads. Instead, embroider the eyes to make the toy safer for young ones.
Can I personalize the design?
Absolutely! The tutorial encourages adding personal touches like different hat colors, accessories, or embroidered details to make the gnome one-of-a-kind.
Do I need special tools for this project?
No, only basic crochet tools are needed: yarn, hook, tapestry needle, stuffing, and scissors. Stitch markers are optional but very useful for beginners.
Conclusion
Creating an Amigurumi Bob Marley Crochet Gnome Pattern- Step by Step Tutorial is more than just a crafting project—it is an opportunity to express creativity, celebrate culture, and enjoy the relaxing rhythm of crochet. From preparing materials to assembling final details, each step contributes to a handmade piece filled with personality and meaning.
This tutorial provided a detailed guide, from shaping the body to adding signature Marley-inspired features like the colorful hat and iconic hair. With patience and creativity, anyone can complete this project and create a unique gnome that reflects both artistry and inspiration.
We hope this guide has been helpful and inspiring. If you try making your own Bob Marley crochet gnome, we would love to hear your honest opinion and suggestions. Sharing your experience can help other crafters and build a supportive community of crochet enthusiasts.