
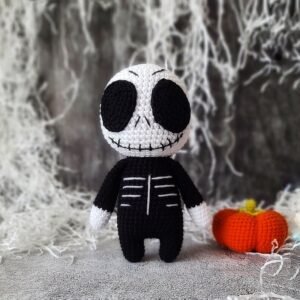
If you want a fun and festive project to celebrate spooky season, the Crochet Halloween Skeleton and Pumpkin- Step by Step Tutorial is the perfect choice. This tutorial is designed to help beginners and experienced crocheters alike create adorable yet slightly spooky decorations. A handmade crochet skeleton and pumpkin set makes for wonderful Halloween home décor, party favors, or even unique gifts for friends who love seasonal crafts. By following this guide, you will not only learn how to crochet these themed items but also improve your crochet skills with clear and detailed instructions.
The beauty of this Crochet Halloween Skeleton and Pumpkin- Step by Step Tutorial is that it combines creativity with practicality. You get to explore different stitches, shaping techniques, and assembly tips that give character to your final creations. Whether you want a scary skeleton or a cute pumpkin with a cheerful face, this pattern allows plenty of room for personalization. You can choose the yarn colors that suit your Halloween vibe, from traditional orange and black to playful pastel shades for a softer look.
Another reason why many people are drawn to this tutorial is the joy of seasonal crafting. Handmade Halloween décor adds a warm, personal touch to any celebration. Instead of purchasing mass-produced decorations, you can create something unique that reflects your own style. With this Crochet Halloween Skeleton and Pumpkin- Step by Step Tutorial, you not only enjoy the process of crafting but also end up with a delightful piece you’ll be proud to display year after year.
Materials and Tools Needed for Crochet Halloween Skeleton and Pumpkin
Before starting the Crochet Halloween Skeleton and Pumpkin- Step by Step Tutorial, it’s important to gather all the necessary supplies. Preparing your materials in advance ensures a smooth and enjoyable crafting process. Yarn is the star of the project, so choose high-quality yarn in colors such as white, black, and orange to bring your skeleton and pumpkin to life. Cotton yarn is highly recommended because of its durability and neat stitch definition.
Crochet hooks are another essential tool. The size of the hook depends on the yarn weight you choose. A smaller hook will give you tighter stitches, which is great for shaping small details like the skeleton’s bones or the pumpkin’s ridges. A larger hook, on the other hand, makes the project softer and slightly bigger. Having a few sizes available can help you experiment until you find the result you like best.
Stuffing material is crucial to give your skeleton and pumpkin their 3D form. Polyester fiberfill works perfectly for this purpose because it is lightweight, soft, and easy to mold. You’ll also need safety eyes, embroidery thread, and a yarn needle for sewing parts together and adding details such as the skeleton’s face or the pumpkin’s stem. Scissors and stitch markers will also come in handy for cutting yarn and keeping track of your progress.
When working through the Crochet Halloween Skeleton and Pumpkin- Step by Step Tutorial, organization makes everything easier. Place your materials in a basket or box so you won’t lose track of small items. This simple preparation helps you stay focused and avoid interruptions while crocheting. Remember that crafting should be a fun and stress-free experience.
In addition to the basic supplies, you may want to keep optional accessories on hand. For example, felt or fabric glue can be used for extra embellishments. Small buttons or beads can add character to your skeleton’s outfit or give your pumpkin a sparkle. These little extras are optional but can make your final project stand out.
Finally, patience and creativity are also part of your toolkit. The Crochet Halloween Skeleton and Pumpkin- Step by Step Tutorial requires careful attention to detail, especially when assembling the different parts. But with practice, you’ll find the process rewarding and relaxing.
Step by Step Instructions for the Crochet Skeleton
The skeleton part of the Crochet Halloween Skeleton and Pumpkin- Step by Step Tutorial starts with the head. You’ll begin by working in the round using basic stitches like single crochet. Increasing stitches gradually helps form a round skull shape. This is the foundation of the skeleton and sets the tone for the rest of the project.
Once the head is complete, you move on to the body. The skeleton’s body is usually cylindrical, and crocheting in continuous rounds helps maintain the shape. You can stuff the body as you go along to give it firmness. Using stitch markers here is helpful to avoid losing your place while working in spirals.
Next come the arms and legs. These are smaller pieces but equally important for the overall look of the skeleton. The limbs are crocheted separately and then sewn onto the body. Keeping the stitches tight ensures the arms and legs don’t appear floppy. Adding stuffing to the limbs before attaching them gives your skeleton structure and makes it more realistic.
The details are what bring your skeleton to life. The Crochet Halloween Skeleton and Pumpkin- Step by Step Tutorial encourages using embroidery thread or black yarn to create facial expressions. Simple stitches can form the mouth and nose, while safety eyes give the skeleton a playful or spooky look, depending on your preference.
Assembling the skeleton requires care and precision. Positioning the limbs and head properly ensures balance and symmetry. A yarn needle makes the sewing process easier, and double-checking placement before stitching helps avoid mistakes. Remember that this is your handmade creation, so feel free to adjust the design to suit your vision.
At this stage, your skeleton is nearly complete. The last step is adding optional accessories like a small scarf, hat, or even a tiny bow tie. These finishing touches give your skeleton personality and make it stand out in your Halloween collection.
Step by Step Instructions for the Crochet Pumpkin
Now let’s move to the pumpkin portion of the Crochet Halloween Skeleton and Pumpkin- Step by Step Tutorial. The pumpkin is made using rounds of single crochet, starting with a magic ring. Increasing stitches gradually forms a flat circle, which then transforms into a bowl shape as you continue crocheting. This is the foundation of the pumpkin’s body.
Once the base is established, you begin shaping the pumpkin. By alternating between increases and decreases, you can create the ridged effect that gives pumpkins their signature look. Orange yarn is the classic choice, but don’t be afraid to experiment with other colors such as white or green for a unique twist.
After completing the body, stuffing is added to give the pumpkin its plump and round form. It’s important to fill it firmly but not too tightly, as overstuffing can distort the shape. The top is then closed using a series of decreases until the pumpkin is sealed. This step requires careful stitching to keep the pumpkin looking neat and symmetrical.
The stem of the pumpkin is crocheted separately, usually in green or brown yarn. It is then attached to the top of the pumpkin. A simple cylindrical shape works well, but you can also experiment with curls or vines for extra detail. The stem adds character and completes the pumpkin’s design.
Facial features are optional but highly recommended for Halloween. Using black yarn or felt, you can create eyes and a mouth to turn your pumpkin into a jack-o’-lantern. This small addition transforms a simple crochet pumpkin into a festive Halloween decoration.
Once all parts are assembled, you can further decorate the pumpkin with ribbons, beads, or even tiny hats. The Crochet Halloween Skeleton and Pumpkin- Step by Step Tutorial gives you the freedom to add your own flair and creativity.
Tips for Beginners and Personalization Ideas
The Crochet Halloween Skeleton and Pumpkin- Step by Step Tutorial is beginner-friendly, but some parts may feel challenging at first. If you are new to crochet, practice basic stitches such as single crochet, increase, and decrease before starting. This will make the process smoother and less intimidating.
Patience is key when working with amigurumi-style projects. The skeleton’s smaller parts require precision, while the pumpkin’s shaping takes practice. Take your time and don’t rush through the steps. Crocheting is meant to be a relaxing and enjoyable activity.
Personalization is one of the best parts of this tutorial. You can change yarn colors to match your Halloween theme, add different accessories, or experiment with facial expressions. A smiling skeleton or a spooky pumpkin can completely change the mood of your decorations.
For those who enjoy gifting handmade items, this crochet set makes a wonderful present. A skeleton and pumpkin duo is thoughtful, festive, and shows the effort you put into creating something unique. Pair them with Halloween candy or treats for a memorable gift package.
Another fun idea is to create a whole collection. Instead of making just one skeleton and one pumpkin, you can crochet multiple pieces in different sizes and colors. Displaying them together creates a charming Halloween centerpiece for your home.
Finally, remember to enjoy the creative journey. The Crochet Halloween Skeleton and Pumpkin- Step by Step Tutorial is not just about the finished product—it’s about the joy of crafting and the pride of making something with your own hands.
FAQ about Crochet Halloween Skeleton and Pumpkin
1. Is the Crochet Halloween Skeleton and Pumpkin suitable for beginners?
Yes, this tutorial is beginner-friendly, though some parts like small limbs or shaping the pumpkin may take practice.
2. What type of yarn is best for this project?
Cotton yarn is recommended for durability and stitch clarity, but acrylic yarn can also be used for a softer finish.
3. How long does it take to complete the skeleton and pumpkin?
Depending on your skill level, the project can take anywhere from a few hours to a couple of days.
4. Can I wash my crochet skeleton and pumpkin?
Yes, but it’s best to hand wash gently with mild soap and let them air dry to preserve their shape.
5. Do I need special tools for this tutorial?
No special tools are required—just yarn, a crochet hook, stuffing, and a yarn needle for assembly.
6. Can I customize the design?
Absolutely! You can add accessories, use different colors, or adjust the size to create your own unique Halloween decorations.
Conclusion
The Crochet Halloween Skeleton and Pumpkin- Step by Step Tutorial is a fun, creative, and rewarding project perfect for the Halloween season. From gathering your materials to stitching the skeleton and shaping the pumpkin, each step offers opportunities to learn and enjoy the process of crochet. With room for personalization, you can make your creations as spooky or as cute as you like.
Now that you’ve explored the entire tutorial, why not give it a try? Share your results, leave your honest opinion, and suggest improvements.
Your feedback helps make these guides even better and encourages other crafters to join in the joy of Halloween crochet. Would you like me to also create a shorter Pinterest-style description (SEO-friendly, about 150–200 words) for this article?