
If you have ever dreamed of creating something handmade to decorate your home, then make this crochet curtain using the easiest stitch- Step by Step Tutorial is exactly what you need. Crochet curtains add a personal and creative touch to any window, combining beauty with functionality. This project is perfect for beginners, as it uses one of the simplest stitches in crochet, making it accessible to anyone who wants to bring charm to their living space.
The idea of crocheting your own curtain may seem overwhelming at first, but with the right guidance and a clear step by step tutorial, it becomes a relaxing and rewarding craft. By following the instructions carefully, you will not only learn how to crochet a curtain but also gain valuable skills that can be applied to other projects such as tablecloths, doilies, and even clothing. This is why learning with an easy-to-follow guide is essential for building confidence and creativity.
One of the reasons why this project is so popular is that it requires very few materials and just a bit of patience. Curtains are practical items that every home needs, and when you make one yourself, it reflects your style and dedication. Whether you want a simple design for a kitchen window or something more decorative for a living room, this crochet curtain using the easiest stitch can be customized to match your preferences. With that in mind, let’s dive into the tutorial and explore each step in detail.
Choosing the Right Materials for Your Crochet Curtain
Before starting to make this crochet curtain using the easiest stitch- Step by Step Tutorial, you need to prepare your materials. The most important item is yarn, and for curtains, cotton yarn is a great choice. Cotton is durable, lightweight, and has a natural look that fits well with home decor. You can also experiment with colors depending on the ambiance you want to create, from neutral tones to bright, cheerful shades.
The hook size is equally important. For beginners, a medium-sized crochet hook such as 4mm or 5mm works perfectly with cotton yarn. It allows you to create neat stitches without struggling too much. A hook that is too small may make the project difficult, while a hook that is too large could make the fabric too loose. Finding the right balance ensures that your curtain drapes beautifully.
Apart from yarn and hooks, you’ll also need scissors, a measuring tape, and a yarn needle for finishing touches. These tools may seem basic, but they play a key role in making the process smoother. Always measure your window before starting so that you know exactly how wide and long your curtain should be. This avoids the common mistake of ending up with a curtain that doesn’t fit properly.
Another consideration is choosing the stitch pattern. Since we are focusing on the easiest stitch, the single crochet or double crochet is ideal. Both stitches are beginner-friendly and create a strong yet flexible fabric. They are easy to learn and repeat, which makes them perfect for larger projects like curtains.
It’s also worth mentioning that crochet projects like this can be done in small sessions. You don’t need to finish everything in one sitting. This makes it a relaxing activity, perfect for evenings or weekends when you want to unwind. Knowing this helps reduce the pressure and allows you to enjoy every step of the process.
Lastly, make sure to keep your workspace comfortable. Having good lighting and a cozy chair can make a big difference when working on a long project. After all, crafting should be enjoyable, not uncomfortable. Now that you have all your materials ready, it’s time to move on to the actual crocheting process.
Starting Your Crochet Curtain with the Base
The foundation chain is the first step when you make this crochet curtain using the easiest stitch- Step by Step Tutorial. This chain determines the width of your curtain, so it’s crucial to measure carefully. Start by creating a slip knot and then chain the number of stitches needed to match the width of your window. Remember, it’s always better to add a few extra chains than to have a curtain that turns out too narrow.
Once your foundation chain is ready, you’ll move on to the first row using the chosen stitch. If you are using single crochet, insert your hook into the second chain from the hook and complete a stitch. Continue across the row until you reach the end. This row sets the tone for the entire project, so take your time to make the stitches even and neat.
The second row and beyond are where the repetitive beauty of crochet comes in. Turn your work, chain one for single crochet, and then repeat the process across the row. With each new row, your curtain will slowly begin to take shape. The consistency of your stitches will ensure the curtain looks polished and professional.
As you build more rows, you’ll notice how relaxing the process becomes. The rhythm of crocheting is soothing and allows your mind to focus on the craft while letting go of daily stress. This is one of the many reasons why crochet is loved by so many around the world.
Don’t worry if your first few rows don’t look perfect. With practice, your tension will improve, and your stitches will become more uniform. The key is not to rush but to enjoy each step of the journey. A handmade curtain carries a charm that no store-bought item can replicate.
By the time you reach the desired length, you’ll feel a strong sense of accomplishment. Completing the base rows is a major milestone in this project and prepares you for adding finishing touches that will make your curtain stand out even more.
Adding Decorative Touches to Your Curtain
One of the most exciting parts of this make this crochet curtain using the easiest stitch- Step by Step Tutorial is adding decorative details. While the basic stitches create a solid fabric, you can enhance the design with patterns, edging, or even color changes. Simple techniques can transform a plain curtain into a beautiful centerpiece for any room.
For instance, you can alternate rows of single crochet with rows of double crochet to create texture. This adds variety while still keeping the stitch pattern simple enough for beginners. If you prefer a lacy look, skipping stitches occasionally and chaining spaces can produce an airy design that allows more light to pass through.
Another popular idea is using multiple colors. By switching yarn colors every few rows, you can create stripes or gradients. This technique is straightforward but makes a big impact on the final result. Just make sure to weave in the ends neatly so the curtain looks clean on both sides.
Edging is another way to personalize your curtain. Adding a scalloped border or a picot edge gives the piece a delicate, finished look. These techniques may sound advanced, but they are simple to learn once you have mastered the basics. A decorative edge frames the curtain beautifully and gives it a professional touch.
You can also incorporate beads or tassels to enhance the charm of your crochet curtain. These small details bring personality and uniqueness to your creation. However, remember to keep the balance so the curtain remains functional as well as decorative.
Experimenting with these embellishments not only makes your curtain special but also gives you the freedom to express your creativity. Each curtain becomes a reflection of your style and effort, turning a simple project into a piece of handmade art.
Finishing and Installing Your Crochet Curtain
The final step in this make this crochet curtain using the easiest stitch- Step by Step Tutorial is finishing your project and preparing it for display. Once your curtain reaches the desired length, fasten off the yarn securely. Use a yarn needle to weave in all the loose ends, ensuring the curtain looks neat and polished. This small detail is crucial for achieving a professional result.
After securing the ends, block your curtain to help it lay flat and maintain its shape. Blocking is the process of lightly wetting the fabric, shaping it to the desired dimensions, and letting it dry. This step may seem optional, but it makes a huge difference in how the curtain drapes and hangs on your window.
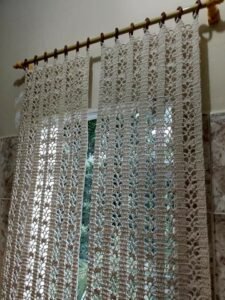
When it comes to hanging the curtain, you can create a rod pocket by leaving a space at the top during your final rows or sewing a separate strip later. A rod pocket makes it easy to slide the curtain onto any curtain rod. Alternatively, you can use curtain rings with clips for a more modern look.
Take a moment to admire your finished work before hanging it. Completing such a project requires patience and creativity, and the result is a beautiful handmade addition to your home. Every time you see the curtain, you’ll be reminded of the effort and love that went into making it.
Installing the curtain is simple. Just place it on the chosen rod and adjust it to hang evenly. Once in place, the curtain will instantly transform the atmosphere of the room, adding warmth and character.
With your crochet curtain complete, you’ve not only decorated your home but also learned a valuable craft skill. This sense of accomplishment is what makes crochet projects so meaningful and rewarding.
FAQ about Crochet Curtains
1. How long does it take to crochet a curtain?
The time depends on the size of the curtain and your crochet speed. A small kitchen curtain may take a few days, while a larger living room curtain can take a couple of weeks if worked on a few hours each day.
2. What is the easiest stitch for beginners to use in a curtain?
The single crochet and double crochet are the easiest stitches. They are simple, repetitive, and create a sturdy fabric suitable for curtains.
3. Can I use different types of yarn for a crochet curtain?
Yes, but cotton is highly recommended because it’s durable, breathable, and easy to maintain. Acrylic yarn can also work but may not drape as nicely as cotton.
4. How do I wash a crochet curtain?
Most cotton crochet curtains can be hand-washed in cool water with mild detergent. Lay flat to dry to maintain the shape and avoid stretching.
5. Can beginners really crochet a curtain?
Absolutely! With a step by step tutorial and patience, even beginners can complete a curtain project. The key is to start with simple stitches and progress slowly.
6. Can I make a crochet curtain without following a pattern?
Yes, once you understand the basics, you can create curtains by measuring your window and crocheting rows until the desired length is achieved. Patterns help guide you, but they are not strictly necessary.
Conclusion
To summarize, this guide showed you how to make this crochet curtain using the easiest stitch- Step by Step Tutorial from start to finish. We covered everything from choosing the right materials and starting your base rows to adding decorative details and finishing touches. This project is perfect for beginners who want to create something practical yet beautiful for their home.
By following these steps, you’ll gain confidence in your crochet skills and enjoy the satisfaction of completing a handmade piece. Curtains are more than just decor—they reflect your creativity and dedication.
Now it’s your turn! Try this tutorial, enjoy the process, and don’t forget to share your results. Leave your honest opinion and suggestions below—I’d love to hear about your experience and see how your crochet curtain turned out.