
Creating Halloween Cat Gnomes is one of the most enjoyable and magical craft projects you can make to celebrate the spooky season. Whether you’re a beginner crafter or an experienced maker, this Halloween Cat Gnomes – Step by Step Tutorial will guide you through the process of creating adorable decorations that bring a mix of cuteness and Halloween charm to your home. These tiny, mystical figures combine the whimsical nature of gnomes with the mysterious vibe of Halloween cats, making them perfect for decorating shelves, tables, or even gift-giving.
The idea of crafting Halloween Cat Gnomes is not just about decoration; it’s also about expressing creativity and enjoying the art of handmade projects. With this tutorial, you’ll learn how to design, assemble, and personalize your own gnomes, from choosing the materials to adding the final spooky touches. Each step is designed to be simple, clear, and enjoyable, allowing you to create a unique piece that reflects your personal Halloween spirit.
If you’re looking for a fun and cozy autumn craft to do at home, this Halloween Cat Gnomes – Step by Step Tutorial is exactly what you need. You can make them as part of your Halloween décor, to gift to friends, or even to sell at craft fairs. The beauty of this project lies in its simplicity and customization possibilities—no two gnomes will ever look exactly alike! Now, let’s explore how to make your own set of enchanting Halloween Cat Gnomes.
Choosing the Right Materials for Your Halloween Cat Gnomes
Before diving into the crafting process, it’s essential to gather all the necessary materials for your Halloween Cat Gnomes. The right supplies will ensure your gnomes look polished and charming. You’ll need felt fabric in Halloween shades like black, orange, purple, and gray, as well as faux fur for the beard or tail, and stuffing material to give your gnomes their shape. Small wooden beads or buttons can serve as noses, and glue or a hot glue gun will hold everything together.
Another key component of this Halloween Cat Gnomes – Step by Step Tutorial is the base of your gnome. You can use small socks, fabric scraps, or even empty rice bags to form the body. Fill them with rice or stuffing to give them weight and volume. This creates a stable foundation for your gnome to stand on, which is important if you plan to display them on shelves or tables.
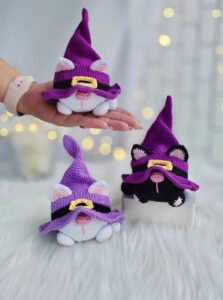
Don’t forget the fun part—choosing accessories! Mini witch hats, tiny pumpkins, black cats, or little broomsticks can make your gnome look more festive. You can even use yarn or embroidery thread to add texture to your creation. The more creative you get, the more unique your Halloween Cat Gnomes will be.
Selecting the perfect color palette also adds personality to your project. Traditional Halloween colors like orange and black never fail, but you can also mix in deep purples, ghostly whites, or metallic tones for a more modern twist. Experimenting with colors allows you to make each gnome special and visually appealing.
When it comes to crafting tools, make sure you have a pair of sharp scissors, a ruler, and a needle and thread. Even though most of the project involves gluing, sometimes hand-stitching small details gives a cleaner, stronger finish. Keep all your materials organized and ready before starting, as this will make the crafting process much smoother.
Finally, remember that making Halloween Cat Gnomes is not about perfection—it’s about creativity. Each handmade gnome will have its own personality, and that’s what makes them so charming. So, gather your materials, get comfortable, and let’s begin crafting your adorable spooky friends!
Step-by-Step Guide to Making Your Halloween Cat Gnomes
Now that you have all your materials ready, it’s time to dive into the actual crafting part of this Halloween Cat Gnomes – Step by Step Tutorial. The process is simple, and you can adjust each step according to your style and preference. Let’s begin with the body of the gnome, which serves as the base of your entire project.
Start by taking a small sock or piece of fabric and filling it with rice or polyfill. Make sure the base is sturdy enough to stand on its own. Tie the top tightly with a rubber band or string to secure the filling inside. This will form the gnome’s body and give it the characteristic rounded shape.
Next, it’s time to create the hat. Cut a triangle-shaped piece of felt in your chosen Halloween color, such as orange or purple, and glue or sew the edges together to form a cone. Once done, place the hat over the top of your gnome’s body, covering the tied section. Adjust it to give the gnome a whimsical, slightly tilted hat look.
For the beard (or cat-like whiskers), cut a small piece of faux fur and glue it just below the hat. If you’re going for a cat-themed look, you can also add felt ears on both sides of the hat. To make the ears, cut small triangles from black or gray felt and glue them securely in place. This step adds the signature feline charm to your Halloween Cat Gnomes.
Attach a small wooden bead or button in the center of the fur to create the gnome’s nose. You can also add small eyes or whiskers using a fine-tip marker or thread. Once these details are in place, your gnome will start coming to life with a unique, spooky personality.
Finally, you can decorate your gnome with little accessories like a broomstick, pumpkin, or bat sticker. The goal is to make it as festive as possible while still keeping it cute. Take your time during this step, as the finishing touches are what make each Halloween Cat Gnome stand out.
Decorating and Customizing Your Halloween Cat Gnomes
Now that the base of your Halloween Cat Gnomes is complete, it’s time to make them truly yours through decoration and customization. One of the most enjoyable parts of this project is experimenting with different materials, textures, and color combinations to match your Halloween theme.
You can start by adding embellishments like ribbons, lace, or miniature bells. These little additions give your gnomes personality and charm. For a spookier look, use black lace or glittery thread to wrap around the hat. This not only enhances the visual appeal but also ties your design together beautifully.
Another great idea for this Halloween Cat Gnomes – Step by Step Tutorial is to use small Halloween charms or ornaments. For example, tiny bats, ghosts, or spiders made from felt can be glued to the hat or body. These accents help capture the festive Halloween spirit while keeping the gnome cute and family-friendly.
You can also experiment with different sizes. Creating a small family of gnomes—some tall, some short—makes your Halloween display more dynamic. Mix and match colors and accessories to make each gnome unique. Kids especially enjoy naming each gnome and giving them their own personalities!
If you’re feeling extra creative, you can even incorporate LED tea lights to make your gnomes glow. Placing them around a table or window will create a cozy and magical atmosphere. Just make sure the lights are battery-operated and safe to use near fabric materials.
Remember, the secret to stunning Halloween Cat Gnomes lies in creativity. There’s no right or wrong way to decorate them. Use what you have on hand and let your imagination guide you. Whether you prefer spooky elegance or cute whimsy, your handmade gnomes will become a highlight of your Halloween décor.
Displaying and Caring for Your Halloween Cat Gnomes
Once your Halloween Cat Gnomes are finished, it’s time to display them proudly! You can place them on your mantel, coffee table, or even by your front door to greet guests. Their charming and festive look will instantly add warmth and fun to any space.
If you plan to use them as part of a larger Halloween setup, consider arranging them alongside pumpkins, candles, or fairy lights. This will help create a cohesive and magical display. Grouping several gnomes together creates an adorable “Halloween village” effect that both kids and adults will love.
For outdoor use, make sure to protect your gnomes from moisture. While felt and fabric can withstand some wear, prolonged exposure to rain or humidity can damage the materials. Keep them in covered areas if possible, or bring them indoors after outdoor events.
If you plan to reuse your Halloween Cat Gnomes for future celebrations, store them in a cool, dry place. Wrap them gently in tissue paper or place them in a box to avoid dust and deformation. This way, your gnomes will stay in great condition for many Halloweens to come.
Another fun idea is to gift these gnomes to friends and family. Handmade Halloween crafts carry a special charm, and people appreciate the time and care that goes into each one. Whether it’s for a neighbor, teacher, or loved one, your gnome will bring a smile to anyone’s face.
Above all, take pride in your creation! Your Halloween Cat Gnomes represent creativity, effort, and the joy of crafting something by hand. Each one is a little piece of art that adds warmth to the season.
1. What materials do I need to make Halloween Cat Gnomes?
You’ll need felt fabric, faux fur, stuffing, a small wooden bead or button, glue, scissors, and decorative accessories like ribbons or mini pumpkins.
2. Can I make Halloween Cat Gnomes without sewing?
Yes! Most of the project can be completed using hot glue or fabric glue. Sewing is optional but can provide a stronger finish.
3. How long does it take to make a Halloween Cat Gnome?
Typically, it takes about 30 to 60 minutes to complete one gnome, depending on the complexity of the design.
4. Are Halloween Cat Gnomes suitable for kids to make?
Absolutely! With adult supervision for hot glue use, this is a perfect craft for kids to enjoy during Halloween season.
5. How can I personalize my Halloween Cat Gnomes?
You can customize them with different colors, hats, and accessories. Adding names or small charms makes them even more personal and special.
Conclusion
Making Halloween Cat Gnomes is a delightful and creative way to celebrate the Halloween season. This Halloween Cat Gnomes – Step by Step Tutorial has shown how simple it is to create charming decorations using basic materials and a bit of imagination. From choosing fabrics to adding final details, every step lets you express your creativity.
Whether you make them for yourself, to gift, or to decorate your home, these gnomes will bring a smile to everyone’s face. Try making a few different designs and see which one becomes your favorite.
We hope you enjoyed this tutorial! Don’t forget to leave your honest opinion and suggestions below. Your feedback helps inspire more fun and creative craft tutorials for everyone to enjoy.