
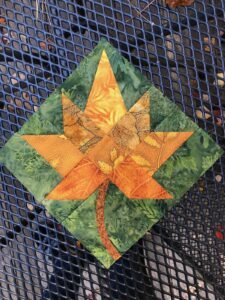
The Maple Leaf Quilt Block – Step by Step Tutorial is one of the most beloved and timeless quilt designs in the quilting world. This beautiful pattern captures the essence of autumn through its elegant leaf shape and warm color combinations. Whether you’re a beginner quilter or an experienced crafter, this tutorial will walk you through the process of creating your own Maple Leaf block from start to finish. Known for its versatility, the Maple Leaf block can be used in quilts, table runners, wall hangings, and even seasonal decorations, making it a must-learn design for every quilter.
Learning how to make a Maple Leaf Quilt Block is not only a rewarding creative experience but also a wonderful opportunity to practice precision and color coordination. This traditional design dates back to the 1800s and continues to be a favorite among quilting enthusiasts because of its simplicity and visual appeal. The block is made up of squares and half-square triangles, arranged in a way that mimics the shape of a maple leaf, symbolizing change, warmth, and the beauty of nature.
In this Maple Leaf Quilt Block – Step by Step Tutorial, we’ll explore everything you need to know—from choosing fabrics and cutting the pieces to assembling the block and pressing it neatly. Each step will be explained in detail so you can follow along with ease, even if you’re new to quilting. By the end of this tutorial, you’ll have a stunning Maple Leaf block ready to be added to your next quilting project or displayed as a beautiful standalone piece.
Choosing the Right Fabrics for Your Maple Leaf Quilt Block
Before you start sewing your Maple Leaf Quilt Block, choosing the right fabrics is an essential step. The color selection will determine how realistic and visually appealing your leaf looks. Autumn-inspired shades like rust, gold, burgundy, and forest green work beautifully for this design. However, you can also use vibrant or pastel tones for a more modern take on the classic block. The key is to ensure that your leaf color contrasts well with your background fabric so that the leaf shape stands out clearly.
Cotton fabrics are ideal for quilting because they are easy to cut, sew, and press. You’ll need two main fabrics—one for the leaf and one for the background. For a scrappy look, you can mix several fabric prints within the same color family to give your Maple Leaf more texture and depth. Many quilters enjoy using leftover fabric scraps from other projects to create a collection of multi-colored Maple Leaf blocks that celebrate the beauty of fall.
When preparing your fabrics, make sure they are pre-washed and pressed flat. This helps prevent shrinkage and color bleeding later on. Smooth, wrinkle-free fabric will also ensure your cuts are accurate, which is crucial for creating a well-aligned quilt block. Inaccurate cuts can cause mismatched seams, so take your time with this step.
Another important tip in this Maple Leaf Quilt Block – Step by Step Tutorial is to consider fabric placement. The direction of the prints on your fabric can add interesting movement to the leaf design. For example, using fabrics with subtle diagonal patterns or lines can make your leaf appear more dynamic. If you prefer a more traditional look, solid or tone-on-tone fabrics will work beautifully.
Lastly, don’t forget to test your fabric combination before cutting all your pieces. Place your chosen fabrics side by side and step back to see how the colors interact. A well-balanced color palette ensures your finished Maple Leaf Quilt Block looks harmonious and visually appealing.
Once you’ve selected your fabrics, you’re ready to move on to cutting and preparing the pieces for assembly. Having all your materials ready before you begin sewing will make the process smooth and enjoyable.
Cutting and Preparing the Pieces
Accurate cutting is one of the most important steps in this Maple Leaf Quilt Block – Step by Step Tutorial. A typical Maple Leaf block is made from squares and half-square triangles (HSTs), which together form the leaf shape and stem. For one block, you’ll need four leaf fabric squares, four background fabric squares, and one small rectangle or square for the stem.
Start by cutting four 3½-inch squares from your leaf fabric and four 3½-inch squares from your background fabric. Two of these squares from each fabric will be used to create four half-square triangles. To make them, place one leaf square and one background square right sides together, draw a diagonal line from corner to corner, and sew ¼ inch away from both sides of the line. Then cut along the line and press open. You’ll now have two perfect HSTs. Repeat this process to make four HSTs in total.
Next, cut a small rectangle or square from your background fabric for the stem. Many quilters like to add a strip of leaf-colored fabric diagonally across the rectangle to mimic the look of a leaf stem. You can stitch this by cutting the rectangle diagonally, inserting a narrow strip of contrasting fabric, and sewing it back together. This little detail adds a realistic touch to your Maple Leaf Quilt Block.
Once all your pieces are cut and pressed, lay them out on your work surface to visualize the block layout. The HSTs will form the pointed edges of the leaf, while the solid squares make up the center and one corner of the design. The stem piece goes in the lower corner. Arranging your pieces before sewing will help you double-check that all colors and orientations are correct.
A rotary cutter, self-healing mat, and quilting ruler will help ensure precise measurements and clean edges. Take your time with this step—accuracy here will make assembling the block much easier and give you crisp, even seams.
With all your pieces cut and arranged, you’re now ready to begin sewing your Maple Leaf Quilt Block together.
Assembling the Maple Leaf Quilt Block
Now comes the fun part—putting your Maple Leaf Quilt Block together! Begin by sewing your half-square triangles together in pairs, ensuring that the colors and directions form the leaf’s points. Press the seams toward the darker fabric to avoid show-through and bulk. Precision pressing helps your block lay flat and look professional.
Next, sew the squares together row by row. Start with the top row, then move to the middle, and finally the bottom, where the stem piece will be placed. Make sure your seams are aligned perfectly before sewing each row together. Pinning the corners can help maintain even alignment.
Once you have your three rows completed, sew them together carefully. It’s helpful to press each seam as you go to keep everything flat. Your Maple Leaf Quilt Block should now resemble a beautiful leaf shape, with the stem neatly positioned at the bottom.
If you want to add more dimension to your block, you can play with stitch patterns or quilting lines once the top is finished. Outlining the leaf shape with quilting stitches or adding small veins inside the leaf adds a realistic and decorative touch to your design.
After completing the sewing, square up your block using a quilting ruler. Trimming any uneven edges ensures your block fits perfectly with others when piecing together a larger quilt. Accuracy in this step will make your final quilt top look clean and polished.
The Maple Leaf Quilt Block – Step by Step Tutorial emphasizes patience and attention to detail. Even if your first block isn’t perfect, remember that practice is key. Each block you make will help refine your quilting skills and boost your confidence.
Using and Displaying Your Maple Leaf Quilt Blocks
After completing your Maple Leaf Quilt Block, it’s time to decide how to use and display it. One of the great things about this pattern is its versatility. You can use a single block as a wall hanging or combine multiple blocks into a full quilt for a stunning seasonal piece.
For autumn décor, try making a table runner using three or four Maple Leaf blocks sewn in a row. Add a simple border fabric that complements the leaf colors, and you’ll have a cozy handmade centerpiece perfect for fall gatherings.
Another creative idea is to make a pillow cover. A single Maple Leaf Quilt Block at the center of a pillow adds warmth and handmade charm to your living space. Pair it with solid fabrics or patchwork borders to make it stand out even more.
If you’re creating a full quilt, consider alternating the leaf blocks with plain squares or nine-patch blocks. This layout creates visual interest and helps highlight the intricate leaf design. You can also experiment with different fabric shades to represent the changing colors of autumn leaves.
Once your quilt top is assembled, add batting and a backing fabric, then quilt the layers together. Simple diagonal quilting lines or echo stitching around the leaf shapes look beautiful and enhance the design. Finish your quilt with a binding that complements the colors of your leaves for a polished look.
Displaying your Maple Leaf Quilt Block projects around your home during fall adds a cozy, festive atmosphere. They also make wonderful handmade gifts for loved ones who appreciate craftsmanship and the spirit of the season.
1. What size should my Maple Leaf Quilt Block be?
The standard size is usually 12½ inches before sewing it into a quilt, but you can adjust the size by changing your square measurements.
2. Can I make the Maple Leaf block using scraps?
Yes! The Maple Leaf design is perfect for using fabric scraps, especially if you want to create a variety of colorful leaves.
3. Do I need a sewing machine for this project?
While a sewing machine makes the process faster, you can also hand-sew your Maple Leaf Quilt Block if you prefer traditional quilting methods.
4. How do I prevent my fabric from stretching while sewing?
Use a ¼-inch seam allowance and press gently instead of ironing. This helps maintain the shape and alignment of your pieces.
5. Can I make this quilt block in non-traditional colors?
Absolutely! You can use any colors that suit your style. Modern quilters often experiment with bright or pastel colors for a fresh look.
Conclusion
The Maple Leaf Quilt Block – Step by Step Tutorial is a wonderful project for quilters of all skill levels. From choosing fabrics and cutting pieces to assembling and displaying your finished block, this guide has walked you through each step with care and creativity. The result is a timeless design that captures the beauty of nature and the warmth of handmade art.
Whether you’re making a single block or an entire quilt, the Maple Leaf pattern adds a touch of seasonal elegance to your home. We hope this tutorial inspires you to create your own version and experiment with colors, textures, and layouts.
Thank you for following this guide! Please leave your honest opinion and suggestions below—your feedback helps keep the quilting community creative and inspired!