
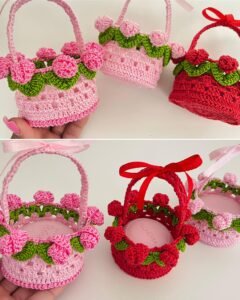
The Crochet basket, quick and easy souvenir holder – step by step tutorial is a perfect project for anyone looking to combine creativity with practicality. Crocheting baskets is one of the most satisfying and versatile crafts because it offers a beautiful way to organize and decorate your space while adding a handmade touch. Whether you are new to crochet or already experienced, this guide will help you create a functional and charming crochet basket that can be used as a souvenir holder, storage container, or even a gift idea.
A crochet basket is ideal for holding small souvenirs, accessories, or household items, making it both decorative and useful. With just a few basic materials and simple stitches, you can create a durable and attractive piece that adds warmth to any room. This project is also a great way to use leftover yarn, as it doesn’t require a large amount and can be made in various sizes and colors. You can match it with your home’s décor or make several in different shades for a cohesive, cozy look.
In this Crochet basket, quick and easy souvenir holder – step by step tutorial, you’ll learn everything from choosing the right yarn and hook to shaping the base and finishing the edges. The instructions are simple to follow, and the results are impressive. Whether you want to make a small basket for jewelry, a medium one for bathroom accessories, or a larger one for organizing crafts, this tutorial will help you make it happen.
Materials You’ll Need for Your Crochet Basket
Before starting the Crochet basket, quick and easy souvenir holder – step by step tutorial, gather the right materials to ensure your project turns out beautifully. Choosing the correct yarn and tools is key to achieving a sturdy and well-shaped basket. The best option is a thick cotton or t-shirt yarn, as it provides strength and structure to the finished product. Cotton yarn also offers a neat look and can hold its shape even when used frequently.
For your crochet hook, select a size that matches your yarn weight. Generally, a 6 mm to 8 mm hook works perfectly for thicker yarns, allowing your stitches to remain tight and firm. A smaller hook may make your work too stiff, while a larger one could make the basket lose its shape. Always test your yarn and hook combination before starting the main project to ensure the desired texture.
You’ll also need a pair of scissors for cutting the yarn and a yarn needle for weaving in ends. If you plan to add decorative elements, such as ribbons, wooden beads, or tags, have those ready as well. These small touches can personalize your basket and make it stand out as a handmade keepsake.
Having a measuring tape is helpful for maintaining consistent dimensions, especially if you plan to make multiple baskets of the same size. It ensures your base and sides stay proportionate and symmetrical. You can also use stitch markers to keep track of the beginning of each round, which is useful when working in continuous spirals.
Finally, make sure you have a flat surface to work on. Keeping your basket even as you crochet helps it maintain its round shape and prevents uneven edges. With these materials ready, you can confidently begin your basket-making journey.
Step-by-Step Instructions to Crochet a Souvenir Holder Basket
Now that you have everything you need, let’s start the Crochet basket, quick and easy souvenir holder – step by step tutorial. Begin by creating a magic ring. This technique allows you to start your basket with a tight, seamless center. Work six single crochet (sc) stitches into the magic ring and pull it tight to close. Join the round with a slip stitch.
In the next round, increase your stitch count by crocheting two single crochets into each stitch from the previous round. You should have twelve stitches at the end of this round. This step expands the base of your basket and sets the foundation for its circular shape.
Continue increasing in each round to make the base as wide as you want your basket to be. For example, if you want a small souvenir holder, three to four rounds of increases are enough. For larger baskets, add more rounds until the base reaches your desired diameter. Remember to keep your stitches even and consistent to ensure a smooth surface.
Once the base is complete, it’s time to form the sides. To do this, crochet one round without increasing. Instead of working into the top loops, insert your hook only into the back loops of each stitch. This creates a slight ridge that helps the sides of the basket stand upright.
From here, continue crocheting in single crochet stitches around and around until your basket reaches the height you want. You can alternate between single and half-double crochet stitches to add texture. If you want your basket to be taller, add more rounds; for a shallow holder, stop earlier.
When your basket is the right height, finish off your yarn and weave in the ends with a yarn needle. To add handles, skip two stitches on opposite sides of the basket and chain four or five stitches, then rejoin the round. On the next round, crochet over these chains to create sturdy handles. Your handmade crochet basket souvenir holder is now ready to use or gift!
Creative Ways to Customize Your Crochet Basket
One of the best things about following this Crochet basket, quick and easy souvenir holder – step by step tutorial is how easy it is to customize your project. The possibilities are endless when it comes to color, size, and embellishments. Start by choosing colors that match your home décor or personal taste. A neutral basket in beige or gray can blend seamlessly into any room, while a bright, multicolored one can add a cheerful accent.
You can also experiment with patterns. Try alternating two or three colors every few rounds for a striped effect. If you enjoy more intricate designs, consider tapestry crochet, which allows you to create images or geometric patterns directly into the fabric. This can turn your simple souvenir holder into a true piece of art.
Adding embellishments is another great way to make your basket unique. You could sew on small crochet flowers, attach ribbons, or add buttons for decoration. If you’re giving the basket as a gift, consider adding a personalized tag with the recipient’s name or a small charm that complements the theme.
Varying the size and shape of your baskets can also lead to creative results. By adjusting the number of rounds in the base or sides, you can create shallow trays, deep baskets, or even oval shapes. This flexibility makes the crochet basket an incredibly versatile project.
For an extra touch of style, use different stitch patterns such as puff stitches or bobble stitches on the sides. These add texture and visual interest without compromising the basket’s structure. You can also line your basket with fabric for a polished look and extra stability.
Lastly, think about practical uses beyond souvenirs. These baskets make great storage for small household items like keys, toiletries, or craft supplies. Their functionality and aesthetic appeal make them a favorite among crochet enthusiasts.
Tips for Finishing and Maintaining Your Crochet Basket
To make sure your crochet basket souvenir holder lasts a long time, it’s important to finish it properly and take good care of it. After completing your last round, weave in all loose ends carefully with a yarn needle to prevent unraveling. If you used multiple colors, ensure the transitions are clean and smooth for a professional finish.
Blocking your basket can help it maintain its shape. Lightly dampen the basket with water, stuff it with towels or paper to hold its form, and let it dry completely. This method is especially helpful for cotton yarn, which tends to become more structured after drying.
If your basket starts losing its firmness over time, you can reinforce it by crocheting an extra round of tight stitches around the top edge or adding a wire or cord to the rim. This provides additional support and keeps the basket’s shape intact.
Cleaning your crochet basket is simple. Hand wash it in cool water with mild soap, then reshape and let it air dry. Avoid wringing it out, as this could distort the shape. If it’s lined with fabric, remove the lining before washing or spot clean when necessary.
Store your baskets in a cool, dry place when not in use. Avoid exposing them to direct sunlight for long periods, as this may cause the yarn colors to fade. Proper care ensures your handmade baskets stay beautiful for years to come.
With these tips, you can keep your crochet basket souvenir holder looking new and fresh, ready to display or gift anytime.
1. Can beginners make this crochet basket project?
Yes! This Crochet basket, quick and easy souvenir holder – step by step tutorial is beginner-friendly. It uses basic stitches like single crochet, making it perfect for those new to the craft.
2. What type of yarn is best for crochet baskets?
Thick cotton yarn or t-shirt yarn works best because it provides strength and stability. These materials help the basket keep its shape over time.
3. How do I adjust the size of my basket?
To make your basket larger, increase more rounds in the base. For a taller basket, add extra rounds to the sides. The same stitch pattern can be easily modified.
4. Can I make a lid for my crochet basket?
Yes, simply crochet another circular base that matches the size of your basket’s opening. You can add a small handle or loop in the center for convenience.
5. How do I make sure my basket keeps its shape?
Use tight stitches and sturdy yarn. Blocking the basket after completion also helps maintain its form and smoothness.
6. Can I sell the baskets I make from this pattern?
Of course! Handmade crochet baskets are popular at craft fairs, online stores, and as personalized gifts. Just remember to mention that they are handmade for authenticity.
Conclusion
The Crochet basket, quick and easy souvenir holder – step by step tutorial is a delightful way to combine functionality and creativity. With just simple materials, basic stitches, and a bit of time, you can craft a beautiful handmade basket that’s perfect for holding souvenirs, small accessories, or even gifts. This project not only enhances your crochet skills but also provides a charming addition to your home décor.
By following the steps and tips shared in this guide, you’ll be able to create baskets that are sturdy, stylish, and full of personality. Each piece can be customized with different colors, patterns, and decorations, making it truly one of a kind.
I hope you enjoyed learning how to make your own crochet basket souvenir holder. If you found this tutorial helpful, please share your honest opinion and suggestions below. Your feedback helps improve future guides and inspires new creative projects for crochet lovers everywhere!