
A Colorful Crochet Pumpkin – Step by Step Tutorial is the perfect project to bring seasonal charm and handmade warmth into your home decor. Whether you’re preparing for fall, Halloween, or Thanksgiving, crochet pumpkins are a fun and creative way to decorate your space. With their vibrant hues and soft textures, they add a cozy touch that embodies the spirit of autumn. This tutorial will guide you through every detail, from choosing the right yarn to assembling and decorating your colorful crochet pumpkins beautifully.
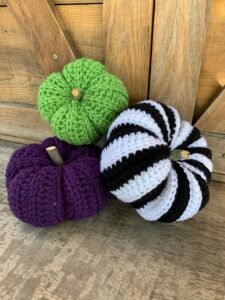
Creating a colorful crochet pumpkin is not only a delightful craft activity but also an opportunity to express your artistic side. You can experiment with different color combinations, yarn textures, and sizes to make your pumpkins unique. Whether you want to keep them classic in orange tones or go bold with pinks, purples, or blues, this project encourages full creativity. The result is a lovely handmade decoration that’s versatile enough to fit into any theme or season.
This step by step tutorial is beginner-friendly, making it ideal for anyone who wants to learn or practice crochet. It uses simple stitches and techniques, yet the finished piece looks impressive and polished. You can use your crochet pumpkins as table centerpieces, shelf decor, or even as thoughtful handmade gifts. The joy of crafting something beautiful from yarn is unmatched, and these little pumpkins will fill your space with warmth and color all year round.Now, let’s dive into the Colorful Crochet Pumpkin – Step by Step Tutorial, where you’ll discover how to create your own charming pumpkin with just a few materials and a bit of time.
Choosing the Right Materials for Your Colorful Crochet Pumpkin
Before you begin, it’s important to gather all the necessary materials for your colorful crochet pumpkin. The right supplies will make your crafting process smoother and ensure your pumpkin turns out soft, vibrant, and well-shaped.
First, you’ll need yarn. For a beautiful and colorful effect, choose medium-weight yarn in several shades. You can use traditional fall colors like orange, brown, yellow, and cream, or go for something more playful like teal, pink, or purple. Acrylic yarn is a great option because it’s affordable, easy to work with, and holds its shape well. Cotton yarn, on the other hand, gives a smoother and more defined texture.
Next, select the right crochet hook size for your yarn. Usually, a 4 mm to 5 mm hook works perfectly for this type of project. If your stitches are too tight, try using a slightly larger hook; if they’re too loose, switch to a smaller one.
You’ll also need polyester stuffing to fill your pumpkin and give it volume. Be sure to stuff it enough so that it holds a plump shape but still feels soft to the touch. A yarn needle is essential for sewing the top and bottom of the pumpkin and weaving in any loose ends neatly.
For the stem, you can either crochet one using brown or green yarn or use a small twig or cinnamon stick for a rustic touch. Optional decorations include ribbons, leaves, or small beads to make your pumpkin extra special.
Preparing your materials beforehand will save you time and help keep your crafting area organized. Once everything is ready, you’re set to begin this fun and festive project from the Colorful Crochet Pumpkin – Step by Step Tutorial.
Step by Step: How to Crochet Your Pumpkin
To start your colorful crochet pumpkin, make a slip knot and chain around 25 to 35 stitches, depending on how big you want your pumpkin to be. The longer the chain, the wider your pumpkin will become. Once your foundation chain is done, work single crochet stitches across each chain. Continue adding rows until you have a rectangular piece.
For a colorful effect, you can change yarn colors every few rows. This technique gives your pumpkin a striped, eye-catching design. Simply cut your yarn, tie the new color, and continue crocheting. Don’t worry if the transitions seem visible at first; they’ll blend beautifully once the pumpkin is assembled.
When your rectangle reaches the desired size, fasten off your yarn, leaving a long tail for sewing. Fold the rectangle in half so that the short sides meet, then use your yarn needle to sew them together, forming a tube shape. Make sure your stitches are secure but not too tight.
Next, take the long yarn tail and weave it around one open edge of the tube. Pull tightly to close the hole. This will form the base of your pumpkin. Once the bottom is sealed, flip the piece right-side out so the seams are hidden inside.
Now it’s time to stuff your pumpkin. Add polyester filling until it feels full and round. Be sure not to overstuff, as this can stretch your stitches too much. After stuffing, use another long piece of yarn to weave around the top edge and pull it closed.
Finally, shape your pumpkin by wrapping yarn around its sides several times, pulling slightly to create ridges that mimic natural pumpkin segments. Tie securely at the bottom. Your basic colorful crochet pumpkin shape is now complete!
Adding the Stem and Decorations
Now comes the fun part—adding your pumpkin’s stem and decorative details. The stem gives your colorful crochet pumpkin a realistic and charming look. There are several creative ways to make one, depending on your preferred style.
The easiest method is to crochet a small tube or cylinder using brown or green yarn. Simply make a chain of about 6 stitches, join to form a ring, and work single crochet rounds until you reach the desired length. Attach this stem securely to the top of your pumpkin with a yarn needle.
If you prefer a natural look, try using a real twig or cinnamon stick. Push it gently into the top center and secure it with a bit of hot glue or thread. The cinnamon stick adds a lovely scent and rustic touch, perfect for fall decorations.
To enhance your pumpkin even more, you can add small crochet leaves or vines around the stem. Use green yarn and simple chain stitches to create vines that curl gracefully. Attach them neatly for a beautiful finishing touch.
For a colorful twist, tie small ribbons around the stem or add buttons, beads, or tiny felt flowers. These details will make your pumpkin stand out and reflect your personality.
Remember, this is where you can truly get creative. Each colorful crochet pumpkin you make can be unique, with different color schemes, decorations, and textures. They make fantastic handmade gifts or cozy home decor accents for any season.
Creative Ways to Use and Display Your Crochet Pumpkins
Once you’ve completed your colorful crochet pumpkin, there are many ways to display it around your home. These handmade decorations are versatile and suitable for multiple settings and occasions.
Place your crochet pumpkins on your living room table as a festive centerpiece. Combine different sizes and colors to create an attractive autumn display. You can mix them with candles, pinecones, or dried leaves for a cozy seasonal arrangement.
They also look wonderful on shelves, mantels, or windowsills. The pop of color and soft texture adds charm to any room. You can even make mini pumpkins to hang as ornaments or attach them to a wreath for a creative door decoration.
If you enjoy giving handmade gifts, colorful crochet pumpkins are thoughtful and heartwarming presents. They’re ideal for friends who appreciate handmade crafts or home decor. Wrap them in a little box or tie them with twine for a rustic gift presentation.
Crochet pumpkins are also great for classroom decorations, craft fairs, or holiday markets. Their appeal lies in their simplicity and vibrant look. With just a few hours of work, you can make several pumpkins to decorate any space beautifully.
Don’t limit this project to fall alone! Try using pastel yarns for spring or bright neon shades for a fun year-round display. The Colorful Crochet Pumpkin – Step by Step Tutorial gives you endless ways to customize and enjoy your handmade creations.
FAQ
1. Can beginners make a colorful crochet pumpkin?
Absolutely! This project is beginner-friendly and uses simple stitches. Even those new to crochet can follow the steps easily.
2. What yarn is best for crochet pumpkins?
Acrylic and cotton yarns are ideal because they’re easy to work with, hold their shape well, and come in many colors.
3. How long does it take to make a crochet pumpkin?
Depending on your skill level, it can take anywhere from one to three hours to complete one pumpkin.
4. Can I wash my crochet pumpkin?
Yes, gently hand wash it in cold water and let it air dry to maintain its shape and color.
5. How can I make my pumpkin look more realistic?
Add a stem, vines, and shaping details by wrapping yarn around the body to create natural-looking ridges.
Conclusion
Making a Colorful Crochet Pumpkin – Step by Step Tutorial is a fun and creative experience that allows you to craft beautiful handmade decorations for your home. You’ve learned how to choose materials, crochet the main body, add stems and embellishments, and display your finished pumpkins in unique ways.
Each pumpkin you make tells a story and reflects your creativity. Whether you’re decorating for the fall season or simply adding a splash of color to your home, these crochet pumpkins bring warmth and personality to any space.
We hope this tutorial inspired you to start your own collection of colorful crochet pumpkins. Don’t forget to share your honest opinion and leave suggestions—we’d love to hear about your creations and how you decorated your handmade pumpkins!