
If you’re looking for a fun and creative crochet project, this How to Crochet Beer Glass Applique – Step by Step Tutorial will walk you through every detail of making a charming and festive design. This project is perfect for anyone who wants to add a playful touch to kitchen towels, coasters, or even party decorations. The best part is that you can easily adapt it to your preferred colors and yarn types. In this guide, you’ll learn how to make your own beer glass crochet applique from start to finish while improving your crochet skills.
The Beer Glass Applique is not only a creative piece to add to your handmade collection but also a great idea for seasonal gifts or festive décor. Whether you want to celebrate Oktoberfest, a summer barbecue, or simply craft something fun for your kitchen, this pattern is sure to bring a smile. The easy-to-follow steps will guide you through making the glass, the foam, and the small details that make the project look realistic and professional. Even if you’re a beginner, this tutorial ensures that you can achieve beautiful results.
By following this How to Crochet Beer Glass Applique – Step by Step Tutorial, you’ll develop better control over basic stitches such as single crochet, half double crochet, and slip stitch. You’ll also learn how to change yarn colors smoothly to achieve that golden beer look with a foamy top. The finished piece can be sewn or glued onto other crochet items like placemats, coasters, or even wall art. Let’s dive into the process and explore the materials, techniques, and steps needed to bring this creative crochet design to life.
Materials and Preparation
Before starting your How to Crochet Beer Glass Applique – Step by Step Tutorial, it’s important to gather all the materials needed for a smooth and enjoyable crafting experience. You don’t need much—just some basic tools and yarn in the right shades. This makes it an accessible project for crafters of all skill levels.
You’ll need a medium-weight yarn in yellow or gold to represent the beer, white for the foam, and a neutral color like beige or light brown for the glass outline. You’ll also need a small crochet hook—typically between 2.5mm and 3.5mm—depending on your yarn thickness. Having a yarn needle, a pair of scissors, and a little bit of patience will help ensure clean finishing touches.
When selecting yarn, consider using cotton yarn for a neat look and better stitch definition. Cotton yarn also makes your applique more durable and easier to attach to other fabric items. If you prefer a softer texture, you can opt for acrylic yarn, though it might not hold shape as firmly.
Before you start crocheting, make sure to read through the entire How to Crochet Beer Glass Applique – Step by Step Tutorial. Having a clear idea of the steps ahead will make the process smoother. Prepare a comfortable workspace with good lighting so you can easily see your stitches and color transitions.
You can also use stitch markers if you’re working with small sections. They’ll help you keep track of the beginning and end of each round or row. This is especially helpful if you’re new to crochet appliques and want to keep your design consistent.
Lastly, keep a little water spray bottle nearby. Cotton yarn can stiffen slightly when dry, so giving it a light mist can help make your work more flexible as you crochet. This small trick can make shaping your beer glass much easier, especially around the foam section.
Step-by-Step Crochet Instructions
Now it’s time to dive into the main part of this How to Crochet Beer Glass Applique – Step by Step Tutorial. The pattern is simple but requires attention to detail, especially when shaping the top foam area and the rounded base of the glass. Start by creating a foundation chain long enough to represent the height of the glass.
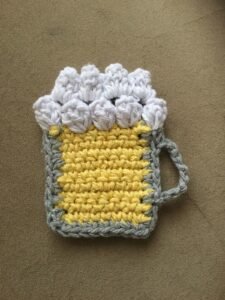
Begin with the base of the glass using your neutral yarn. Work a small oval shape by crocheting single crochets around both sides of the foundation chain. This will give you a solid and slightly rounded bottom for the glass. Once you’re satisfied with the size, fasten off and switch to your golden yarn for the beer section.
Continue crocheting upward using half double crochet stitches. These stitches provide a nice texture that looks smooth yet structured—perfect for representing liquid in a glass. Work several rows in golden yarn to form the main body of the beer. If you want to create the illusion of bubbles or highlights, you can switch between slightly lighter and darker shades of yellow.
Once the body of the beer glass is complete, it’s time to make the foam. Switch to white yarn and use single crochets and slip stitches to create a wavy, uneven edge at the top. This gives a natural “foamy” effect. You can even make a few small puffs or circles to attach separately, enhancing the three-dimensional look.
To assemble, sew or glue the foam onto the top of the beer glass piece. Then, use your yarn needle to weave in all loose ends neatly. You’ll now have a perfectly shaped and textured crochet beer glass applique ready for decoration or gifting.
If you want to add a handle to make it look like a beer mug, simply crochet a small chain and connect it to the side with slip stitches. This small addition makes your design even more adorable and realistic.
Decoration Ideas and Creative Uses
After completing your How to Crochet Beer Glass Applique – Step by Step Tutorial, the next step is to explore fun and creative ways to use your finished applique. The design is versatile and can be applied to various home décor or gift items.
One of the most popular ideas is attaching the applique to kitchen towels or aprons. It adds a touch of personality to your kitchen space, especially if you enjoy entertaining or hosting themed parties. You can also create matching sets for summer barbecues or game nights.
Another idea is turning your beer glass applique into a coaster or wall hanging. To make it sturdier, simply sew it onto a round or square background made of thicker yarn or felt. This adds both functionality and a creative aesthetic to your table setting.
If you love personalizing gifts, this applique can be the perfect handmade detail for birthdays, Father’s Day, or even festive occasions like Oktoberfest. Pair it with other themed appliques, such as pretzels or beer bottles, to create a complete decorative collection.
For crochet enthusiasts who sell their crafts, these appliques can also become great additions to your handmade product line. Small items like this are popular at craft fairs and online stores because they are quick to make and have great visual appeal.
Lastly, don’t be afraid to experiment with different yarn colors and textures. Metallic or shiny yarns can make your beer glass look even more festive. You can also use glitter yarn for the foam to give it a touch of sparkle.
Tips for Perfecting Your Crochet Beer Glass Applique
Even with a simple How to Crochet Beer Glass Applique – Step by Step Tutorial, small tips can make a big difference in your final result. Paying attention to your tension, yarn choice, and finishing techniques will help your applique look professional.
Always start with a clean and even foundation chain. Uneven tension at the beginning can affect the symmetry of your beer glass. Take your time adjusting your grip until your stitches look consistent.
Keep your stitches tight enough to maintain shape but not so tight that they curl or distort. This balance ensures that your applique lies flat and looks neat when attached to other items.
Blocking your finished applique is another great tip. Lay it flat on a towel, gently shape it, and spray it lightly with water. Let it dry completely before use. This will help your design hold its form and look more polished.
You can also outline your beer glass with a row of slip stitches in a contrasting color. This creates a clean border and makes the details stand out better.
Lastly, take photos of your finished project. This not only helps you track your progress but also allows you to share your creativity with others. Seeing how your skills improve with each project can be incredibly motivating.
FAQ about Crochet Beer Glass Applique
1. What yarn is best for a Crochet Beer Glass Applique?
Cotton yarn works best because it provides excellent stitch definition and holds its shape well, making it ideal for appliques that will be attached to fabric.
2. Can beginners follow this tutorial?
Yes! The How to Crochet Beer Glass Applique – Step by Step Tutorial is beginner-friendly. It uses basic stitches and includes simple color changes, making it easy to learn and follow.
3. How long does it take to make one applique?
Depending on your skill level, it can take between 30 minutes and 1 hour to complete one beer glass applique.
4. How can I attach the applique to fabric?
You can sew it on using a yarn needle or gently glue it with a fabric adhesive. Sewing is more durable for items that will be washed frequently.
5. Can I make the applique larger or smaller?
Absolutely. You can adjust the size by using thicker or thinner yarn, or by changing your hook size.
6. What can I use the applique for?
It’s perfect for decorating kitchen towels, tote bags, table runners, or even for making coasters and small wall hangings.
Conclusion
This How to Crochet Beer Glass Applique – Step by Step Tutorial offers a fun and creative way to practice crochet while making something cheerful and unique.
You’ve learned how to choose materials, follow the step-by-step pattern, and even explored decorative ideas to personalize your project. Whether you craft it for yourself or as a handmade gift, this applique is sure to impress.
Now that you’ve completed your project, we’d love to hear from you! Share your thoughts, opinions, and suggestions in the comments. Did you try a new color combination or add your own creative twist? Let us know how your Crochet Beer Glass Applique turned out!