
If you love small, charming crochet projects that are both practical and adorable, this Crochet Flower Keychain – Step by Step Tutorial is perfect for you. Crochet keychains are quick to make, use only a small amount of yarn, and are great for beginners who want to practice new stitches while creating something functional. A crochet flower keychain can be used to decorate your keys, bags, or even as a small handmade gift for someone special. In this guide, you’ll learn how to create your own crochet flower keychain with clear and easy steps.
This Crochet Flower Keychain – Step by Step Tutorial will walk you through everything from choosing the right materials to adding finishing touches that make your keychain stand out. The flower design is simple yet elegant, and you can use any color combination to match your personality or style. It’s a fun project for relaxing weekends or as part of a larger collection of handmade accessories.
Besides being a creative project, making crochet keychains is also eco-friendly and cost-effective. You can use leftover yarn from previous projects and turn it into beautiful accessories. Handmade items like crochet flower keychains are also wonderful for craft fairs, small gifts, or personal collections. By following this Crochet Flower Keychain – Step by Step Tutorial, you’ll not only learn a new skill but also create something that carries a touch of handmade love.
Materials You’ll Need for the Crochet Flower Keychain
Before diving into the crocheting process, let’s go over the essential materials required for your Crochet Flower Keychain – Step by Step Tutorial. Having the right supplies ensures your project turns out neatly and beautifully.
Start with cotton yarn, as it’s sturdy and keeps its shape well, which is ideal for keychains. You can choose any color you like for your flower petals and center—soft pastels for a delicate look, or bright colors for a cheerful accessory. Using contrasting shades for the petals and center will make the flower pop.
Next, you’ll need a crochet hook that matches the yarn thickness. A 3 mm or 3.5 mm hook usually works great for small keychain projects. You’ll also need a yarn needle for weaving in ends, a pair of scissors, and some fiberfill if you want your flower to have a bit of puff.
To turn your flower into a keychain, you’ll need a small metal key ring or lobster clasp. These can be found in craft stores or taken from old keychains you no longer use.
Before starting, make sure you’re comfortable with basic crochet stitches such as chain (ch), slip stitch (sl st), single crochet (sc), and double crochet (dc). These stitches are easy to learn and will form the foundation of your Crochet Flower Keychain – Step by Step Tutorial.
Finally, prepare a clean and well-lit workspace. Having your tools and materials organized before beginning will make the process more enjoyable and smooth.
Step-by-Step Guide to Making the Crochet Flower
Now that your materials are ready, let’s begin the Crochet Flower Keychain – Step by Step Tutorial. The flower is created in rounds, and each round adds shape and texture to the petals.
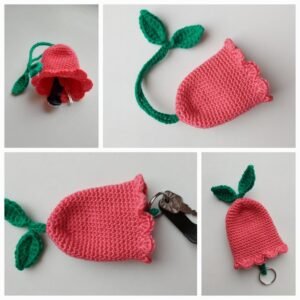
Start by making a magic ring. Inside the ring, crochet 10 single crochets and pull tight to close. Join with a slip stitch to the first stitch to form a small circle. This forms the center of your flower.
Next, chain 3 and make 2 double crochets into the same stitch. Skip one stitch, slip stitch into the next, and repeat the pattern around. You’ll end up with five petals when you complete the round. Each petal should look like a small loop extending from the center.
For the next round, you’ll create fuller petals. Chain 3, then work 2 treble crochets, 1 double crochet, 2 treble crochets, and 1 slip stitch in the next space between petals. Continue this pattern around until your flower looks even and well-shaped.
If you want a more textured flower, add a third layer of petals using a different color. This will give your keychain a beautiful 3D effect. Fasten off the yarn when you’re done, and weave in all loose ends neatly using your yarn needle.
Once your flower is complete, you can optionally add a small bead or button in the center for decoration. This gives the flower a polished, finished look and adds a touch of personality to your Crochet Flower Keychain – Step by Step Tutorial.
Now your flower is ready for the next step—turning it into a keychain that you can proudly carry or gift!
Assembling the Crochet Flower Keychain
After finishing your crochet flower, it’s time to assemble everything and turn it into a charming keychain. This part of the Crochet Flower Keychain – Step by Step Tutorial focuses on the final touches that transform your crochet work into a practical accessory.
Take your key ring or lobster clasp and attach it to the top of the flower. You can do this by crocheting a small loop or chain to connect the two. Chain around 8 to 10 stitches, then slip stitch back to the flower to create a sturdy loop for hanging.
If you prefer a longer keychain, make a longer chain loop. For extra strength, double the yarn strand before crocheting the loop. This will make it more resistant to daily use.
You can also add additional decorations such as small leaves or mini crochet hearts attached to the same keychain ring. These small additions give your keychain extra charm and uniqueness.
If you’re making these as gifts, consider using different yarn textures like metallic or glitter yarn for a more eye-catching result. People love receiving handmade keychains because they carry a personal touch and a sense of care.
After attaching all the parts, double-check that everything is secure. The last thing you want is for your flower to detach from the key ring. Once you’re satisfied, your Crochet Flower Keychain – Step by Step Tutorial is complete! You now have a beautiful and functional crochet accessory to show off.
Tips for Customization and Maintenance
One of the joys of crochet is that you can always make each piece your own. This Crochet Flower Keychain – Step by Step Tutorial can easily be customized to suit any style, personality, or occasion.
To personalize your keychain, experiment with different color combinations. For example, use gradient yarns for petals that blend beautifully from one color to another. You can also make flowers in seasonal colors—pastel shades for spring, bright tones for summer, or red and green for the holidays.
Another way to customize your keychain is by changing the flower type. Try different petal shapes, like pointed ones for daisies or rounded ones for sunflowers. You can even add multiple layers to create a more complex flower design.
If you want your keychain to last longer, consider adding a fabric backing or using a stiffening spray. This will help the flower keep its shape even after frequent use.
When it comes to cleaning, gently hand wash your crochet keychain in cool water using mild soap. Avoid wringing or twisting it. Instead, press gently between towels and let it air dry flat.
Lastly, store your crochet flower keychains in a cool, dry place. If you make multiple keychains, keep them in a box or bag to prevent tangling. Taking good care of your handmade keychains ensures they stay beautiful and functional for a long time.
FAQ about Crochet Flower Keychain
1. Is this project suitable for beginners?
Yes! The Crochet Flower Keychain – Step by Step Tutorial is beginner-friendly. It only requires basic crochet stitches and can be completed in less than an hour.
2. What type of yarn works best for crochet keychains?
Cotton yarn is ideal because it’s durable, easy to clean, and holds its shape well.
3. Can I use leftover yarn from other projects?
Absolutely! Crochet keychains are perfect for using up small yarn scraps. It’s a great way to reduce waste and get creative.
4. How do I attach the flower to the key ring?
You can crochet a small chain loop and slip stitch it to the flower, then slide the key ring through the loop for a secure hold.
5. Can I make different flower designs?
Yes, you can modify the petal count or stitch pattern to create daisies, sunflowers, or roses using the same basic idea.
6. How do I clean a crochet keychain?
Hand wash gently with mild soap and water, then let it air dry flat. Avoid machine washing, as it might stretch or damage the stitches.
7. Can I sell crochet flower keychains?
Definitely! Handmade crochet keychains make wonderful items for craft fairs, small shops, or personal gifts.
Conclusion
This Crochet Flower Keychain – Step by Step Tutorial showed you how easy and enjoyable it is to create a beautiful, functional accessory with just a few materials and basic stitches. From choosing yarn colors to assembling the final product, every step allows you to express your creativity and passion for crochet.
Whether you’re making these for yourself, for gifts, or to sell, crochet flower keychains are always a hit. They are quick to make, customizable, and full of handmade charm.
Now it’s your turn! Try this Crochet Flower Keychain – Step by Step Tutorial, experiment with colors and styles, and create something that reflects your personality. I’d love to hear your thoughts—leave a sincere opinion or suggestion below about your experience with this project. Your feedback helps inspire others to start their own crochet journey!