
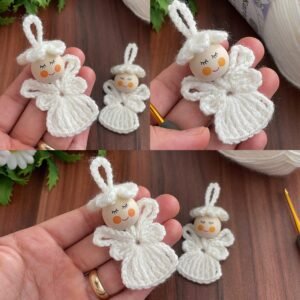
If you love handmade crafts that bring both creativity and a touch of serenity to your home, then this Crochet Angels You’ll Love Making – Step by Step Tutorial is just what you need. Crocheted angels are more than just ornaments; they symbolize peace, hope, and love. Whether you want to create them for Christmas, special occasions, or as thoughtful gifts, these delicate crochet angels are sure to fill your space with warmth and joy. In this tutorial, you’ll discover how to make your own angels using simple stitches and techniques that even beginners can master.
The Crochet Angels You’ll Love Making – Step by Step Tutorial focuses on easy-to-follow instructions that will help you achieve beautiful results without feeling overwhelmed. You’ll learn how to shape the angel’s body, wings, and halo using basic crochet stitches. Each section of this tutorial has been carefully written to ensure clarity and accessibility for all crochet skill levels. By the end, you’ll be able to create charming angels that can be used as ornaments, appliqués, or even keychains.
What makes these crochet angels truly special is the love and attention that go into every stitch. Handmade crafts like these add a personal touch to your home décor and make for perfect heartfelt gifts. You can choose soft white yarn for a traditional look or experiment with colors like gold, silver, or pastel tones to give your angels a unique personality. This Crochet Angels You’ll Love Making – Step by Step Tutorial will guide you through all these creative possibilities so that you can enjoy both the process and the result.
Materials and Tools Needed
Before beginning your Crochet Angels You’ll Love Making – Step by Step Tutorial, it’s important to gather all the necessary materials. The tools you use can make a big difference in how your final angel looks and feels. For this project, you’ll need a crochet hook suitable for your chosen yarn, cotton or acrylic yarn, scissors, a yarn needle, and optional embellishments such as beads or ribbons.
Start with soft, high-quality yarn that has good stitch definition. This will help the angel’s wings and body look neat and well-structured. Cotton yarn is particularly great for this type of project because it holds its shape nicely, giving the angel a more polished appearance. Beginners might prefer a light-colored yarn since it makes it easier to see stitches while crocheting.
The crochet hook size will depend on your yarn’s thickness. A 2.5 mm to 3.5 mm hook is usually ideal for small decorative angels. Make sure to use a comfortable hook that allows you to crochet for longer periods without straining your hand.
Scissors and a yarn needle are essential finishing tools. The scissors will help trim excess yarn, while the needle is used to weave in ends and attach smaller details like the wings or halo. Adding beads or a delicate ribbon bow can make your crochet angel even more enchanting and festive.
Before moving to the next steps, prepare your workspace. A quiet and well-lit environment helps you focus better on your stitches. Having all your tools within reach ensures a smoother crocheting experience, especially if you are following this Crochet Angels You’ll Love Making – Step by Step Tutorial for the first time.
Finally, keep a small bowl or box nearby to store small accessories like beads or safety pins. This helps prevent losing any small parts while working on your project. With everything ready, you can now begin the creative process of bringing your crochet angel to life.
Step-by-Step Guide to Making Your Crochet Angel
Now that you have everything set up, it’s time to start the actual Crochet Angels You’ll Love Making – Step by Step Tutorial. Begin with the angel’s body, which forms the foundation of your project. Create a magic ring and work single or double crochet stitches in a circular pattern. Gradually increase your stitches to shape the skirt or gown of the angel.
Once the base is wide enough, continue crocheting in rounds to give the angel’s body height. The skirt can be as long or as short as you prefer. Some crocheters like to add a lacy texture by using chain spaces or shell stitches for a more elegant design.
Next, move on to creating the wings. To make the wings symmetrical, crochet two identical pieces. Use lighter yarn tension for a delicate, airy look. You can also add a touch of sparkle by using metallic thread or blending a thin silver yarn with your main color. Attach the wings to the back of the angel using your yarn needle and secure them firmly.
The head can be made by crocheting a small round ball using single crochet stitches. Stuff it lightly with a bit of fiberfill to give it shape. Once it’s done, sew the head to the top of the angel’s body. You can also use embroidery thread to add small facial details if you like, although many crocheters prefer leaving the angel’s face plain for a serene look.
To finish your angel, crochet a small ring for the halo. This can be done using metallic gold or silver yarn for a radiant effect. Attach it above the head, making sure it’s centered and balanced. Finally, weave in all loose ends and trim any excess yarn to keep your piece tidy.
Once complete, gently block your angel by shaping it with your hands and letting it dry flat. This will help the wings and skirt hold their form beautifully. Congratulations, your crochet angel is ready to bring a touch of handmade beauty wherever you place it!
Creative Uses for Your Crochet Angels
After following the Crochet Angels You’ll Love Making – Step by Step Tutorial, you’ll likely find yourself inspired to use these lovely creations in many ways. One of the most common uses is as Christmas ornaments. Hang them on your tree, wreath, or garlands to add a soft, elegant touch to your holiday décor.
Another popular idea is to use them as gift toppers. Instead of traditional bows, a small crochet angel can adorn your presents, making them extra special and memorable. The recipient can then keep the angel as a keepsake.
You can also make a garland entirely out of crochet angels by stringing several together. This creates a stunning decoration for mantels, doorways, or windows. You can alternate colors for a playful look or keep it classic with white and gold.
For those who enjoy making gifts, crochet angels make wonderful tokens of affection. They are perfect for birthdays, baptisms, weddings, or as comfort gifts during tough times. Because they symbolize love and protection, they carry a heartfelt message that words often can’t express.
Miniature crochet angels can also be used as keychains, car accessories, or bookmarks. Their versatility makes them ideal for many creative projects, both decorative and practical.
Finally, you can sell your crochet angels at craft fairs or online. Handmade items like these are always in demand, especially during the holiday season. Just remember to keep your designs original and use quality materials to make your angels stand out.
Tips for Perfecting Your Crochet Angel
Even though this Crochet Angels You’ll Love Making – Step by Step Tutorial is beginner-friendly, practice makes perfect. Here are a few helpful tips to improve your crochet technique and achieve more professional-looking results.
Always maintain consistent tension in your yarn. Uneven tension can cause your angel to lose its shape or look lopsided. If you’re new to crochet, take short breaks to relax your hands and ensure your stitches remain even.
Experiment with different yarn types and colors. While white and cream are traditional choices, you can make angels in pastel tones or metallic shades for a modern twist. Using yarn with a subtle shimmer can make your angel look extra festive.
Blocking your crochet work is crucial, especially for delicate projects like angels. It helps define the shape of the wings and gown while giving the entire piece a neater finish.
If you plan to hang your angel, attach a small loop of yarn or thread to the top of its head. You can also stiffen your angel using a light fabric stiffener to help it maintain its form over time.
Adding tiny embellishments like pearls, beads, or ribbons can personalize your angels even more. Just remember to keep decorations minimal to preserve the elegance of your handmade piece.
Lastly, don’t rush the process. Crocheting is as much about mindfulness as it is about crafting. Enjoy each stitch, knowing that you are creating something unique and meaningful with your hands.
FAQ About Crochet Angels You’ll Love Making – Step by Step Tutorial
1. Can beginners make crochet angels?
Yes! The Crochet Angels You’ll Love Making – Step by Step Tutorial is designed for all skill levels. Even if you’re a beginner, the basic stitches and clear steps make it easy to follow.
2. What kind of yarn works best for crochet angels?
Cotton yarn is ideal because it holds its shape well and gives a clean, crisp look. However, you can also use acrylic or blended yarns depending on your preference.
3. How long does it take to make one crochet angel?
It depends on your experience level and the size of your angel. On average, small angels take about 1 to 2 hours to complete.
4. Can I wash my crochet angels?
Yes, but it’s best to hand wash them gently in cool water and let them air dry to preserve their shape and details.
5. Can I customize the angel’s design?
Absolutely! You can modify the wings, colors, or embellishments to create unique versions that reflect your personal style.
Conclusion
In this Crochet Angels You’ll Love Making – Step by Step Tutorial, you learned how to create charming handmade angels that add warmth and beauty to any space.
From gathering materials to shaping wings and adding finishing touches, each step helps you build both skill and creativity. These crochet angels are perfect as gifts, ornaments, or personal keepsakes that carry love and serenity in every stitch.
Now that you’ve reached the end of this tutorial, we’d love to hear from you! Share your thoughts, opinions, or suggestions in the comments. Your feedback helps inspire even more creative crochet projects for everyone to enjoy.