
If you are looking for a fun and creative project, learn how to make this easy and adorable crochet butterfly.-Step by Step Tutorial is perfect for you. Crochet butterflies are not only cute and decorative, but they also make excellent gifts, embellishments for clothing, accessories, and even home décor. This tutorial will guide you through every step, whether you are a beginner or an experienced crocheter, ensuring that you can create a beautiful butterfly every time.
The beauty of this learn how to make this easy and adorable crochet butterfly.-Step by Step Tutorial lies in its simplicity and versatility. You can choose from a wide range of colors, sizes, and yarn textures to make butterflies that match your style or your home décor. From bright, cheerful shades for spring decorations to pastel or muted tones for subtle elegance, the possibilities are endless. This project also allows you to practice basic crochet techniques, such as single crochet, double crochet, and slip stitches, while creating something visually pleasing.
Before we start, make sure to gather your materials. You will need yarn in at least two different colors (one for the wings and one for the body), a suitable crochet hook (usually recommended on your yarn label), a pair of scissors, a yarn needle for finishing, and optional beads or embellishments for decoration. Once you have everything ready, you can follow along with this learn how to make this easy and adorable crochet butterfly.-Step by Step Tutorial to craft a beautiful, lightweight butterfly that can be used in multiple ways.
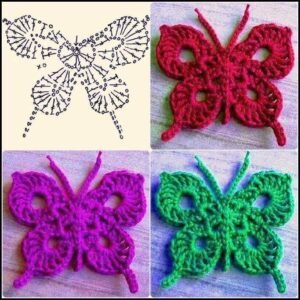
Creating the Butterfly Wings
The first step in this learn how to make this easy and adorable crochet butterfly.-Step by Step Tutorial is crafting the wings. Start by making a small foundation chain, typically five to six chains, and join with a slip stitch to form a loop. This loop will serve as the center of the butterfly, from which the wings extend.
For the top wings, crochet a combination of double crochets and treble stitches to give them a full, rounded shape. Increase the number of stitches gradually to create a natural wing curve. Remember, consistency in stitch height is key to maintaining symmetry between both top wings.
Once you finish one top wing, repeat the process on the opposite side. Use the center loop as a pivot point. Make sure both wings have the same number of stitches so your butterfly looks balanced. Pinning the wings temporarily can help if you need precise alignment.
After the top wings are complete, move on to the bottom wings. These are slightly smaller and can be created using half double crochets and double crochets. The smaller size provides a realistic proportion to the butterfly’s overall shape.
Attach the bottom wings to the center loop in the same way as the top wings. Ensure the stitches are secure, as these points will support the body attachment. Smooth out any uneven edges by gently stretching the wings.
Finally, weave in the loose yarn ends with your yarn needle. This step not only secures your work but also gives the butterfly a polished, professional appearance. Once the wings are ready, you can move on to crafting the body.
Making the Butterfly Body
The next step in this learn how to make this easy and adorable crochet butterfly.-Step by Step Tutorial focuses on the body, which is simple but essential for the butterfly’s structure. Start with a small chain, typically around ten to twelve stitches, depending on the desired body length.
Once the chain is ready, work single crochet stitches back along the chain to form a firm, cylindrical shape. This will create a sturdy base to which you will attach the wings. For a slightly raised body, consider using half double crochet stitches instead.
After completing the body, attach it securely to the center loop between the wings. Use a yarn needle or your hook to stitch the body to the wings, ensuring it is tightly fastened. This will prevent your butterfly from coming apart during handling.
You can now shape the antennae by creating two small chains and attaching them to the top of the body. Simple chains with a small bead at the end can give your butterfly a realistic look and add a decorative touch. Adjust the antennae length according to your preference.
Check the overall shape of the butterfly. Make minor adjustments by pulling or slightly stretching stitches to ensure symmetry. This careful shaping ensures your butterfly looks delicate and beautiful.
Finally, weave in any remaining yarn ends to secure the body and wings. This step is crucial for maintaining durability, especially if you plan to use your butterfly as an accessory or decorative piece.
Adding Finishing Touches
Adding finishing touches is an important part of this learn how to make this easy and adorable crochet butterfly.-Step by Step Tutorial. Embellishments such as beads, embroidery, or fabric paint can enhance the butterfly’s appearance. A small bead at the center of the wings can mimic natural patterns found on real butterflies.
Consider using contrasting yarn colors for the edges of the wings to make them stand out. This not only adds depth but also gives a playful, eye-catching effect. You can also use variegated yarn to create a multicolored gradient across the wings.
If you plan to use your butterfly on accessories like hair clips, headbands, or bags, attach a small safety pin, clip, or thread loop to the back. This allows you to move and reposition the butterfly as desired.
For decorative purposes, you can create multiple butterflies in various sizes and colors, forming a beautiful mobile, wall art, or table centerpiece. These handmade butterflies can brighten up any room or craft project.
Gently block the finished butterfly by pinning it to a flat surface and lightly spraying with water. This step helps the wings retain their shape and makes the butterfly look more professional.
Finally, admire your creation. This small but charming crochet butterfly is now ready to be used, gifted, or displayed, showcasing your skill and creativity in a delightful way.
Uses and Care for Your Crochet Butterfly
Once your butterfly is finished, it’s important to know how to use and care for it properly. This learn how to make this easy and adorable crochet butterfly.-Step by Step Tutorial creates a lightweight, delicate piece, so handle it with care to prevent stretching or snagging.
If using as an accessory or decoration, avoid exposure to direct sunlight for long periods, as this can fade the yarn colors. Store your butterfly in a safe, dry place when not in use.
Cleaning is simple: hand wash gently with mild detergent and air dry flat. Avoid wringing or twisting, which could distort the wings and body. Light steaming or blocking can help reshape the butterfly after washing.
These crochet butterflies are versatile: attach them to clothing, accessories, home décor, or use them as gifts. They are perfect for seasonal décor, parties, or crafting projects with kids.
Making a series of butterflies in different colors allows for creative arrangements. You can place them on branches, create a garland, or even combine them with flowers for a whimsical effect.
With proper care, your handmade crochet butterflies will last for years, making them not only charming but also durable additions to your crafting collection.
Learn How to Make This Easy and Adorable Crochet Butterfly
1. Can beginners make this butterfly?
Yes, this learn how to make this easy and adorable crochet butterfly.-Step by Step Tutorial is designed for beginners, using basic stitches and simple techniques.
2. What yarn works best for this project?
Cotton or acrylic yarn works well, providing good stitch definition and easy handling.
3. How do I make multiple butterflies look different?
Use different yarn colors, embellishments, or stitch patterns to create unique butterflies.
4. Can I use this butterfly as a hair accessory?
Absolutely! Attach a clip or pin to the back for versatile use.
5. How do I keep the wings from curling?
Blocking the butterfly with pins and light steam after finishing helps maintain its shape.
6. Can this project be scaled up or down?
Yes, adjust the chain lengths and stitch numbers to make larger or smaller butterflies.
Conclusion
In this learn how to make this easy and adorable crochet butterfly.-Step by Step Tutorial, you’ve learned how to create a delicate, beautiful butterfly from start to finish.
From crafting the wings to assembling the body, adding finishing touches, and understanding care, this tutorial provides a complete guide for beginners and experienced crocheters alike.
Now it’s your turn to try making your own crochet butterflies. Experiment with colors, sizes, and embellishments, and share your creations. Don’t forget to leave your honest feedback and suggestions—it inspires others to create their own adorable butterflies and helps the crafting community grow.