
If you’ve ever dreamed of creating something cozy, beautiful, and practical for your home, then you’ll love this Make this Quick and Easy Crochet Rug – Step by Step Tutorial. Handmade rugs add warmth and charm to any space, and crocheting your own gives you the freedom to choose colors, sizes, and textures that perfectly match your décor. This project is not only satisfying but also simple enough for beginners to enjoy. Whether you’re looking for a weekend project or a creative way to use leftover yarn, this tutorial is exactly what you need.
The beauty of this Make this Quick and Easy Crochet Rug – Step by Step Tutorial lies in its simplicity. You don’t need to be an expert crocheter or own special tools. All you need is some yarn, a hook, and a little patience. You’ll learn how to make a soft, sturdy rug that adds personality to your living room, bedroom, or even bathroom. The stitches used are basic, but when combined thoughtfully, they create a texture that feels both comfortable underfoot and visually appealing.
Another advantage of making your own crochet rug is sustainability. Instead of buying expensive machine-made rugs, you can repurpose yarn scraps or even upcycle old t-shirts into yarn. The Make this Quick and Easy Crochet Rug – Step by Step Tutorial encourages creativity and eco-friendly crafting. Plus, a handmade rug makes a wonderful gift for housewarmings, weddings, or holidays. Once you finish your first one, you might just find yourself making more for every room in your home!
Materials You’ll Need to Make Your Crochet Rug
Before diving into the crochet process, let’s prepare the materials you’ll need for this Make this Quick and Easy Crochet Rug – Step by Step Tutorial. Having everything ready beforehand will make your crocheting experience smooth and enjoyable.
First, choose your yarn. For rugs, thick yarns such as bulky cotton, polyester cord, or even t-shirt yarn work best because they create a durable and soft texture. You can also combine multiple strands of medium-weight yarn to achieve a thicker appearance. The color combinations are endless—neutral tones for minimalist homes or bright shades for a fun, playful look.
Next, select an appropriate crochet hook. The hook size should match the yarn thickness, usually between 8 mm and 12 mm for rug projects. A larger hook helps you work faster and creates looser stitches, giving the rug a nice drape. Make sure your hook is comfortable to hold, especially since rugs require more continuous stitching than smaller crochet projects.
You’ll also need scissors to cut your yarn and a large tapestry needle to weave in the ends once your rug is finished. Some people like to use a non-slip backing to keep the rug in place, especially if it will be used on hardwood or tile floors. It’s not necessary, but it can be a nice addition for safety.
Lastly, find a comfortable space to work in. Crocheting a rug can take a few hours, so choose a cozy spot with good lighting and enough room to spread out your work as it grows. Once you have everything prepared, you’re ready to start crafting your beautiful crochet rug following this Make this Quick and Easy Crochet Rug – Step by Step Tutorial.
Step-by-Step Instructions to Crochet Your Rug
Now that your materials are ready, let’s dive into the exciting part—making your rug! This section of the Make this Quick and Easy Crochet Rug – Step by Step Tutorial will walk you through each step carefully so you can follow along easily, even if you’re new to crocheting.
Start by creating a slipknot on your hook. Then, make a foundation chain as wide as you want your rug to be. For example, if you want a small rug, chain around 40 stitches. For a larger one, chain 60 or more. Remember that the number of chains determines the width of your rug, while the number of rows will determine the length.
Once you’ve made your foundation chain, crochet a single crochet stitch into the second chain from the hook and continue across the row. This will create a sturdy base. At the end of the row, chain one, turn your work, and start crocheting back across. Continue this process using either single crochet or half-double crochet stitches—both create a dense texture perfect for rugs.
If you want to add color stripes, switch yarn colors at the end of a row by pulling a new color through the last two loops of the previous stitch. This technique ensures clean color transitions. You can experiment with patterns, from simple stripes to geometric designs, to make your rug unique.
Keep crocheting rows until you reach your desired rug length. Once complete, fasten off your yarn and use a tapestry needle to weave in all the loose ends neatly. If you’d like, you can crochet a border around the entire rug using single crochet stitches to give it a more finished look.
When you’re done, spread the rug flat and gently block it if needed. Blocking helps smooth out the edges and makes your rug look professionally made. Congratulations! You’ve just finished your Make this Quick and Easy Crochet Rug – Step by Step Tutorial, and now you have a handmade piece that adds warmth and charm to any space.
Tips and Tricks for Perfecting Your Crochet Rug
As with any craft, a few tips can make your experience with this Make this Quick and Easy Crochet Rug – Step by Step Tutorial even better. These small adjustments can greatly improve your final result and make the process more enjoyable.
First, maintain consistent tension. Uneven tension can cause your rug to curl or stretch unevenly. Practice keeping your stitches uniform and relaxed, especially when using thicker yarns that may feel more rigid.
Second, if your rug starts to curl at the edges, you may be adding or skipping stitches by accident. Count your stitches at the end of each row to make sure the number remains consistent. This simple habit will keep your rug perfectly shaped.
Third, consider using multiple strands of yarn together. This not only adds texture but also makes the rug thicker and sturdier. You can combine two or three colors for a unique marbled effect that looks stunning in any room.
Fourth, when crocheting with t-shirt yarn or bulky fibers, take breaks often. These materials can be heavy on the hands and wrists, so it’s important to rest to avoid discomfort. Stretch your hands occasionally to keep your muscles relaxed.
Fifth, don’t be afraid to experiment with different stitches. Once you’ve mastered the basics, try adding a few rows of puff stitches, bobbles, or shell patterns for extra flair. These decorative touches elevate the look of your Make this Quick and Easy Crochet Rug – Step by Step Tutorial and make it truly one-of-a-kind.
Lastly, always measure your rug’s dimensions before finishing. This ensures it fits perfectly in your chosen space, whether it’s beside your bed, in front of a sink, or under a coffee table.
Creative Uses and Design Ideas for Your Crochet Rug
Once you’ve mastered the Make this Quick and Easy Crochet Rug – Step by Step Tutorial, you can use your new skills to make rugs in all shapes and styles. The versatility of crochet allows for endless creativity when it comes to design and function.
A round crochet rug, for example, adds a cozy touch to a reading nook or child’s room. You can start with a magic ring and work in continuous rounds, increasing each round evenly to create a perfect circle. Use soft pastel colors for nurseries or bold hues for statement pieces.
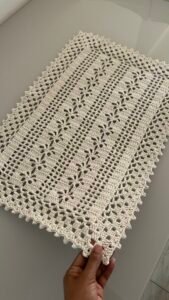
Rectangular rugs work beautifully in hallways or bathrooms. Try alternating colors every few rows to create a striped effect that brightens the space. For a more modern design, use neutral shades like beige, gray, or cream.
If you’re feeling adventurous, try crocheting a rug in a unique shape—such as an oval, heart, or hexagon. The steps are similar, but you’ll adjust your increases and decreases accordingly. This is a great way to personalize your décor and practice new crochet techniques.
You can also repurpose your crochet rug as a pet mat. Pets love soft textures, and a handmade rug provides a cozy spot for them to rest. It’s machine-washable (depending on your yarn type) and adds a cute handmade touch to your pet’s corner.
Another creative idea is to use small crochet rugs as chair pads or placemats. By following the same Make this Quick and Easy Crochet Rug – Step by Step Tutorial with fewer rows, you can make smaller versions perfect for daily use. Handmade home accessories like these always add warmth and charm.
FAQ
1. What type of yarn is best for making a crochet rug?
Thick cotton or t-shirt yarn works best because it’s durable and easy to clean. You can also use bulky acrylic yarn for a softer feel.
2. Can I wash my crochet rug in the machine?
Yes, but it depends on the yarn type. Cotton rugs can usually be machine-washed on a gentle cycle. Always check your yarn label for care instructions.
3. How long does it take to make a crochet rug?
A small rug can take 3 to 4 hours, while a larger one may take a couple of days, depending on your speed and stitch pattern.
4. What stitches are best for beginners?
Single crochet and half-double crochet are the easiest and most effective for rugs because they create dense, sturdy textures.
5. Can I make this rug using leftover yarn?
Absolutely! Mixing leftover yarns adds a fun, colorful look to your project and is a great way to use up scrap materials.
Conclusion
Making your own rug using this Make this Quick and Easy Crochet Rug – Step by Step Tutorial is a fulfilling and enjoyable experience. You’ve learned how to choose the right materials, follow the step-by-step process, and apply tips that guarantee beautiful results.
This project proves that crochet isn’t just for blankets or clothing—it’s also perfect for functional and stylish home décor.
Now it’s your turn! Gather your yarn, pick your favorite colors, and start crocheting your own beautiful rug. Once you’ve finished, share your experience and leave your honest opinion and suggestions below. Your feedback inspires others to try handmade creations and keeps the joy of crochet alive!