
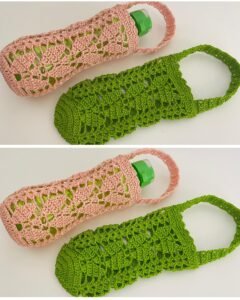
If you love practical crochet projects that combine beauty and functionality, this Practical and Easy Crochet Water Bottle Cover – Step by Step Tutorial is exactly what you need. A crochet water bottle cover is the perfect accessory for those who want to protect their bottles, add a personal touch, and reduce condensation while carrying their drinks. With simple stitches and minimal materials, you can create a stylish cover that fits your favorite bottle and showcases your creativity.
Crocheting a water bottle cover is a wonderful way to use up leftover yarn and practice essential crochet techniques. Whether you’re heading to work, school, or a picnic, this handmade accessory makes hydration both fashionable and eco-friendly. Plus, this tutorial is designed to be beginner-friendly, so even if you’re new to crochet, you’ll be able to follow along easily and complete your first bottle cover in no time.
This Practical and Easy Crochet Water Bottle Cover – Step by Step Tutorial will guide you through every part of the process—from selecting yarn and tools to completing your final stitches. You’ll learn how to make a snug, durable cover that fits perfectly and can be customized with different colors, textures, and even decorative details like buttons or straps. Let’s get started with this creative and functional crochet project that combines practicality with style.
Materials and Tools Needed for Your Crochet Water Bottle Cover
Before you begin this Practical and Easy Crochet Water Bottle Cover – Step by Step Tutorial, gather all your materials. Preparation ensures a smoother crocheting experience and helps you stay organized as you work.
You’ll need cotton yarn for this project. Cotton is the best choice because it’s absorbent, durable, and easy to clean. You can also use a blend of cotton and acrylic if you want a softer texture. Choose a color that matches your style or the bottle you’re covering.
Next, select a crochet hook that suits your yarn. Typically, a 3.5mm to 4mm hook works perfectly for medium-weight yarn. Make sure the hook feels comfortable in your hand, as you’ll be using it for multiple rounds.
You’ll also need scissors, a yarn needle for weaving in ends, and a measuring tape to ensure your cover fits your bottle perfectly. It’s helpful to have your water bottle nearby so you can measure as you go.
If you’d like to make your cover more functional, you can include a strap or handle. You can crochet one separately or attach a simple cord so you can carry your bottle easily.
Optional decorative materials include beads, buttons, or appliqués if you want to personalize your cover. Keep in mind that the simpler your design, the faster it will be to finish.
Once you have all your supplies ready, you’re prepared to begin crafting your beautiful and functional crochet water bottle cover.
Step by Step Instructions for Crochet Water Bottle Cover
Now that your materials are ready, let’s move into the detailed steps of this Practical and Easy Crochet Water Bottle Cover – Step by Step Tutorial. Follow these instructions carefully to create a perfect and long-lasting cover.
-
Start with a Magic Ring: Begin with a magic ring and make 6 single crochets (sc) inside it. Pull tight and slip stitch to close the round. This will be the base of your bottle cover.
-
Increase the Base: For the next round, make 2 single crochets in each stitch around (12 stitches total). Continue increasing evenly in each round until your circle is roughly the same width as the bottom of your bottle.
-
Build the Sides: Once the base is large enough, stop increasing. Work one single crochet in each stitch around to start building up the sides of the cover. You can use half double crochets (hdc) or double crochets (dc) for a taller design.
-
Add Texture: To make your cover more interesting, alternate between rounds of single crochet and mesh stitch (chain 1, skip one stitch, double crochet in next). This creates a breathable pattern that looks elegant and helps the bottle stay cool.
-
Measure as You Go: Keep checking the fit by placing the cover on your bottle. Adjust the stitch height or number of rounds to ensure a snug fit that’s easy to remove and put back on.
-
Finish with a Drawstring or Strap: Once your cover reaches the bottle’s neck, add a drawstring to hold it in place. You can crochet a simple chain cord or use a matching ribbon. If you want a carrying strap, attach it firmly to the sides before fastening off your yarn.
Congratulations! You’ve just completed the core steps of your Practical and Easy Crochet Water Bottle Cover – Step by Step Tutorial.
Tips and Customization Ideas for Your Crochet Bottle Cover
One of the best things about this Practical and Easy Crochet Water Bottle Cover – Step by Step Tutorial is how customizable it is. You can adjust the pattern, colors, and decorations to create a unique piece every time.
First, experiment with colors. Try stripes, ombre effects, or even a multicolored yarn for a playful look. A two-tone combination—like cream and teal or pink and gray—adds sophistication while still keeping it simple.
Second, add a bottom reinforcement. If you want your cover to last longer, crochet an extra base layer and sew it onto the bottom. This helps it stay flat and prevents wear over time.
Third, consider adding a handle. You can crochet a long strap that allows you to carry the bottle on your shoulder or wrist. This makes it more convenient for outdoor activities, gym sessions, or hikes.
Fourth, you can make the pattern more decorative by adding flower motifs, small hearts, or geometric appliqués. These details turn a basic project into something truly eye-catching.
Fifth, try different stitches. Once you’re comfortable with the basic pattern, use shell stitches, puff stitches, or lattice designs for texture and flair. Each stitch style gives the cover a completely different appearance.
Finally, always remember to securely weave in your ends. A clean finish makes your project look professional and ensures that your stitches won’t come undone with use or washing.
Benefits of Using a Crochet Water Bottle Cover
There are many reasons to fall in love with making and using a crochet water bottle cover. Beyond its aesthetic appeal, it’s practical and eco-friendly.
First, it protects your bottle from scratches and dents. Whether you have a stainless-steel or glass bottle, a crochet cover adds an extra layer of safety.
Second, it helps reduce condensation. Crochet yarn, especially cotton, absorbs moisture and keeps surfaces dry, preventing water rings on tables or inside bags.
Third, it provides better grip. A crocheted surface is less slippery, making it easier to hold your bottle securely while walking or exercising.
Fourth, it’s eco-friendly. By making a reusable and washable cover, you reduce the need for disposable plastic sleeves or wraps.
Fifth, a handmade bottle cover is a reflection of your personal style. You can create one that matches your outfits, workout gear, or even seasonal themes.
Lastly, it’s a perfect gift idea. Handmade crochet items carry warmth and thoughtfulness. A water bottle cover makes a useful, unique, and heartfelt present for anyone who values sustainability and creativity.
Practical and Easy Crochet Water Bottle Cover
1. What type of yarn works best for a crochet water bottle cover?
Cotton yarn is the best choice because it’s strong, absorbent, and easy to wash. It also holds its shape well even after frequent use.
2. Can beginners follow this Practical and Easy Crochet Water Bottle Cover – Step by Step Tutorial?
Yes! This tutorial is designed for all skill levels. The stitches used are basic and easy to learn, making it perfect for beginners.
3. How long does it take to crochet a water bottle cover?
Depending on your skill level, it can take between 1 to 2 hours to complete one cover. It’s a quick and rewarding project.
4. Can I make the cover fit any bottle size?
Absolutely! By adjusting the number of rounds in the base and height, you can customize the pattern to fit any bottle shape or size.
5. How do I wash my crochet water bottle cover?
Hand wash with mild soap and cold water, then lay it flat to dry. Avoid harsh detergents to preserve the yarn’s color and shape.
6. Can I sell crochet water bottle covers that I make using this tutorial?
Yes, you can sell your handmade covers. Just make sure your items are well-crafted and use quality materials for durability.
7. What kind of hook size should I use?
A 3.5mm or 4mm hook is ideal for medium-weight yarn, but always check your yarn label for recommendations.
Conclusion
Making your own Practical and Easy Crochet Water Bottle Cover is both a fun and functional craft project. In this tutorial, you’ve learned all the necessary steps—from gathering materials to adding creative touches—to make a stylish and reusable cover that fits perfectly.
This simple yet rewarding project not only enhances your crochet skills but also contributes to a more sustainable lifestyle. The best part is how customizable it is—you can adjust colors, stitches, and decorations to match your personality or gift-giving needs.
We hope this Practical and Easy Crochet Water Bottle Cover – Step by Step Tutorial has inspired you to create your own. Try different variations, enjoy the creative process, and don’t forget to share your experience! Leave your honest opinion and suggestions below—we’d love to hear your thoughts and ideas for future crochet tutorials.