
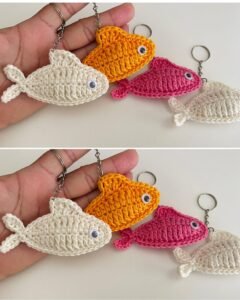
If you are looking for a fun, small, and creative crochet project, this Quick and easy crochet fish keychain – Step by Step Tutorial is perfect for you. It’s a simple pattern that allows you to make adorable keychains shaped like little fish, ideal for decorating your keys, bags, or even as thoughtful handmade gifts. This project is beginner-friendly, and you’ll only need a few materials and basic crochet skills to get started. Whether you’re an experienced crocheter or just beginning your journey, this guide will walk you through each step in an easy-to-understand way.
The charm of this Quick and easy crochet fish keychain – Step by Step Tutorial lies in its simplicity and versatility. You can experiment with different yarn colors, sizes, and even add tiny embellishments like beads or eyes to make each fish unique. These small crochet items are also excellent stash-busters, helping you use up leftover yarn from other projects. Because they are quick to make, you can crochet several in a short amount of time, making them great for selling, gifting, or keeping as cute accessories for yourself.
Crocheting such small and fun projects can be incredibly relaxing and satisfying. It’s a great way to unwind while creating something beautiful and functional. The Quick and easy crochet fish keychain – Step by Step Tutorial also makes a perfect project for kids or beginners learning how to crochet small shapes. Once you understand the basics, you can easily adapt the pattern to create other sea-themed designs, like starfish or shells, for a matching set of keychains.
Materials Needed for Your Crochet Fish Keychain
To get started with this Quick and easy crochet fish keychain – Step by Step Tutorial, you will need a few simple materials. Most of them are easy to find and affordable, making this project both accessible and enjoyable. You’ll need some yarn, a crochet hook, a keychain ring, scissors, a tapestry needle, and optional embellishments like safety eyes or small beads.
When it comes to yarn, cotton is the best choice because it gives the fish a nice texture and durability. You can use leftover cotton yarn in bright colors to make the keychain more playful and eye-catching. Alternatively, acrylic yarn works as well and offers a softer texture, perfect for those who like vibrant and fluffy finishes.
The crochet hook size depends on your yarn thickness. For small keychains, a 2.5mm or 3mm hook usually works best. This helps create tight stitches so the stuffing (if used) won’t show through. If you want your fish to be slightly larger, you can use thicker yarn and a larger hook.
A small amount of fiberfill or leftover yarn can be used to stuff the fish and give it a more defined shape. This step is optional but recommended if you want a plumper, 3D-style fish. For eyes, you can either use small safety eyes, embroider them with black yarn, or glue on tiny beads for a cute finishing touch.
Don’t forget your keychain ring or lobster clasp! You can attach the fish to it with a small loop of yarn or a metal jump ring. It’s a simple step that turns your crochet creation into a functional accessory.
Before you begin, gather all your tools and prepare a comfortable workspace. Having everything organized will make your crocheting smoother and more enjoyable. This preparation ensures your Quick and easy crochet fish keychain – Step by Step Tutorial goes perfectly from start to finish.
Step-by-Step Crochet Instructions
Now, let’s move on to the fun part of the Quick and easy crochet fish keychain – Step by Step Tutorial—creating your little fish. Start with a magic ring or chain two, then crochet six single crochets into the second chain from the hook. Pull the ring tight and join with a slip stitch to form a small circle.
In the second round, make two single crochets in each stitch around. You’ll end up with twelve stitches in total. This forms the base of the fish’s body. Continue increasing gradually by adding single crochets in each stitch, depending on how big you want your fish to be. Typically, three to four rounds are enough for a keychain-sized fish.
Once the body is large enough, stop increasing and crochet evenly in each stitch for a few rounds to give the fish some length. If you want to make the fish thicker, you can stuff it lightly with fiberfill at this stage. This gives your keychain a nice, plump look.
To create the tail, you’ll crochet a few chains (about five or six) and then work single crochets, half double crochets, and double crochets along the chain. This combination of stitches will form a triangular tail. Secure it by slip-stitching back into the fish’s body. You can adjust the shape and size of the tail to your liking.
For the fins, crochet small chain loops (around four or five stitches) and attach them on each side of the fish body using single crochets. You can make one or two fins per side, depending on the design you want. These little details make your fish look more realistic and add personality to your creation.
Finish off by attaching the keychain ring. Insert your hook at the top of the fish’s head, pull a loop of yarn through, and tie it securely to the metal ring. Once you’ve done this, weave in any loose ends neatly using your tapestry needle. Your Quick and easy crochet fish keychain – Step by Step Tutorial is now complete!
Creative Ideas and Customization Options
The beauty of this Quick and easy crochet fish keychain – Step by Step Tutorial is that it can be customized in endless ways. You can change the colors, add stripes, or even use variegated yarn for a multicolored effect. Each fish you make can have its own unique charm and style.
If you love marine themes, consider creating a whole collection of crochet sea creatures. You can make fish in different sizes and colors, then pair them with crochet shells, starfish, or tiny octopuses for a full ocean-inspired keychain set. These make delightful gifts for ocean lovers or children.
You can also personalize your fish keychain by adding initials or small embroidered designs. Using surface crochet or embroidery, write a letter or simple heart shape on the fish’s side. This makes it more meaningful as a gift or a keepsake.
Adding small details like a bead for an eye, a glitter thread for sparkle, or even a mini bow can make your fish stand out. Handmade accessories are all about creativity, so feel free to play around with textures and patterns.
For a more elegant version, use metallic or pastel yarns to give your keychain a stylish and modern appearance. This could be perfect for adults who prefer a more sophisticated look but still love handmade crafts.
If you want to make your fish more functional, attach it to a zipper pull on bags or pouches. The Quick and easy crochet fish keychain – Step by Step Tutorial gives you flexibility to adapt the pattern for multiple uses, making it a great project for both fun and practicality.
Tips for a Perfect Finish
To ensure your Quick and easy crochet fish keychain – Step by Step Tutorial turns out beautifully, here are some helpful tips. First, maintain consistent tension throughout your work. Uneven tension can make the fish look lumpy or misshapen. Practicing a few rounds on scrap yarn can help you achieve even stitches.
Second, use a small hook size to make tight stitches. This helps keep the stuffing inside and gives your keychain a cleaner look. Loose stitches might cause gaps that affect the shape of your fish.
When attaching the fins and tail, make sure they are symmetrically placed. This makes the fish look balanced and well-made. You can pin them in place before sewing if you want extra precision.
If you’re making multiple fish keychains, consider crocheting them assembly-line style. Make all the bodies first, then the tails, and finally the fins. This saves time and ensures uniformity among all your pieces.
Weaving in ends neatly is essential for a professional finish. Use a tapestry needle and secure the yarn tails firmly inside the fish body so they don’t unravel over time.
Lastly, add a personal touch. Your crochet fish doesn’t have to look like anyone else’s. Add your favorite colors, unique stitches, or tiny accessories to make it your own. That’s what makes this Quick and easy crochet fish keychain – Step by Step Tutorial so enjoyable—it’s creative, relaxing, and entirely customizable.
FAQ
1. Can beginners make this crochet fish keychain?
Yes! This tutorial is beginner-friendly and only uses basic stitches like single crochet, slip stitch, and chain.
2. What type of yarn is best for this project?
Cotton yarn is the best choice because it’s sturdy, durable, and holds its shape well.
3. How long does it take to make one keychain?
Depending on your speed, it usually takes about 30 to 45 minutes to complete one fish keychain.
4. Can I make the fish bigger or smaller?
Absolutely! Use thicker yarn and a larger hook for a bigger fish, or thinner yarn and a smaller hook for a tiny version.
5. How do I attach the fish to the keychain ring?
You can use a yarn loop or a metal jump ring to connect the top of the fish to your keychain ring securely.
6. Can I wash the crochet fish keychain?
Yes, but hand washing is recommended to maintain its shape and prevent stretching.
Conclusion
This Quick and easy crochet fish keychain – Step by Step Tutorial is a wonderful project for anyone who loves creating cute and practical handmade crafts.
It’s fast, enjoyable, and full of opportunities for personalization. From choosing colors to adding tiny details, every step allows you to express your creativity while making something you can use or gift.
Whether you’re making one or a dozen, these little crochet fish will surely bring smiles. Try it today, and once you finish, don’t forget to share your honest opinion and suggestions—I’d love to know how your crochet fish turned out!