
If you love practical crochet projects that are both beautiful and useful, this DIY crochet cloth holder – step by step tutorial is perfect for you. This charming project is ideal for organizing your kitchen or bathroom towels in a stylish and handmade way. Whether you’re a beginner or an experienced crocheter, this tutorial will guide you through every stitch to create a functional item that also adds a cozy, handmade touch to your home.
Creating your own crochet cloth holder is not only a relaxing activity but also a creative way to personalize your space. You can choose your favorite yarn colors to match your kitchen decor or make different ones for various rooms. The process is simple and satisfying, and the final product makes a great gift for friends or family who appreciate handmade items. Plus, you’ll get the satisfaction of knowing you created something useful and eco-friendly with your own hands.
This DIY crochet cloth holder – step by step tutorial will show you everything you need—from choosing the right yarn and hook to assembling and decorating your final piece. Even if you’re new to crochet, don’t worry! This guide explains each part clearly so you can follow along easily. With patience and creativity, you’ll have a lovely crochet holder that keeps your towels neatly organized while adding a personal touch to your decor.
Materials You Will Need for the DIY Crochet Cloth Holder
Before starting your DIY crochet cloth holder – step by step tutorial, it’s essential to gather all the necessary materials. Choosing the right supplies can make a big difference in the quality and durability of your finished piece.
First, you’ll need cotton yarn, which is ideal for household items like towel holders because it’s strong and easy to wash. Cotton yarn holds its shape well and can withstand moisture, making it a great option for kitchen or bathroom use. Choose medium-weight yarn for a sturdy but flexible result.
Next, pick a crochet hook suitable for your chosen yarn. Usually, a 3.5mm or 4mm hook works perfectly with medium-weight cotton yarn. Make sure the hook feels comfortable in your hand since you’ll be using it for a while.
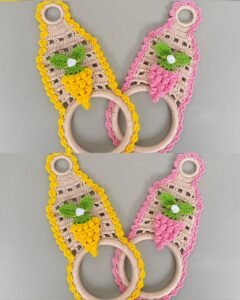
You’ll also need some metal or wooden rings to serve as the base for holding the towels. These rings add structure and allow your cloth holder to hang securely. Many crafters prefer wooden rings for a rustic, natural look, while others like the sleekness of metal.
A pair of scissors and a tapestry needle are essential for trimming and weaving in the yarn ends neatly. Don’t forget to have a measuring tape nearby to ensure all parts of your holder are even and symmetrical.
Finally, if you want to add some extra charm, you can include small decorations like crocheted flowers, buttons, or beads. These tiny details can make your project stand out and reflect your personal style.
Step-by-Step Instructions for Making the Crochet Cloth Holder
Now that you have all your materials, let’s dive into the DIY crochet cloth holder – step by step tutorial. This section will guide you through the entire process, from the base to the finishing touches.
Start by making a foundation chain with about 30 stitches, depending on how long you want your holder to be. Remember that you can adjust the length later to suit your preference. Work in single crochet stitches for the first few rows to create a sturdy base.
Once the base is complete, continue crocheting in double crochet to give the holder some flexibility and texture. Keep your tension consistent for a neat and professional finish.
Next, attach the wooden or metal ring to one end of your crocheted strip. You can do this by crocheting directly around the ring with single crochet stitches. This will secure the ring firmly in place and give the holder its hanging structure.
After that, crochet a small loop or button closure on the opposite end. This loop will help keep your towel in place when hanging. Make sure the loop is tight enough to hold but loose enough to open easily when needed.
To add some decorative flair, consider crocheting a small flower or leaf applique and sewing it onto your holder. This detail gives your project a personalized and handmade appearance that enhances its charm.
Finally, weave in all the yarn ends with a tapestry needle, trim any excess, and your crochet cloth holder is ready to use!
Design Ideas and Customization Tips
One of the best parts about following this DIY crochet cloth holder – step by step tutorial is the freedom to customize it according to your taste. There are countless ways to make your project unique and perfectly suited to your home.
Try experimenting with different yarn colors. You can make bright and cheerful holders for a playful kitchen or choose neutral tones for a minimalist and elegant look. Using multiple colors in stripes or patterns can also add visual interest.
Consider adding crochet appliques like hearts, stars, or animal shapes to make your holder more fun. These designs are perfect if you want to create themed holders for holidays or seasons.
If you enjoy texture, try incorporating different stitch patterns, such as shell stitches, puff stitches, or granny-style motifs. These patterns can make your project look more intricate and professional.
You can also personalize your holder with buttons or ribbons. Sewing a decorative button at the top or weaving a ribbon through the stitches can add a stylish finish.
Another creative idea is to make matching sets. You can crochet several holders in coordinating colors for each family member or make a complete kitchen set that includes matching potholders and dishcloths.
Lastly, don’t forget to block your finished piece if necessary. This will help it hold its shape and look more polished.
Practical Uses and Gift Ideas
This DIY crochet cloth holder – step by step tutorial isn’t just about making something pretty—it’s also about creating a functional item you can use every day. Once you’ve made one, you’ll realize how handy it is in various parts of your home.
In the kitchen, your crochet holder can keep dishcloths and hand towels organized and within easy reach. It’s perfect for hanging on a cabinet or wall hook, keeping your space tidy and stylish.
In the bathroom, you can use it to hang face towels or washcloths. Its soft texture adds a cozy, spa-like feel to your bathroom decor.
For craft rooms or laundry areas, it can also hold small rags or cleaning cloths. This versatility makes it a practical and multipurpose accessory.
Additionally, this crochet project makes an excellent handmade gift. A DIY crochet cloth holder shows care and thoughtfulness, especially when made in colors that match the recipient’s home. Pair it with a set of hand towels or soaps to create a beautiful, complete gift set.
You can also make several holders to sell at craft fairs or online marketplaces. Handmade home accessories are popular, and this simple yet charming project could easily catch the attention of buyers who love unique, handmade items.
The combination of creativity, usefulness, and beauty makes this project a favorite among crochet enthusiasts everywhere.
About DIY Crochet Cloth Holder – Step by Step Tutorial
1. What type of yarn is best for a crochet cloth holder?
Cotton yarn is the best option because it’s durable, absorbent, and easy to wash. It maintains its shape even with frequent use and exposure to moisture.
2. Can beginners make a crochet cloth holder?
Absolutely! This DIY crochet cloth holder – step by step tutorial is beginner-friendly. The stitches used are simple, and the project is small enough to complete in a single afternoon.
3. How long does it take to make one holder?
Depending on your crochet speed and experience, it usually takes about 2 to 3 hours to complete one cloth holder.
4. Can I make it without a ring?
Yes, you can replace the ring with a crocheted loop or even a wooden bead, though using a ring gives better structure and strength.
5. How do I wash my crochet cloth holder?
Hand wash it with mild soap and let it air dry. Avoid bleach and hot water, as they can damage the yarn fibers.
6. What are some decoration ideas for my holder?
You can add crochet flowers, buttons, beads, or even embroidered initials to make your holder more personalized and decorative.
Conclusion
In this DIY crochet cloth holder – step by step tutorial, you learned how to create a practical, decorative, and eco-friendly household accessory. With just a few materials and basic crochet techniques, you can make a beautiful item that helps organize your space while adding a handmade touch.
Whether you’re crafting for yourself, gifting to a loved one, or selling your creations, this project is both fun and rewarding. Remember, your creativity has no limits—experiment with colors, patterns, and designs to make each holder truly unique.
If you enjoyed this tutorial, leave your honest opinion and suggestions below. Your feedback helps inspire new crochet ideas and tutorials for everyone who loves handmade crafts!