
If you love charming handmade crafts that blend creativity and coziness, then this Learn how to make these crochet chicaras-Step by Step Tutorial is the perfect project for you. “Chicara” means cup in Portuguese, and these crochet cups are adorable little creations that can serve as home decorations, gifts, or even cozy coasters for your kitchen. In this tutorial, we’ll guide you through every step so you can make your own crochet chicaras with confidence, even if you’re just starting out in crochet.
These crochet chicaras are not only fun to make but also a wonderful way to express your personality. You can use different yarn colors, add embellishments, and even customize them for seasonal themes like Christmas, Easter, or Valentine’s Day. The best part is that they require only basic crochet stitches and minimal materials, making them perfect for beginners and experienced crafters alike. Plus, they make lovely handmade gifts that show care and creativity.
Throughout this Step by Step Tutorial, you’ll learn everything from selecting your materials to finishing your crochet cup with a neat and professional look. Whether you plan to use your crochet chicara as a decorative item, a coaster, or even a small container, this guide will help you achieve beautiful and consistent results. So, grab your crochet hook, pick your favorite yarn, and let’s get started creating these cute and cozy crochet chicaras together.
Materials and Tools You’ll Need
Before we begin the Learn how to make these crochet chicaras-Step by Step Tutorial, let’s gather the essential materials and tools. Having everything organized will make your project run smoothly and more enjoyable.
You’ll need some yarn, preferably 100% cotton, as it provides good texture and durability. You can use medium-weight yarn, but feel free to experiment with different thicknesses depending on how big or small you want your crochet chicara to be. For a more colorful result, you can combine two or more shades of yarn to give your piece a creative and unique look.
A crochet hook suitable for your chosen yarn size is essential. Most medium-weight yarns work well with a 3.5 mm or 4 mm crochet hook. Keep a pair of scissors nearby to cut the yarn, and don’t forget a tapestry needle for weaving in ends. A stitch marker can also be helpful to keep track of your rounds, especially if you’re new to crocheting in circles.
For stuffing, you can use fiberfill, leftover yarn scraps, or even small pieces of fabric. If you want your crochet chicara to stand upright and hold its shape, a bit of stuffing helps to maintain the structure. Some crafters also use light cardboard at the base to make the bottom sturdier.
Optional items include decorative elements like buttons, small bows, or ribbons. These little details add character and charm to your finished crochet chicaras. Once you’ve gathered all your materials, find a comfortable space with good lighting to start your creative session.
Taking a few minutes to prepare your supplies will make following this Step by Step Tutorial much easier and enjoyable. Now that you’re ready, it’s time to start crocheting!
Crocheting the Base of the Chicara
To begin the Learn how to make these crochet chicaras-Step by Step Tutorial, you’ll start with the base of the chicara. This part forms the bottom of your crochet cup and determines its size and stability. Begin by making a magic ring or a chain of four stitches joined in a loop. Then, crochet six single crochets into the ring.
Next, you’ll work in continuous rounds, increasing your stitches to form a flat circle. On the second round, make two single crochets in each stitch, totaling twelve stitches. On the third round, alternate between one single crochet and one increase. This gradual expansion helps the base stay flat without curling. Continue increasing each round evenly until your base reaches your desired diameter.
Once the base is the size you want, stop increasing and crochet one single crochet in each stitch around. This step creates the upward sides of the cup. Continue crocheting in rounds until the cup reaches your desired height. For a realistic chicara look, keep the sides about the same height as the width of the base.
If you want a sturdy structure, use tighter stitches and firm yarn tension. You can also crochet with two strands of yarn together for extra thickness. This helps your crochet chicara maintain its shape and gives it a solid, durable texture.
At this point, your project will start to look like a small bowl. You can now decide whether to make the edges straight or slightly curved inward to resemble a real cup. Small adjustments in stitch tension can make a big difference in the final look.
With the base and sides complete, you’re ready to move on to the next fun step—adding the handle and the details that give your crochet chicara its signature charm.
Adding the Handle and Finishing Details
This part of the Learn how to make these crochet chicaras-Step by Step Tutorial brings your project to life. The handle is what transforms your small crochet bowl into a recognizable cup shape. To make the handle, start by chaining about 10 to 15 stitches, depending on your desired size. Then, single crochet across the chain to create a flat and sturdy strip.
Once the handle strip is complete, attach one end to the top edge of your cup and the other end a few stitches away, forming a curved handle. Use a tapestry needle to securely sew the ends into the cup body. Make sure the handle is firmly attached, especially if your chicara will be used as a decoration or gift.
After the handle is in place, you can add extra details to personalize your design. Some popular ideas include crocheting a small saucer for the cup, adding a contrasting rim color, or stitching a tiny heart or flower onto the side. These details make your crochet chicara stand out and add a personal touch.
You can also make the chicara look like it’s filled with coffee or hot chocolate by crocheting a round disk in a brown or cream color and placing it inside the top opening. It’s a cute way to make your project more realistic and fun.
If you’re planning to use your crochet chicaras as decorative pieces, you can lightly stuff them to hold their shape. For a more functional use—like a coaster—skip the stuffing and keep the bottom flat.
When you’re satisfied with the design, weave in all loose ends neatly using a tapestry needle. Trim any excess yarn to give your project a clean, professional look. Now you’ve got an adorable crochet chicara that’s ready to display or gift!
Creative Uses and Styling Ideas
After finishing the Learn how to make these crochet chicaras-Step by Step Tutorial, you might be wondering how to use or display your creations. The good news is that these cute crochet cups are incredibly versatile and can be adapted for different occasions and purposes.
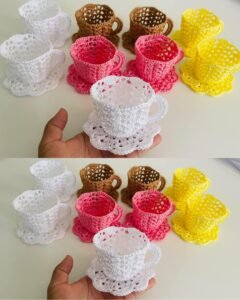
You can use them as decorative items in your kitchen, living room, or office. They look beautiful when placed on shelves or tables, adding a cozy, handmade touch to your home décor. For a charming display, make a few in different colors and arrange them together.
If you enjoy giving handmade gifts, these crochet chicaras are perfect for that. You can fill them with candies, chocolates, or small trinkets and wrap them in cellophane. It’s a heartfelt gift that anyone would appreciate.
They also make wonderful party favors for special occasions like baby showers, weddings, or holidays. Simply match the yarn colors to the event theme, and you’ll have unique, personalized souvenirs that guests will adore.
For a festive touch, make themed crochet chicaras—red and green for Christmas, pastel tones for Easter, or pink for Valentine’s Day. You can even add small crochet flowers, hearts, or bows to complement the theme.
And don’t forget that these little crochet cups are perfect for selling at craft fairs or online shops. Their small size and easy customization make them ideal for crafters who love creating beautiful, marketable items.
1. What is the best yarn to use for crochet chicaras?
Cotton yarn is the best choice because it provides structure and a clean finish. Acrylic yarn can also be used for a softer texture.
2. Can beginners make these crochet chicaras?
Absolutely! This project is perfect for beginners since it uses basic stitches like single crochet, increases, and slip stitches.
3. Do I need to stuff the chicaras?
Stuffing is optional. If you want them to hold their shape or be used as decorations, add a bit of fiberfill. For coasters, skip the stuffing.
4. Can I wash the crochet chicaras?
Yes, but it’s best to hand-wash them gently with mild detergent and let them air dry to preserve their shape and color.
5. How can I make the chicaras more unique?
You can use multiple colors, add embroidery, or create patterns like stripes or polka dots. Accessories like bows or buttons also make them special.
6. Can I sell my crochet chicaras?
Definitely! Handmade crochet items are very popular at craft fairs and online stores. Just make sure your finishing is neat and professional.
Conclusion
The Learn how to make these crochet chicaras-Step by Step Tutorial is a delightful way to explore your creativity while making something charming and practical. You’ve learned how to crochet the base, add the handle, and decorate your chicaras to reflect your personal style. Whether you use them as decorations, gifts, or craft items, these crochet cups bring warmth and creativity into any space.
By following this tutorial, you’ve not only created a beautiful piece but also developed valuable crochet skills. With just a bit of yarn and imagination, you can craft endless variations to suit any occasion or color scheme.
I hope you enjoyed this guide and feel inspired to start your own collection of crochet chicaras. Please share your honest opinions and suggestions below—I’d love to know how your project turned out and what creative ideas you added to make your crochet chicaras truly unique!