
If you love Halloween and want to add a handmade charm to your spooky decorations this year, then this Jack Pumpkin Amigurumi Crochet Halloween Decoration-Step by Step Tutorial is just what you need. Crocheting your own Jack Pumpkin is not only fun but also a creative way to personalize your home for the holiday. This amigurumi pumpkin is adorable, easy to make, and perfect for both beginners and experienced crafters. With this guide, you’ll learn how to create a cute little Jack that can bring a festive touch to your Halloween setup.
The beauty of Jack Pumpkin Amigurumi Crochet Halloween Decoration-Step by Step Tutorial is that you can customize every part of your pumpkin. Whether you prefer a classic orange pumpkin with a spooky smile or a more whimsical version with pastel tones, this project lets you express your creativity. It’s also a great opportunity to use leftover yarn from previous projects and turn it into something special for the season. These little pumpkins make wonderful Halloween gifts, party decorations, or even cute keepsakes for friends and family.
Throughout this guide, we’ll walk you through each step—from gathering materials to assembling and decorating your amigurumi Jack Pumpkin. You’ll discover that making a crochet Halloween decoration can be both relaxing and rewarding. Once you’ve completed your pumpkin, you’ll not only have a festive piece of décor but also the satisfaction of having made it yourself. So, grab your hook, prepare your yarn, and let’s start this magical Halloween project together!
Materials You’ll Need to Make Your Jack Pumpkin
Before diving into the Jack Pumpkin Amigurumi Crochet Halloween Decoration-Step by Step Tutorial, let’s get everything you need ready. Proper preparation ensures your crafting process is smooth and enjoyable.
First, you’ll need some yarn. For a traditional pumpkin look, go with orange yarn, but feel free to explore other colors like white, purple, or black for a unique twist. Cotton or acrylic yarns are both excellent options since they provide structure and softness to your amigurumi. Choose a medium-weight yarn for best results.
Next, pick a crochet hook that matches your yarn’s thickness—typically a 3.0 mm or 3.5 mm hook works well. Having a yarn needle for sewing parts together and a pair of scissors will make finishing your project easier. You’ll also need some fiberfill or soft stuffing to give your pumpkin its shape and firmness.
Safety eyes or small black beads can be used for your Jack’s eyes. Alternatively, you can embroider them with black yarn if you prefer a handmade, softer look. For the stem, a small piece of brown or green yarn will do the trick. Adding a touch of wire to the stem gives it flexibility if you want to shape it creatively.
Optionally, you can use a bit of blush, felt, or fabric glue to add decorative details like cheeks, mouth shapes, or a little hat to give your Jack Pumpkin extra personality. Once you have all your materials ready, you’re set to start crafting your adorable Halloween decoration.
Having your tools and materials organized before starting helps you stay focused and makes the Step by Step Tutorial flow smoothly. So, let’s move on to crocheting the pumpkin body—the foundation of your Jack Amigurumi!
Crocheting the Pumpkin Body
Now that your materials are ready, let’s begin creating the pumpkin base for your Jack Pumpkin Amigurumi Crochet Halloween Decoration-Step by Step Tutorial. The body is what gives your pumpkin its recognizable round and ridged shape.
Start by making a magic ring and working six single crochets into it. Pull the loop tightly to close the center. On the next round, make two single crochets in each stitch, giving you a total of twelve stitches. Continue increasing each round by evenly adding stitches until the pumpkin reaches your desired size. For a small pumpkin, six to eight rounds of increases should be enough.
Once you’ve reached the desired diameter, crochet one single crochet in each stitch around without increasing. This step builds height and gives your pumpkin a fuller shape. Continue this for about five or six rounds, depending on how plump you want your pumpkin to look.
After finishing the height, start decreasing to close the pumpkin. Do this by making single crochet decreases evenly around until the top hole is small enough to stuff. Before completely closing, fill the pumpkin with fiberfill, making sure it’s firm but still squeezable. Then finish closing with a few more decreases.
To create the pumpkin’s characteristic ridges, use a long strand of yarn and wrap it vertically around the pumpkin several times, pulling slightly tight each time to form distinct sections. This gives your amigurumi that realistic pumpkin shape that’s both cute and detailed.
Once the base is done, fasten off the yarn securely and weave in any loose ends. Now your pumpkin body is complete and ready for its adorable Jack-inspired details!
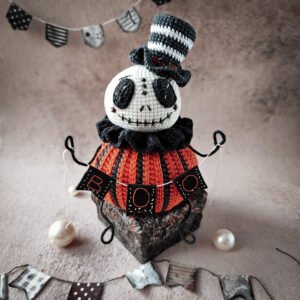
Adding the Face and Details
This is the most fun part of the Jack Pumpkin Amigurumi Crochet Halloween Decoration-Step by Step Tutorial—giving your pumpkin its unique Halloween personality! Whether you want your Jack to look spooky, cute, or somewhere in between, this step lets you be as creative as you want.
Start with the eyes. If you’re using safety eyes, insert them before you close the pumpkin completely. Position them symmetrically on the front of the pumpkin, leaving enough space for the mouth below. If you’re embroidering the eyes, use black yarn or embroidery thread to make small ovals or triangles. You can also use felt cutouts glued in place for a cartoonish look.
For the mouth, decide on the expression you want—classic Jack-o’-lantern grin, a surprised “O” shape, or a simple smiling curve. Embroider or crochet the mouth using black yarn, making sure the stitches are secure and evenly spaced. Adding a few small stitches for teeth or a curved smirk can make your pumpkin look extra festive.
If you’d like to add cheeks, use a bit of pink yarn or felt circles for a cute touch. Some crafters even use a dab of blush powder for a soft color effect. For extra Halloween flair, you can give your Jack a little hat or bow tie crocheted in contrasting colors like purple or green.
Don’t forget the stem! Crochet a short chain, work single crochets along it, and sew it onto the top of the pumpkin using brown or green yarn. You can even twist a bit of wire inside for a curly vine effect.
Once all the details are complete, take a moment to admire your work. Your Jack Pumpkin now has its full Halloween charm and is ready to become a part of your seasonal décor!
Creative Ways to Use Your Jack Pumpkin
After finishing your Jack Pumpkin Amigurumi Crochet Halloween Decoration-Step by Step Tutorial, you’ll find that your creation can be used in many delightful ways beyond just decoration. These cute pumpkins are versatile and can add a handmade touch to any space or event.
One popular idea is to use them as table centerpieces for your Halloween party. Place several Jack Pumpkins of different sizes in a bowl or along a dining table for a festive and cozy display. You can even mix them with fairy lights or small artificial leaves to enhance the Halloween atmosphere.
Another great use is turning them into hanging decorations. Simply attach a string or ribbon to the top stem, and you can hang them on doors, windows, or even a Halloween tree. They also make perfect keychains or bag charms if you create smaller versions using thinner yarn.
If you enjoy gift-giving, these little pumpkins make thoughtful handmade presents. You can personalize each one by adjusting the colors, faces, and sizes. Attach a tag with a warm Halloween message to make your gift even more special.
Crafters also love using these amigurumi pumpkins to sell at craft fairs or local markets. Handmade Halloween decorations are always in demand, and these are small, cute, and quick to make. Plus, they show off your creativity and crochet skills.
Finally, these pumpkins can be used year after year as part of your seasonal décor. Store them safely after Halloween, and next year you’ll have your own handmade decorations ready to bring out again!
1. What type of yarn works best for making Jack Pumpkin Amigurumi?
Cotton or acrylic yarn works best because they hold shape well and are easy to clean. Cotton gives a firm texture, while acrylic is softer and more flexible.
2. Can beginners follow this tutorial?
Yes! The Jack Pumpkin Amigurumi Crochet Halloween Decoration-Step by Step Tutorial is beginner-friendly and uses basic stitches like single crochet, increase, and decrease.
3. How long does it take to make one pumpkin?
Depending on your crochet speed and experience, it usually takes 2–4 hours to complete one pumpkin from start to finish.
4. Can I wash my crochet Jack Pumpkin?
Hand-washing with mild soap and cold water is recommended. Avoid machine washing to prevent misshaping your amigurumi.
5. Can I make different sizes of pumpkins?
Absolutely! Simply adjust the number of increase rounds for larger pumpkins or use thinner yarn and a smaller hook for mini versions.
6. How can I make my pumpkin stand out?
Experiment with unique colors, add accessories like hats or scarves, or embroider fun expressions for a one-of-a-kind pumpkin character.
Conclusion
This Jack Pumpkin Amigurumi Crochet Halloween Decoration-Step by Step Tutorial is a fun, creative, and beginner-friendly project that adds a touch of handmade magic to your Halloween celebrations. You’ve learned how to crochet the pumpkin body, add a stem, decorate the face, and explore creative ways to display or gift your creation.
Crochet projects like this remind us how satisfying it is to turn yarn into something adorable and festive. Each Jack Pumpkin you make carries your personal touch and can become a lasting part of your Halloween traditions.
I hope you enjoyed this tutorial and feel inspired to make your own crochet Jack Pumpkin! Don’t forget to share your honest opinions and suggestions—I’d love to know how your pumpkin turned out and what creative ideas you added to make it truly your own.