
If you’re looking for a creative and joyful holiday project, How to Make Star Christmas Elf Ornaments-Step by Step Tutorial is the perfect guide for you. These adorable ornaments bring a handmade touch to your Christmas decorations while allowing you to express your creativity. Whether you are an experienced crafter or a beginner looking for an enjoyable project, making these charming elf ornaments is both fun and fulfilling. This guide will take you through each step in detail so you can easily make your own set of festive ornaments that add a cozy, handmade charm to your Christmas tree or home décor.
When the holiday season comes around, people love filling their homes with cheerful and heartwarming crafts. Creating your own Star Christmas Elf Ornaments is not only a wonderful way to personalize your decorations but also a fun family activity. With a few basic materials and some creativity, you can turn simple craft supplies into something magical. The Step by Step Tutorial provided here ensures that even beginners can achieve impressive results while having a great time along the way.
In this guide, you’ll learn everything you need to know — from gathering materials and understanding the basic design to decorating your little elves with a personal touch. Making Star Christmas Elf Ornaments can be a relaxing and rewarding experience, and it’s a great opportunity to create keepsakes that can be enjoyed year after year. Let’s begin the journey and discover how to bring these charming elves to life!
Materials and Preparation
Before you begin crafting your Star Christmas Elf Ornaments, you need to gather the essential materials. The good news is that this project doesn’t require expensive supplies — most of the materials can be found at home or at any local craft store. You’ll need felt or fabric in Christmas colors, stuffing, thread, a needle, scissors, a hot glue gun, and decorative items like small bells, ribbons, and buttons. Having all materials ready before starting will make the process smoother and more enjoyable.
Next, choose your color scheme carefully. Traditional Christmas colors such as red, green, white, and gold are great options, but you can also experiment with pastels or metallic shades for a modern twist. The combination of colors will determine the personality of your elves, so feel free to be creative and bold.
Prepare your workspace by organizing your materials. Having a clean and well-lit area to work in makes crafting more comfortable and helps you focus better. Lay down a piece of fabric or newspaper to protect the surface, especially if you’ll be using glue or paint.
If you’re making multiple ornaments, consider creating a small production line. Cut all your pieces first, then assemble and decorate each one. This method saves time and ensures consistency across all your ornaments.
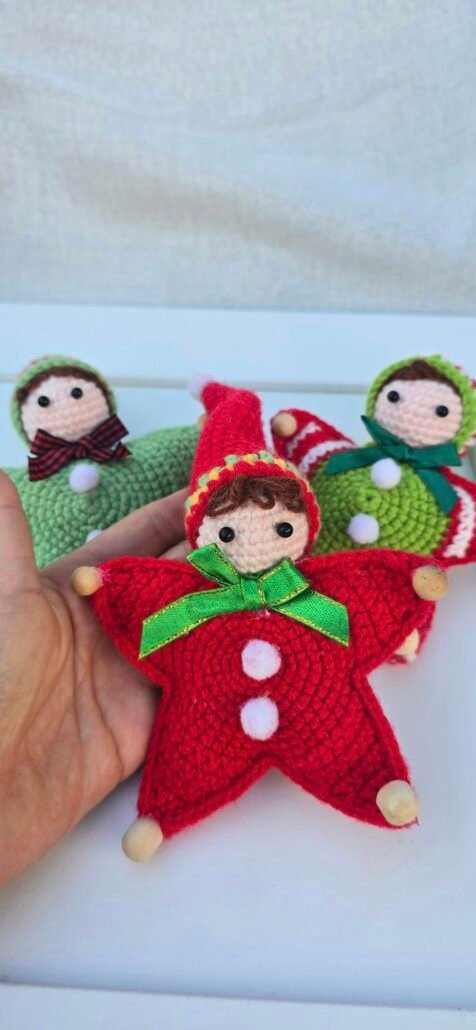
For the base shape, cut out star templates from cardboard. These stars will serve as the body of your elves. Trace the shapes onto your chosen fabric or felt and cut them out carefully. You’ll need two star pieces for each ornament — one for the front and one for the back.
Once your pieces are ready, you can start stitching or gluing them together, leaving a small opening to insert stuffing. This will give your Star Christmas Elf Ornaments a soft, plush texture that makes them even more adorable.
Assembling the Elf Ornament
Now that you’ve prepared all your materials, it’s time to start assembling your Star Christmas Elf Ornaments. Begin by stitching or gluing the two star pieces together, leaving enough space to insert the stuffing. Use small, neat stitches for a polished look or fabric glue if you prefer a quicker method.
Gently fill the star with stuffing, making sure it’s evenly distributed. Don’t overfill, as you still need space to attach the facial details and decorations later. Once you’re satisfied with the shape, close the opening securely.
Next, it’s time to create the elf’s face. You can either embroider or paint small eyes and a smile onto the center of the star. If you’re feeling playful, add rosy cheeks using blush or fabric paint. The goal is to give your elf a friendly and whimsical expression that captures the holiday spirit.
To make the hat, cut out a small triangle from felt and glue or stitch it onto the top of the star. Add a small pom-pom or bell to the tip for that classic elf look. If you want, you can also add yarn or felt pieces for hair peeking out from under the hat.
Decorate the star’s body with tiny buttons, sequins, or glitter to make your ornament sparkle. Don’t be afraid to experiment — each Star Christmas Elf Ornament can have its own personality and charm.
Finally, attach a small loop of ribbon or string to the top of the ornament. This will allow you to hang your handmade elves on your Christmas tree, garlands, or even as a gift topper for presents.
Adding the Final Touches
The small details are what truly make your Star Christmas Elf Ornaments come to life. Once the basic structure is complete, you can add creative embellishments that reflect your personal style. Consider using lace, ribbons, or fabric scraps to give your elves a festive wardrobe. These details transform simple materials into something truly special.
Another great idea is to personalize each elf ornament. Write names or short messages on the back using fabric markers or embroidery. Personalized ornaments make wonderful gifts for family and friends, carrying a unique sentimental value.
Adding a bit of sparkle can also enhance the festive look. You can apply a light dusting of glitter or use metallic thread for stitching. Just be sure not to overdo it — a subtle shine adds charm without overwhelming the design.
If you want to make your ornaments more interactive, sew a small bell inside so they jingle when moved. This creates a fun and cheerful sound that adds to the Christmas atmosphere.
Don’t forget to secure all embellishments properly, especially if children or pets will be around. Safety should always come first when working with small parts or hot glue.
Lastly, inspect each ornament carefully once you’re done. Trim any loose threads and make sure everything is firmly attached. A well-finished ornament not only looks better but also lasts for many Christmas seasons to come.
Creative Ways to Use Your Star Christmas Elf Ornaments
Once you’ve finished your Star Christmas Elf Ornaments, it’s time to display them! The most traditional way is to hang them on your Christmas tree. Their playful and colorful design will make your tree stand out and fill your home with warmth.
You can also use these ornaments to decorate wreaths, garlands, or centerpieces. Adding handmade touches to different parts of your home creates a unified festive look that feels both elegant and cozy.
If you’re hosting a Christmas dinner or party, consider using your elf ornaments as place cards. Attach a small name tag to each one and place them at every guest’s seat. It’s a charming and memorable detail that your guests will love.
Another creative idea is to use your Star Christmas Elf Ornaments as part of gift wrapping. Tie one onto a wrapped present for a personalized and delightful surprise. It’s a small gesture that makes any gift feel more thoughtful.
You can even sell your ornaments at local craft fairs or give them as handmade gifts. People appreciate unique, handcrafted items, and your Step by Step Tutorial skills will surely impress others.
Finally, keep some ornaments for yourself as a tradition. Each year, you can add a new elf to your collection, creating a set that tells a story of creativity and holiday joy over time.
1. What materials do I need for the Star Christmas Elf Ornaments?
You’ll need felt or fabric, stuffing, thread, a needle, scissors, glue, and decorations like ribbons or buttons.
2. Can beginners make these ornaments?
Yes! The How to Make Star Christmas Elf Ornaments-Step by Step Tutorial is designed to be beginner-friendly, guiding you through each stage clearly.
3. How long does it take to make one ornament?
Depending on your skill level, each ornament can take between 30 minutes to 1 hour.
4. Can I customize the colors?
Absolutely! Feel free to use any color combination that matches your Christmas theme or personal preference.
5. Are these ornaments reusable every year?
Yes, if handled and stored carefully, your handmade Star Christmas Elf Ornaments can be enjoyed for many Christmases.
6. What can I use instead of felt?
You can use cotton, fleece, or any other soft fabric that holds shape well when stitched or glued.
Conclusion
Making your own Star Christmas Elf Ornaments is a joyful way to celebrate the holiday season. This Step by Step Tutorial showed you how simple materials can be transformed into adorable, festive decorations that spread warmth and creativity. Whether you’re crafting alone or with loved ones, this project invites imagination and connection — two of the most beautiful gifts of Christmas.
Now that you’ve learned how to make these charming ornaments, try experimenting with new designs, colors, and embellishments. Each one you create adds a personal touch to your festive décor.
I hope you enjoyed this guide and found inspiration for your next holiday craft project. Don’t forget to share your thoughts and leave a sincere opinion or suggestion — your feedback helps inspire even more creative ideas!